Showing posts with label seasonal. Show all posts

Friday, December 14

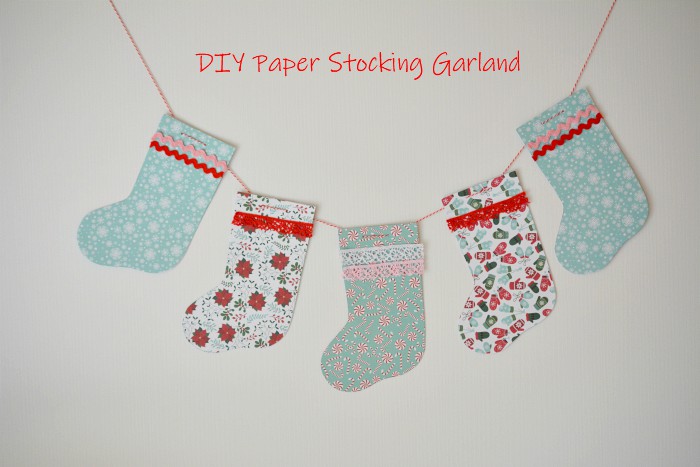
Paper Stocking Garland - Easy Craft

[Werbung/Anzeige/Advertisement]


Hello lovelies! 💗 Hallo ihr Lieben!

Here's a fun little paper craft project just in time for the holidays. It's been really dark these past few days, so the pics aren't the best quality. 

Hier zeige ich euch eine einfache und schnelle Deko-Idee. Leider war es in den letzten Tagen so dunkel, dass die Bildqualität nicht die Beste ist.


You will need // Ihr braucht

Assortment of Christmas-themed cardstock // Scrapbook Papier mit weihnachtlichen Motiven
Various bits of trims // kleine Stücke Spitze, Zackenlitze etc. zum Verzieren
Thin double-sided tape // Dünnes doppelseitiges Klebeband
Twine // Bastelgarn
Scissors // Schere
Needle with large eye // Nadel mit großem Öhr
Pencil // Bleistift
Awl // Ahle


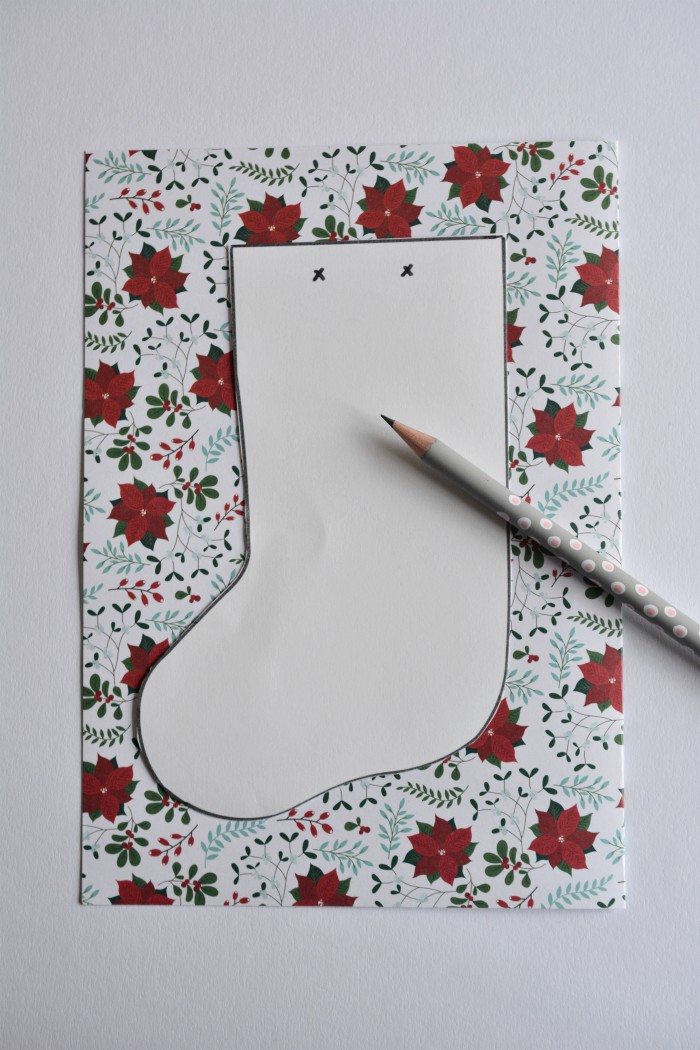
Download mini stocking template (see link above) and print. Cut out the shape. Use this template to trace as many stockings as you wish your garland length to be. Then cut them out. Since I don't have a lot of space for hanging mine is a small one with just five stockings. 


Die Vorlage downloaden (siehe Link oben) und ausdrucken. Entlang der schwarzen Linie ausschneiden. Diese Vorlage mit Hilfe des Bleistifts auf das Papier übertragen und soviel Socken ausschneiden wie die Girlande lang sein soll. Da ich nicht viel Platz zum Aufhängen habe, habe ich eine Mini-Girlande mit nur fünf Socken gebastelt.


Step One
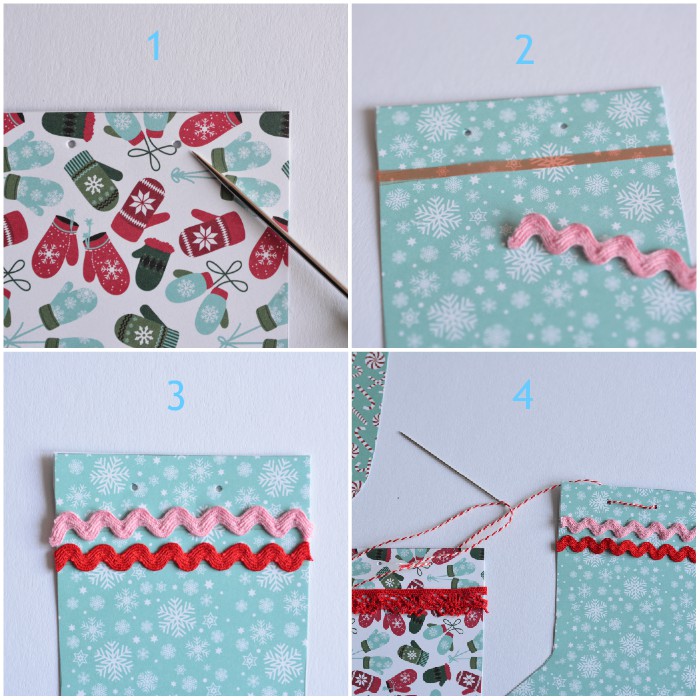
Mark the holes on each stocking. Then use the awl to gently punch the two holes.

Step Two
About 1 cm beneath the holes stick a strip of double-sided tape. Peel off the backing. Attach a bit of trim to it and press well. 

Step Three
You can customize your stocking as you wish, for example, add one or two more rows of trim.

Step Four
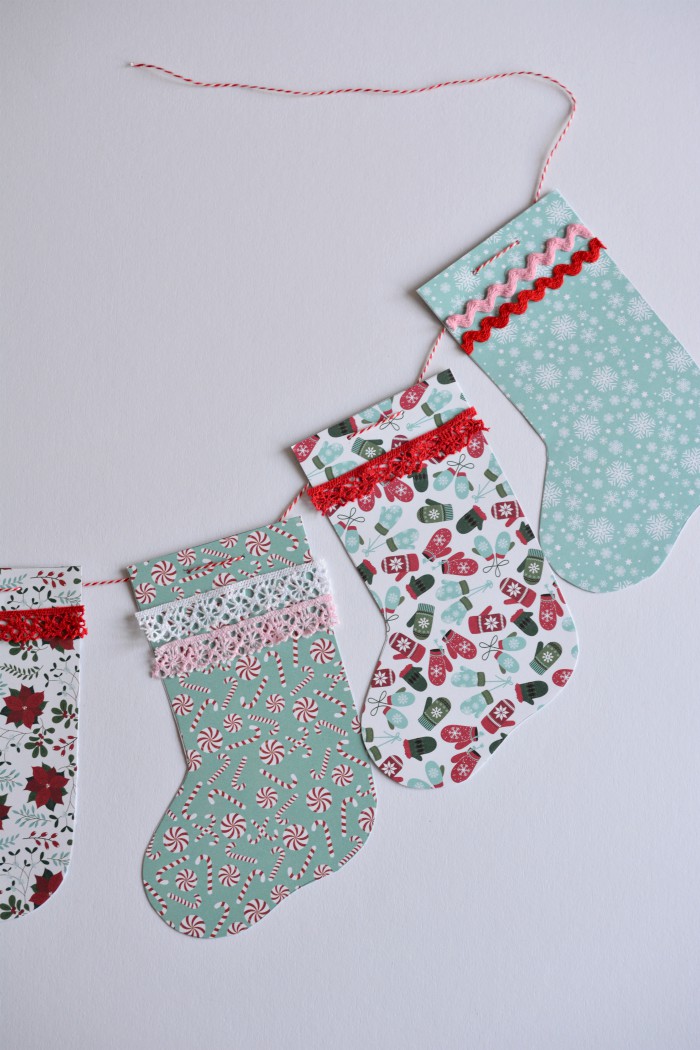
Thread the needle with a long piece of twine. Starting from one end, thread needle through the first hole from the back and down through the second hole. Up through the back of the next stocking and down again through the second hole until you have threaded all stockings. Space them apart equally.

☃

Schritt Eins
Die Position der Löcher markieren. Dann mit der Ahle je zwei Löcher pro Socke machen.

Schritt Zwei
Circa 1 cm unter den Löcher ein Stück doppelseitiges Klebeband befestigen. Dann ein gleich langes Stück Borte, Spitze etc. abschneiden und fest andrücken. 

Schritt Drei
Je nach Wunsch könnt Ihr die Socken mit weiteren Borten verzieren.

Schritt Vier
Das Bastelgarn in die Nadel einfädeln und von einer Seite beginnend von hinten durch das erste Loch führen, dann von vorne durch das zweite Loch, dann in das erste Loch von hinten von der zweiten Socke und wieder von vorne durch das nächste Loch...bis alle Socken aufgefädelt sind. Die Socken gleichmäßig auf der Schnur verteilen.


And now the garland is ready for hanging in your favorite place!
💗
Und nun ist die Papiergirlande fertig zum Aufhängen!

 photo signature_zpscqkypdzs.png

Friday, December 11

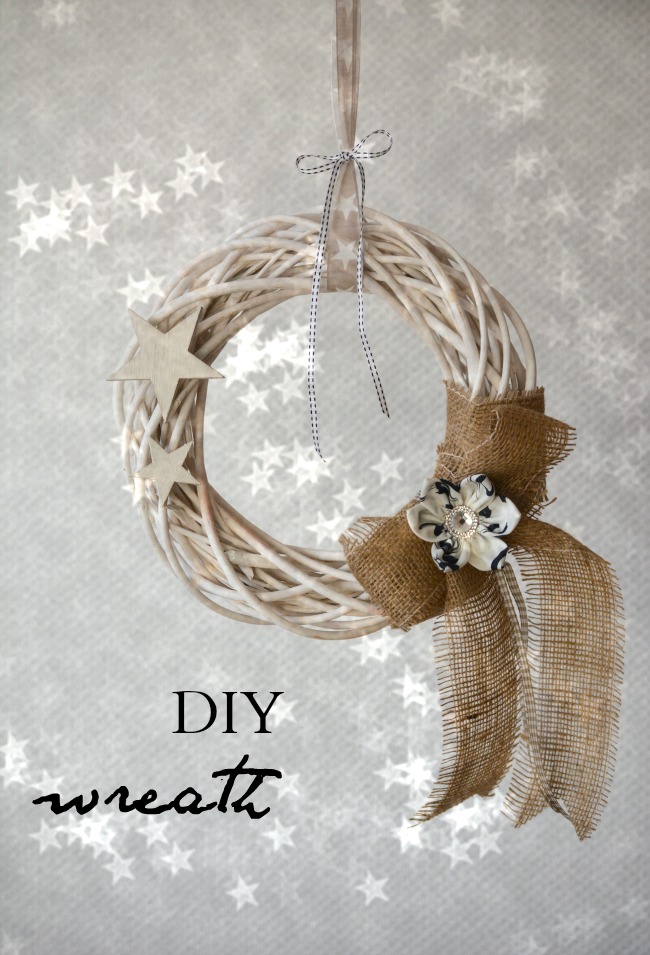
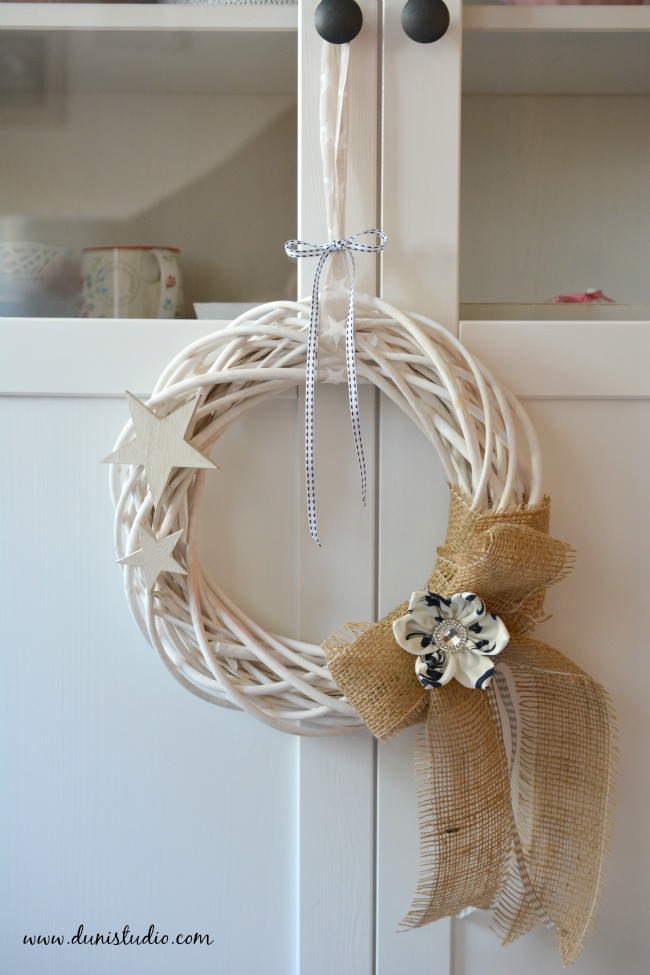
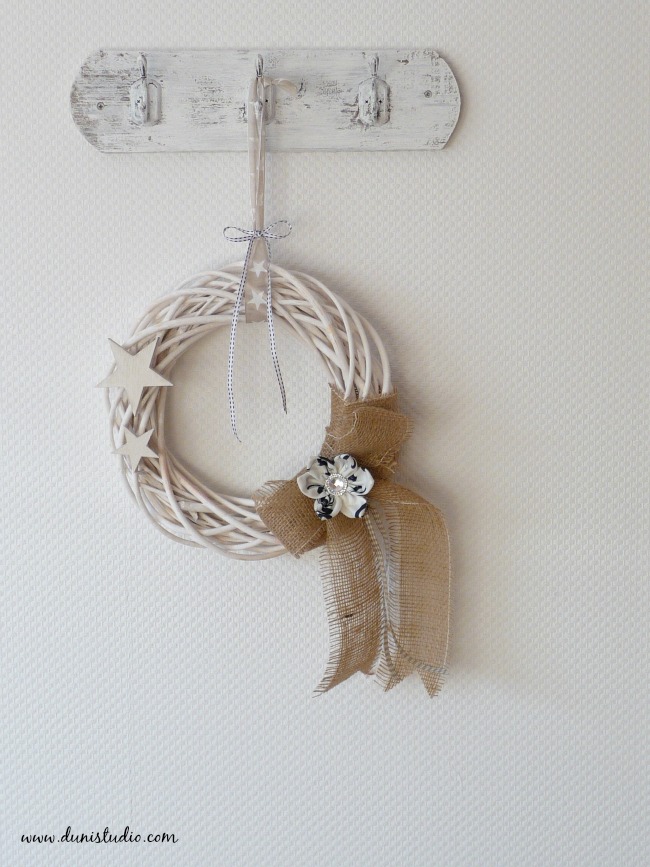
Simple Rustic Christmas Wreath


Holiday crafting is my favourite part in the run up to Christmas. True to this year's rustic & shabby chic theme I have created this simple wreath. It's easy to make and adds a subtle rustic touch to your home!
*
Weihnachtliche Deko basteln macht mir jedes Jahr besonders viel Spaß. Passend zum Rustikal-Shabby Chic Thema habe ich diesen Kranz kreiert. Er geht ganz einfach und macht trotzdem was her!

You'll need || Ihr braucht

white painted twig wreath | geweißter Weiden-Kranz
wide jute ribbon | Rupfenband
assorted ribbons | verschiedene Bänder
wooden stars | Holzsterne 
fabric scrap | Stück Stoff
button | Knopf 
hot glue gun | Heißklebepistole
basic sewing kit | Basic Nähutensilien


How to:

1. I decided on an asymmetrical design with the bow slight off-center to the right. Hot glue this area all around.
2. Wrap jute ribbon around the glued part a few times to create a base.
3. Cut a length of jute ribbon and overlap to create a "bow" shape. Pinch the middle.
4. Attach to base by winding gingham ribbon around the middle a few times and secure with a knot.
 (hidden at back). Snip the ends of jute ribbon to create pointy tips.
*
So geht's:

1. Mein Design ist asymmetrisch, d.h. die Schleife sitzt etwas rechts von der Mitte unten. Dieses Stück großflächig mit Heißkleber bedecken.  
2. Ein Stück Rupfenband zweimal darum wickeln und gut andrücken. Dieses bildet die Basis.
3. Längeres Stück Rupfenband abschneiden und zur Schleife legen. Mittig zusammendrücken.
4. Schmales Karoband mehrmals um die Mitte wickeln und mit Knoten (auf Rückseite) fixieren. Enden hängen lassen.  Enden des Rupfenbandes so einschneiden, dass je zwei Spitzen entstehen.


Finishing touches | das Werk vollenden


The fabric flower is the icing on the cake! Here's my quick and lazy easy way to do it:

1. & 2. For six petals draw three circles (I used a container with 4" diameter) on the wrong side of fabric and cut out. 3. Halve each circle to make six semi-circles. 4. Fold each in half, right sides facing and edge stitch as shown. 5. Turn right side out and place seam at the back. 6. Use a basting stitch at rounded edge. Sew one right after the other. 7. You should end up with something like this. 8. Carefully pull on the bobbin thread from each side to create petals, tighten and knot each end. 9. Stitch first and last petal together to form a flower. Turn over and handstitch around raw edge through all petals to secure.
*
Die Stoffblume ist das i-Tüpfelchen am Kranz! Die Blume ist ruck-zuck genäht, so geht's:

1. & 2. Für sechs Blütenblätter drei Kreise (ich habe einen Übertopf mit Durchmesser 10 cm benutzt) auf die Rückseite des Stoffes zeichnen und ausschneiden. 3. Kreise halbieren. 4. Halbrunde rechts auf rechts zusammenlegen und knappkantig steppen (siehe Foto). 5. Auf Rechts drehen und Naht nach hinten legen. 6. Mit einem langen Geradstich die Blüten nacheinander steppen. 7. So sollte es aussehen. 8. Vorsichtig von beiden Seiten den Unterfaden anziehen, so dass sich die Blütenblätter zusammenziehen. Beide Enden verknoten. 9. Erstes und letztes Blütenblatt zusammennähen. Umdrehen und mit Handstichen rundum mittig alle Blütenblätter fest miteinander vernähen. 


Last few steps:

1. Hot glue fabric flower to center of bow and glue a big button (or in my case a round crystal) to the center.
2. Hot glue wooden stars to wreath.
3. Attach ribbon(s) for hanging.

Letzte Schritte:

1. Mit Heißkleber die Stoffblume mittig auf die Schleife kleben und einen großen Knopf (oder in meinem Fall einen runden Kristall) aufkleben.
2. Holzsterne mit Heißkleber am Kranz fixieren.
3. Band zum Aufhängen anbringen.


And now hang up your handmade Christmas wreath to be enjoyed by everybody! This craft project is part of my Etsy team BBA December challenge brought to you by yours truly.

Sources: black and white ribbon, gingham ribbon and crystal appliqué from Union Knopf | Happy Home fabric from here | everything else from craft store
*
Bezugsquellen: schwarz/weiß Borte, Karoband und Kristall Applikation von Union Knopf | Happy Home Stoff von hier | alles andere aus dem Bastelladen


Friday, November 6

Rustic Miniature Christmas Tree DIY

I had so much fun creating these rustic fabric gift tags, and these rustic jam jar candles that I decided to create a rustic themed Christmas tablescape! In this tutorial I will show you how to make individual miniature Christmas trees and cute handstamped Kraft cards too! After all, Christmas is just around the corner...
★
Mir hat mein rustikales Stoff-Anhänger-DIY  und das Marmeladenglas-Upcycle so viel Spaß gemacht, dass ich gleich eine weitere DIY Idee im rustikalen Look zeigen möchte!  Es gibt drei Anleitungen für süße Mini-Bäumchen als Tischdeko und dazu gestempelte Karten aus Kraft Papier. Immerhin, bis Weihnachten ist es nicht mehr weit...


The cards are possibly the easiest you'll ever make :) From Kraft cardstock cut as many rectangles as you require to the size of 7" x 3.5". Score down the middle and fold. Using black ink stamp little Christmas motifs in the lower right corner. Christmas-themed rubber stamps can be found in most craft stores or online. Tie a piece of black gingham ribbon along fold. Done!
★
Diese Kärtchen aus Kraft Papier (cardstock) sind im Nu gemacht :) Aus dem Papier so viele 18 cm x 9 cm Rechtecke schneiden wie Ihr benötigt. Mittig falzen und zusammenklappen. Rechts unten mit kleinen weihnachtlichen Motiven bestempeln (Stempelkissenfarbe Schwarz). Die Gummistempel gibt es für wenig Geld im Bastelladen oder Internet. Mit schwarzem Dekoband an der Innenkante verzieren. Fertig!


★And now the trees ★ Und jetzt die Bäumchen★

You'll need | Ihr benötigt

approx. 4.5" styrofoam™ cones | 11 cm Styropor® Kegel
burlap twine | Jutegarn
decorative wire | Basteldraht
assorted rustic ribbons and lace | verschiedene rustikale Borten und Spitze
wide burlap ribbon | breites Rupfenband
small white buttons | kleine weiße Knöpfe
thin double sided clear tape | schmales doppelseitiges Klebeband, durchsichtig
short steel pins A LOT  | kurze Stecknadeln aus Stahl SEHR VIELE
small wooden stars (such as tabletop confetti) | kleine weiße Holzsterne (Streuartikel)


Let's start with the easiest of all three ~ burlap twine and decorative wire

1. take one cone and stick a few double sided tape strips on it. The glue-y bit is clear, so it's not visible later on. 
2. + 3. make a knot in the twine and pin it to the top of the cone. Then proceed to wind it evenly around entire cone, until you reach the bottom. Cut of end and secure it by tucking it in the last row. The tape should hold everything in place nicely, but if need be you can secure the twine with a couple of pins here and there. 
Finish by winding some decorative wire around the cone and use a tiny piece of double sided tape to stick the wooden star on top :)


Wir fangen mit dem einfachsten Bäumchen an ~ Jutegarn und Basteldraht

1. Einige Streifen doppelseitiges Klebeband auf den Kegel kleben. Folie vorsichtig abziehen, darunter befindet sich der extrem haftende durchsichtige Leim. 
2. + 3. Ein Ende des Garns verknoten und mit einer Stecknadel an der Spitze fixieren. Dann das Garn gleichmäßig um dem Kegel bis zum Boden wickeln. Abschneiden und Ende unter die letzte Reihe stecken. Wer absolut sicher gehen will, dass das Ganze hält fixiert das Garn hier und da mit Stecknadeln.
Zum Schluß ein Stück Basteldraht (hier mit Sternen) um das Bäumchen wickeln und einen kleinen weißen Holzstern mit einem winzigen Stück doppelseitiges Klebeband oben aufkleben :)


The second one requires a little more time ~ rustic ribbon tree
★
Das zweite Bäumchen dauert etwas länger ~ rustikale Borten und Spitzen


1. for this tree you'll need plenty of steel pins. This is where my magnetic pin bowl comes in handy! Cut ribbon and lace into 3.2" pieces. 
2. fold over ribbon pieces and starting at the bottom pin around circumference of cone. Line up the next row to overlap the first one.
3. Continue pinning ribbons and lace until you reach the top.
4. Glue a small piece of ribbon horizontally, so it covers the raw edges of the top row.
Once again finish by sticking a small wooden star to the top!
★
1. für dieses Bäumchen benötigt Ihr sehr viele Stecknadeln. Da kommt meine DIY magnetische Nadelschale gerade recht! Die Borten und Spitze in 8 cm Stücke schneiden.
2. Borten und Spitze zur Hälfte legen. Von unten ringsherum mit Stecknadeln fixieren. Die nächste Reihe überlappend anbringen.
3. genauso weitermachen bis knapp unter die Spitze des Kegels.
4. mit doppelseitigem Klebeband ein Stückchen Dekoband um die Spitze wickeln, so dass die Kanten der obersten Reihe abgedeckt sind.
Zuletzt wie beim Bäumchen Nr. 1 einen kleinen Holzstern obendrauf fixieren!


you will need some dexterity for the final tree ~ burlap ribbon, rustic ribbon and buttons
★
das letzte Bäumchen benötigt etwas Fingerfertigkeit ~ Rupfenband, Borte und Knöpfe


1. start by sticking a few double-sided tape strips over the cone. Cut pieces of burlap and apply diagonally until cone is covered. You'll need to pin it here and there to hold the shape.
2. now wind the rustic ribbon diagonally over the burlap and fix with pins as before. Stick little buttons all over. Tip ► if you push the pins in at a 45° angle, the buttons won't fall off.
Finally, stick a little wooden star on top!


1. wie schon beim ersten Bäumchen zunächst ein paar Streifen doppelseitiges Klebeband aufkleben und Folie vorsichtig abziehen. Das Rupfenband in kleinere Stücke schneiden und diagonal um den Kegel kleben. Damit alles gut in Form bleibt hier und da mit Stecknadeln fixieren.
2. Rustikale Borte diagonal um den Kegel wickeln und mit Stecknadeln fixieren. Dann mit kleinen Knöpfen verzieren. Tipp ► Stecknadeln im 45° Winkel durch die Löcher im Knopf stecken - so halten sie besser.
Wie auch bei den anderen beiden Bäumchen: oben auf die Spitze ein Holzsternchen draufkleben!


Writing up this post not to mention waiting for a bright day to photograph the decor and trees took longer than actually making them! Really. But anyway, I hope you enjoyed this tutorial:)
 ♡♡♡
Diesen Post zu schreiben und die Fotos zu bearbeiten hat länger gedauert als das Basteln! Ehrlich. Aber hauptsache Euch hat dieses Tutorial gefallen :)


★★★

Wednesday, November 4

Advent, Advent... { 5 Minute DIY }


Hi everybody!        Hallo, ihr Lieben!


Okay, this post isn't supposed to make you feel anxious or anything. Just a gentle reminder that the first advent happens to be end of this month, yes this month ;-)
Of course there are plenty of traditional advent wreaths available, but for a crafty and non-traditional person like me I like to make my own unique version! What I like about this project is that you'll probably find many of the materials in your house already! I like easy projects with quick results.
*
Vielleicht mag dieses weihnachtliche Bastelprojekt dem einem oder anderen zu früh vorkommen, aber tatsächlich ist der erste Advent schon Ende diesen Monats! Traditionelle Kränze gibt es ja bereits zu kaufen, aber für nicht-traditionelle Menschen wie mich sind selbstgemachte einfach schöner und individueller :) Das Gute an diesem Projekt - das Material habt Ihr sicherlich schon zuhause! Ich mag einfache DIY Ideen.


This Christmas I've decided on a rustic/shabby chic theme
*
Dieses Weihnachten dekoriere ich im rustikalen/shabby chic Look

You'll need | Ihr benötigt

4 clean jam jars | 4 saubere Marmeladengläser
jute twine | Jutekordel
4 wooden buttons with large holes | 4 Holzknöpfe mit großen Löchern
numbered tags | nummerierte Anhänger
4 white pillar candles | 4 weiße Stumpenkerzen
rectangular cake platter | rechteckige Kuchenplatte

  1. you can make the numbered tags yourself or you can get them at craft stores
  2. wrap a length of minipompom trim around the top of the jam jar twice. Tuck in the ends.
  3. wrap a piece of jute twine around the top and secure with a knot. 
  4. thread the ends of the twine through the button holes and tie a bow. Fix the tag to the button
Repeat for remaining three jars. All that's left to do is place a candle in them and arrange on the cake platter. Easy, right?

  1. the nummerierten Anhänger selbst machen oder im Bastelladen kaufen
  2. ein Stück Minipompomborte zwei Mal um die obere Kante des Marmeladenglases wickeln, die Enden darunter einstecken.
  3. Jutekordel drumwickeln und verknoten.
  4. Enden durch die Knopflöcher ziehen und Schleife binden. Anhänger um den Knopf binden
Schritte 1 - 4 dreimal wiederholen. Nun die Kerzen in die Gläser stellen und auf der Kuchenplatte arrangieren. Wie gesagt, einfach und schnell :)


Rustic wooden buttons kindly supplied by Union Knopf 
*
große Holzknöpfe wurden mir von Union Knopf zur Verfügung gestellt


Please do not leave burning candles unattended!
Kerzen niemals unbeaufsichtigt brennen lassen!
Happy Crafting!

Wednesday, February 25

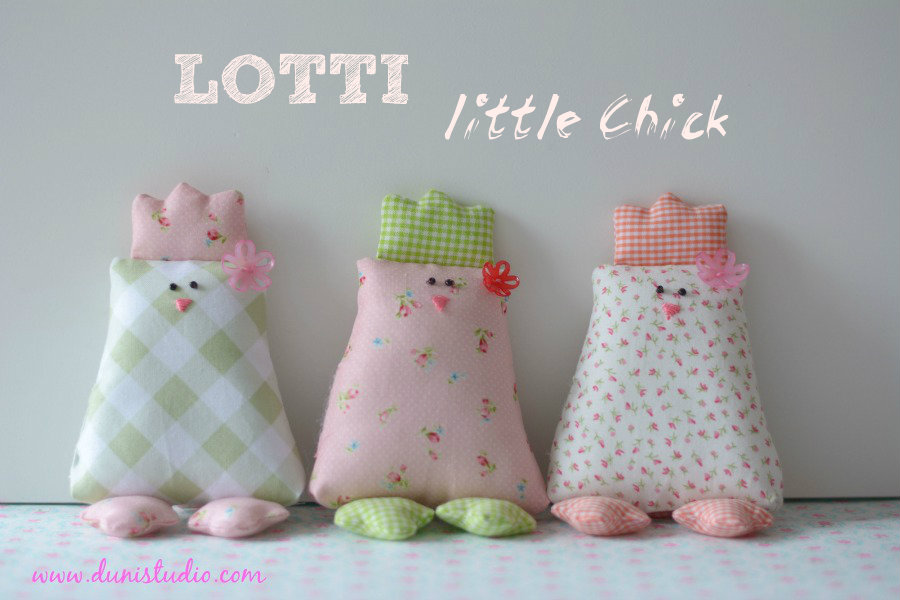
Lotti the Little Chick Sewing Tutorial [Free PDF]


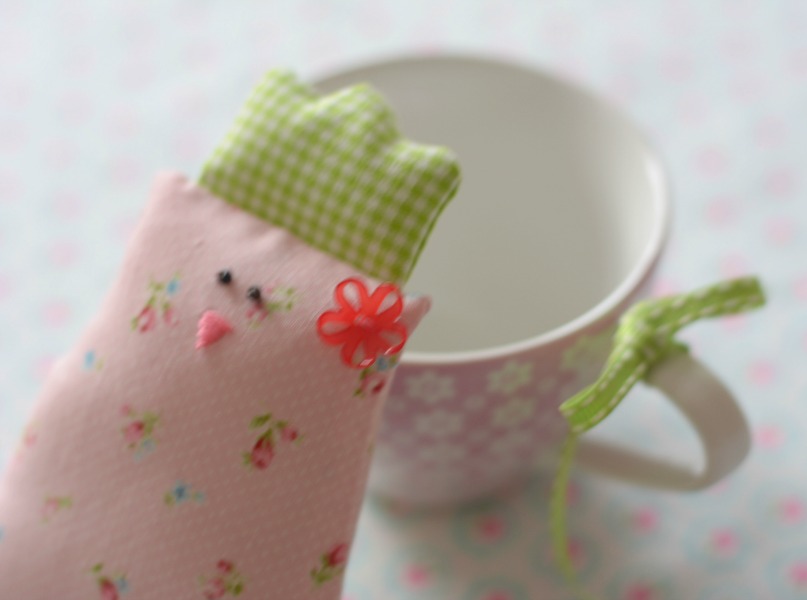
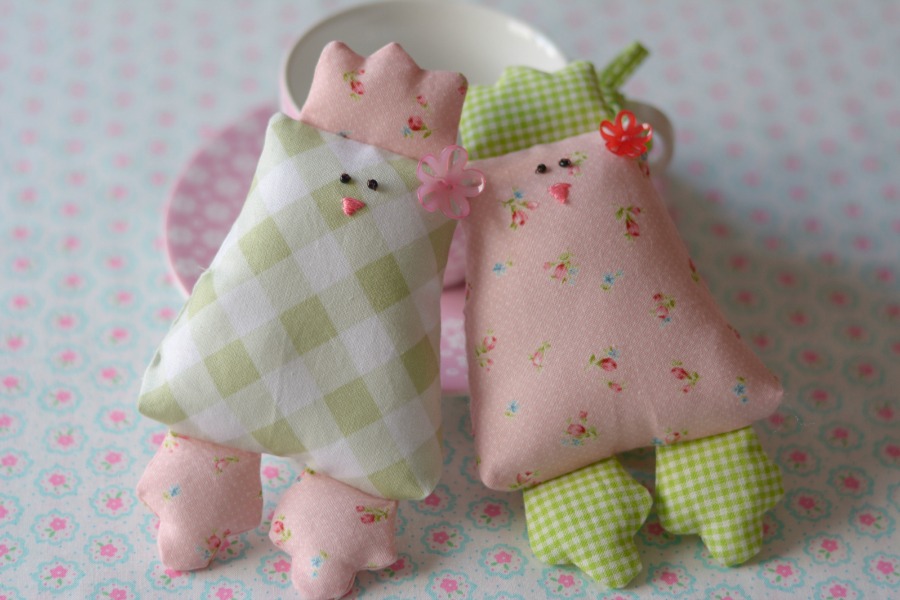
In nur ein paar Wochen ist schon Ostern! Und da ich letztes Jahr mit meinen Osterbasteleien spät dran war gibt es heute schon eine kleine DIY Idee für Euch ~ Lotti, das kleine Küken :) Schwierigkeitsgrad: ✄ ✄ (mit Näherfahrung)
*
In just a few weeks it's Easter! Last year I was so behind that I failed to post some Easter crafts. So here's my little DIY idea for you today ~ Lotti, the little chick :) Sewing level: ✄ ✄ (intermediate)


Lotti, das kleine Küken ist ca. 17 cm groß, und trägt eine hübsche Blume im "Haar". Um solch ein Kücken herzustellen benötigt Ihr meine Vorlage welche Ihr Euch hier herunterladen könnt. Hinweis - dies ist kein Kinderspielzeug. Nur zur Oster Deko zu verwenden. Sicher stellen, dass Euer Drucker bei 100% eingestellt ist und darauf achten, dass die vollständige Seite gedruckt wird!

*
Lotti, the little chick is about 17 cm tall and wears a cute flower in her "hair". In order to make your very own you will need to download my template right here  Important - this is not a kids toy. Use as Easter decoration only. Make sure your printer is set to 100%. Some printers require defining page area to be printed. Please print the entire page. Should you run in to difficulties just drop me a line via email.


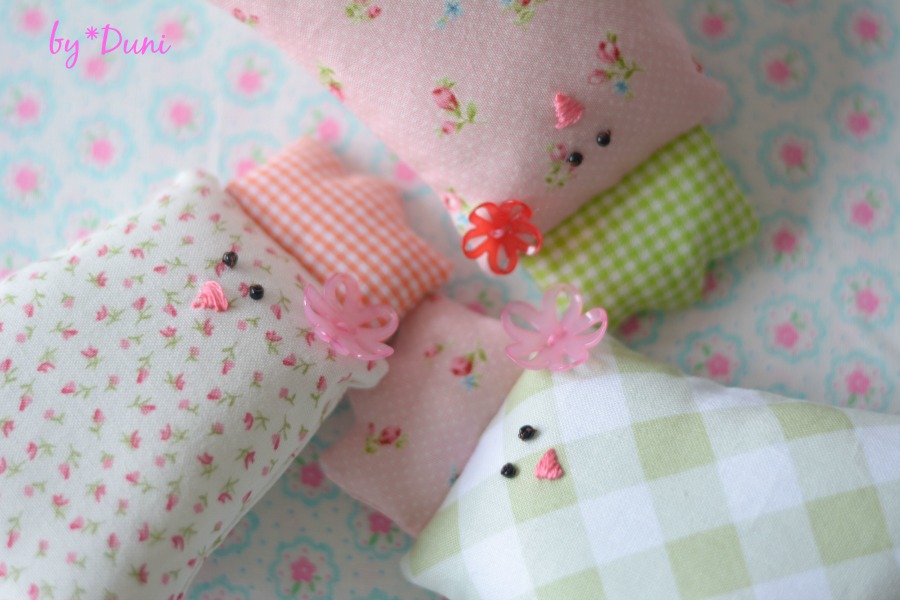
Niedliche Blumenknöpfe von der Firma Union Knopf. Die Knöpfe aus Kunststoff kommen in zwei Größen und diversen Farben. Damit lassen sich unzählige Projekte verzieren.
*
Very cute flower buttons kindly provided to me by the nice people over at Union Knopf. The buttons come in two sizes and various colours and are the perfect embellishment for sewing projects.

Für ein Küken benögt Ihr:

Stoffreste aus Baumwolle - ich empfehle kleine Muster
Farblich passendes Nähgarn
Zwei kleine schwarze Perlen für die Augen
Rosa Stickgarn und Sticknadel
Füllwatte
Ein Blumenknopf
Stoffmarker
Textilkleber
Nähmaschine, Basic Nähutensilien

✄✄✄

For one chick you'll need:

Fabric scraps (cotton) - I recommend small prints
Matching thread
Two black seed beads for the eyes
Pink floss and embroidery needle
Fiberfill
Flower button
Disappearing ink fabric marker
Fabric glue
Sewing machine and basic sewing supplies


Lotti hat ein niedliches kleines Stummelschwänzchen
*
Lotti has a cute little stub tail

Und so wird's gemacht:

Zunächst die Teile Kamm, Körper, Fuß und Schwanz von der Papiervorlage kopieren und ausschneiden. Vom (gebügelten) Stoff die Körperteile zuschneiden. Auf einem Körperteil die Augen aufnähen. Zwei Fäden des Stickgarns entnehmen und einen kleinen dreieckigen Schnabel sticken. Die Positionierung könnt Ihr der Vorlage entnehmen. (Bilder 1 + 2)

How to make:

First, cut out the paper pieces - comb, body, foot, tail. Cut two body pieces from (ironed) fabric. Sew on the eyes. Separate two threads from the floss and stitch a triangular beak. Check the template for correct placement. (pictures 1 + 2)


Weiter...

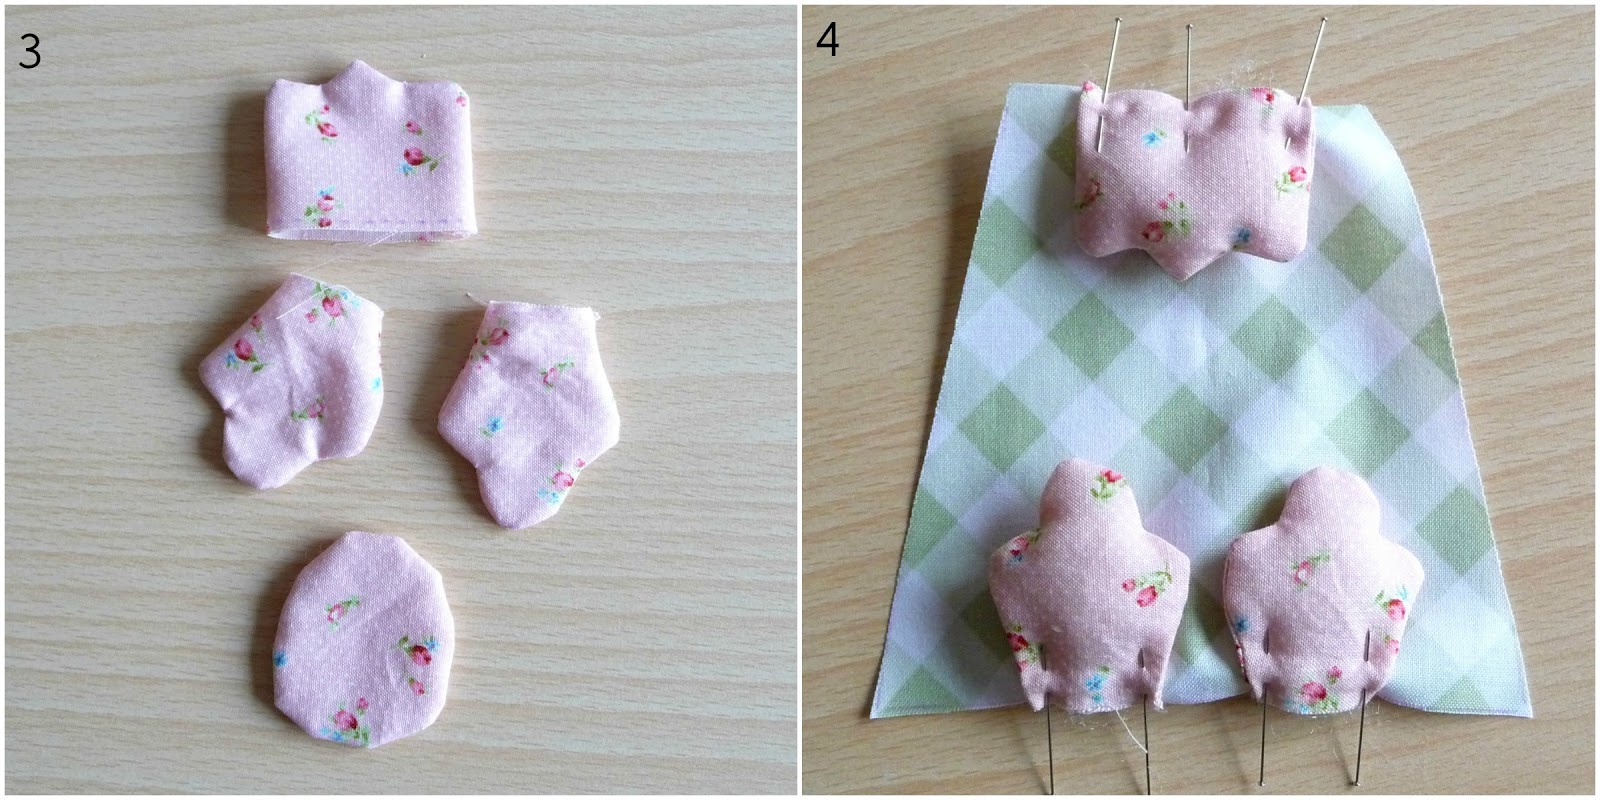
Auf einer gedoppelten Lage Stoff, rechte Seite innen das kleine Schwänzchen, den Kamm und die Füsschen mit dem Stoffmarker nachzeichnen. Entlang dieser Linien nähen, aber nicht die gestrichelte Linie. Die muß zum befüllen offen bleiben. Mit einem knappen Rand von 3 mm ausschneiden. Das Schwänzchen nur durch eine Lage Stoff mit einer spitzen Schere entlang der gestrichelten Linie einschneiden und durch die Öffnung wenden. Restliche Teile auf rechts wenden. Alle Teile bügeln. (Bild 3)
*
Cont'd...

Take a piece of fabric and fold in half, right sides facing. With fabric marker trace the tail, the itty-bitty feet and the comb. Sew along these lines, but leave dashed line open for turning. To turn the tail make a snip along the dashed line with a sharp pair of scissors through one layer only and turn through opening. Turn all pieces right side out and iron. (picture 3)


Nun die kleinen Teilchen mit Füllwatte füllen. Da sie so klein sind braucht man wirklich nicht viel. Am Kammteil die Mitte einzeichnen. Kamm-Mitte trifft auf obere Mitte des Körperteils. Füße jeweils 1 cm von der unteren Mitte entfernt feststecken. (siehe Bild Nr. 4)
*
Now fill the small pieces with fiberfill. As they are so small you really don't need much. Mark the center of the comb and match with center of body part at the top edge. Space the little feet 1 cm either side from the bottom center. (see picture 4)


Und weiter geht's...

Das zweite Körperteil rechts auf rechts auf das erste legen. Ringherum feststecken, dabei an einer Seite (wie auf der Vorlage eingezeichnet) eine 4 cm Öffnung zum Wenden lassen. 1 cm breit zusammensteppen. Die Ecken am Kopfende kurz vor der Naht abschneiden. Die Nähte der beiden Ecken am unteren Ende aufeinanderlegen, so dass ein flacher Boden ensteht. 1 cm von der Ecke markieren (Bild 6) und entlang dieser Linie nähen. Überhang abschneiden.

Let's continue...

Place the second body part right sides facing on the first body part. Pin all around, but leave a 4 cm gap on one side (as indicated on the template) for turning. Stitch together with a 1 cm seam allowance. Clip top corners. To make a flat bottom fold the corners at the bottom so that the seams meet. Mark 1 cm from corner and sew along this line (picture 6). Cut off excess.


Fast fertig :)

Nun das Küken vorsichtig durch die Öffnung auf Rechts wenden. Leicht bügeln. Den Körper mit Füllwatte füllen und die Öffnung mit ein paar Handstichen schließen. Dann das kleine Stummelschwänzchen mit etwas Textilkleber hinten aufkleben,gut  andrücken und trocknen lassen. Zum Schluß den Blumenknopf annähen!

Almost done :)

Gently turn the chick right side out through the side opening. Iron lightly. Fill the body with fiberfill and close the opening with a couple of hand stitches. Then put a dollop of fabric glue on the little stub tail and attach to the backside. Leave to dry. And lastly sew on the flower button!


Hurrah, Eure erste Lotti ist fertig! Wenn Ihr mögt teile ich gerne Eure Kreation bei Pinterest. Schickt mir einfach ein Foto oder Link an meine Email! Bitte beachtet, dass meine Original Vorlage nur für den privaten Gebrauch und nicht für kommerzielle Zwecke gedacht ist. Vielen Dank für Euer Verständnis.
✄
Yay, you made a little Lotti chick! I'd love to see yours - simply send me a photo or link and I will upload to my Easter Pinterest board! Please note that my original template is for personal use only. Thanks for understanding.
xoxo


Friday, March 8

DIY Calligraphy Eggs


If you're adept at Chinese or Japanese calligraphy, you're one of the lucky ones who can paint the characters directly onto the eggshell. Everyone else might like to try this easy-peasy tutorial instead!
*
Wer sich mit Chinesischer oder Japanischer Kalligrafie auskennt pinselt die Schriftzeichen mit schwarzer Tusche direkt auf das ausgeblasene Ei. Für alle anderen habe ich hier eine ganz einfache Anleitung, um diesen Look zu bekommen. Übrigens, die Idee für diese asiatischen Dekoeier stammt von meinem Mann! 

Supplies // Material

white eggs, blown out // weiße ausgeblasene Eier
Mod Podge glue // Decopatch Klebstoff für alle Oberflächen 
small paint brush // kleiner Pinsel
paper scissors // Papierschere

Paper:
Origami Paper, thin gift wrap or white tissue paper printed with Asian characters 
(check craftstores or online - I got mine from Dawanda)

Papier:
Origami, weißes Seidenpapier oder Dekopapier mit Asia Schriftzeichen
(findet man in Bastelläden, Internet oder z.B. bei Dawanda)


How to

Make sure the eggs are clean and dry.  With scissors cut out desired characters from paper, making sure to leave as little white edge around each character as possible. Pour a little mod podge into a small bowl, dip the tip of the brush in and carefully apply on back of the paper cutouts. Position on egg and gently press into place. Cover entire egg. Let dry.

Und so geht's

Ausgeblasene, gereinigte Eier gut trocknen lassen. Mit der Schere aus dem Papier gewünschte Schriftzeichen ausschneiden, dabei so wenig wie möglich weißen Rand lassen. Etwas Decopatch in eine kleine Schüssel geben, Pinselspitze eintauchen und vorsichtig auf die Rückseite der ausgeschnittenen Zeichen streichen. Auf die Eierschale an gewünschter Stelle positionieren und vorsichtig andrücken. Rundum bekleben. Trocknen lassen.

  
Have fun!
Viel Spaß!
 玩 !

Friday, February 22

DIY Egg Cozy


Handmade Egg cozy


Here's a fun way to use up fabric scraps - make a set of egg cozies!

I know it seems like we've just recovered from Christmas and celebrated Valentine's Day only last week...so it's hard to believe that Easter is just around the corner. March 31st to be exact! Time to get crafty :)
*
Kaum zu glauben, dass schon bald Ostern ist (31. März)...beim Wocheneinkauf im Supermarkt wurde ich daran erinnert, denn dort begegneten mir reihenweise Goldhasen! So habe ich mir überlegt ein kleines österliches DIY zusammen zu stellen. Hier zeige ich Euch wie Ihr ein Eierwärmer-Set aus Stoffresten näht :) 


You'll need // man braucht

fabric scraps at least 5 x 5 inches / Stoffreste ca 12 x 12 cm
lining fabric / Futterstoff
fusable interfacing / aufbügelbares Vlies
4 x 3 inch pieces of bias tape / 4 x 8 cm Stücke Schrägband
fabric marker / Stoffmarkierer
sewing machine / Nähmaschine
pins, thread, scissors / Stecknadeln, Garn, Schere


Step One & Two / Schritt Eins & Zwei

I made my own template, but you can find a similar one to download here. Use the template to trace the shape onto the fabric. Cut 2 pieces each of four different fabrics, cut 8 pieces lining fabric and 8 pieces fusable interfacing.
Fuse the interfacing onto the outer pieces. Fold bias binding pieces in half and sew along open edge. These will be used as tabs at the top.

Ich habe meine eigene Vorlage gezeichnet, aber hier habe ich eine ähnliche gefunden, die Ihr downloaden könnt. Eierwärmer mithilfe der Vorlage auf den Stoff zeichnen. Ihr benötigt 2 x von vier verschiedenen Stoffen (außen), 8 x vom Futterstoff (innen) sowie 8 x aufbügelbares Vlies. Vlies jeweils auf die Außenstoffe bügeln. Für die Schlaufe die Schrägband-Stücke falten und entlang der offenen Kante steppen.

Step Three & Four / Schritt Drei & Vier

Take two lining pieces and lay right sides together. Sew along edge leaving approx. 1 1/2 inch gap on one side for turning. Do the same for remaining pieces. Notch rounded edge with sciccors - be careful not to cut through the seams.
Take two matching outer pieces and lay right sides together. Fold bias tape in half and insert inbetween layers at the top. Secure with pins and sew along egde. Do the same for remaining pieces. As with lining notch rounded edges. Snip off excess bit of bias tape. Turn right side out and iron as necessary.

Je zwei Futterteile rechts auf rechts legen. Ringherum schmall absteppen, dabei auf einer Seite ca. 4 cm offen lassen (zum späteren wenden). Runde Kante mit der Schere bis kurz vor der Naht einschneiden.
Je zwei Außenteile rechts auf rechts legen. Schrägband zur Hälfte falten und zwischen die Lagen obere Mitte legen. Mit Stecknadeln fixieren und ringsherum absteppen. Runde Kante ebenfalls einschneiden. Wenden und ggfs. bügeln.

Step Five & Six / Schritt Fünf & Sechs

With right sides facing pull the lining cozy over the outer cozy. Pin the bottom edge and sew together using a narrow seam. Next, carefully pull the outer cozy through the gap. Smooth out the lining cozy and stitch opening closed. Insert the lining into the outer cozy and roll the bottom edge out slightly, so it becomes visible (the pink polkadots on my cozy).

Die Futterteile rechts auf rechts über die Außenteile ziehen. Untere Kante mit Stecknadeln fixieren und rundherum schmal absteppen. Die Außenteile vorsichtig durch das Loch im Futterteil ziehen. Futterteil glatt streichen und Loch schließen. Dann Futter in die Außenteile so hinein stecken, dass etwas vom Futterstoff an der unteren Kante hervorschaut (siehe rosa Püncktchenstoff).

Now they are ready to be used or gifted!
*
Nun sind sie für das Osterfrühstück einsatzbereit oder zum Verschenken!

all fabrics + bias tape from here / alle Stoffe + Schrägbänder von hier
Happy Sewing!


Tuesday, April 3

Make your own candy stand


Here's a pop of colour that will brighten any rainy April day! Simply mix and match your favourite dishes making sure that the tiers get smaller towards top! Now fill with candy, chocolates or Easter eggs! In our house those won't last very long, but there's always the pretty dishes to look at :)

*

Etwas Farbe an einem verregneten Apriltag gefällig? Diese bunt-fröhliche Etagère könnt ihr mit verschieden gemusterten Tellern, Schüsseln und Tassen selbst zusammenbauen! Mit Bonbons, Pralinen oder Schokoeier füllen! Die Naschereien halten bei uns bestimmt nicht lange :)

Retro Rosenstoff hier


Have a great week!

Habt eine schöne (kurze) Woche!