Showing posts with label Produkttester. Show all posts

Thursday, January 12

Shopping Tip [ Names4ever ]


Hallo, ihr Lieben!
heute möchte ich euch die Webseite "Namesforever" vorstellen, die ihren Sitz in unserem Nachbarland, die Niederlande, hat. Das Unternehmen gehört mit zu den beliebtesten Schmuckherstellern in Europa, nicht zuletzt wegen der großen Auswahl an personalisierbarem Schmuck. Insbesondere die Namensketten, ob .925 Silber oder 14 K Gold, erfreuen sich nach wie vor großer Beliebtheit, darunter auch die berühmte "Carrie" Kette, die meinen LeserInnen wohl aus der Kultserie Sex and the City bekannt sein dürfte :)
*
Hello, lovelies!
today I'd like to introduce you to the website "Namesforever", a jewelry manufacturer based in my neighboring country, the Netherlands. This company enjoys huge popularity in Europe, not least due to the wide range of personalizable jewelry in both .925 silver and 14 K gold. Most popular are the fashionable name necklaces that are offered in a variety of styles including the iconic "Carrie" necklace made famous by Sarah Jessica Parker in Sex and the City :)
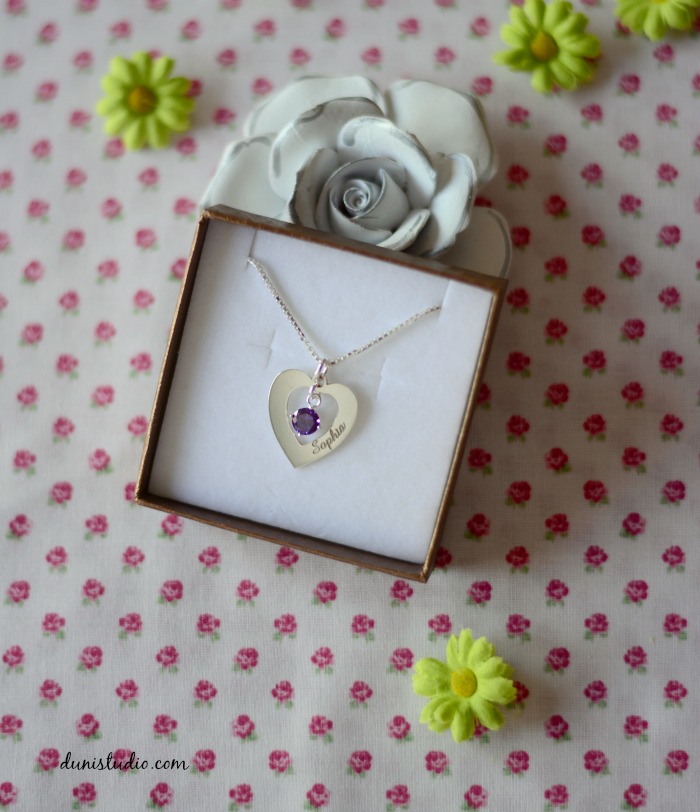


Vor ein paar Wochen wurde ich von der lieben Greta angemailt über eines ihrer Produkte zu schreiben. Da ich ihre Webseite bislang nicht kannte habe ich mir während der Feiertage etwas Zeit genommen im umfangreichen Katalog zu stöbern. Besonders schön fand ich die niedlichen Herzanhänger. Schon länger hatte ich vor meiner Nichte eine personalisierte Kette zu schenken, da sie ja bald Geburtstag hat. Das Angebot an Anhängern ist wirklich sehr groß und ich hatte die Qual der Wahl! Schließlich entschied ich mich aber für einen herzförmigen Anhänger in Silber mit dem Namen meiner Nichte seitlich eingraviert; in der Mitte ein baumelnder, amethystfarbener Kristall. Passend dazu bestellte ich eine kurze venetianische Halskette in Silber. Der Anhänger misst ca. 23 x 20 mm. Die meisten Anhänger gibt es auch in 14K Gold .
*

A few weeks ago I was approached by the lovely Greta to review one of their products. I have to admit that I had not come across this website before, so I took some time during the holidays to browse their extensive catalog. I was particularly impressed by the cute heart necklaces. In the back of my mind I had been thinking about gifting my niece a personalized heart necklace, so their offer could not have come at a better time. I honestly had a hard time choosing as there were several styles I liked. Finally, I opted for a heart shaped pendant in .925 silver with a dangling amethyst crystal, engraved with my niece's name together with a kids' length silver venetian necklace. The pendant measures about 23 x 20 mm. Most of the pendants are available in 14 k gold as well.

Mutter / Kind Schmuckmother / child jewelry

Für frisch gebackene Eltern ist sicherlich die o.g. Kategorie von besonderer Bedeutung. Und Katzen-Mami's und Hunde-Herrchen kommen ebenfalls auf ihre Kosten mit hübschen Anhängern, die alle mit dem Namen der Fellnasen personalisierbar sind.
*
New parents might want to take a look at the adorable pendants in the mother/child jewelry section and parents of furbabies will surely love the charms that can be personalized with your pet's names.
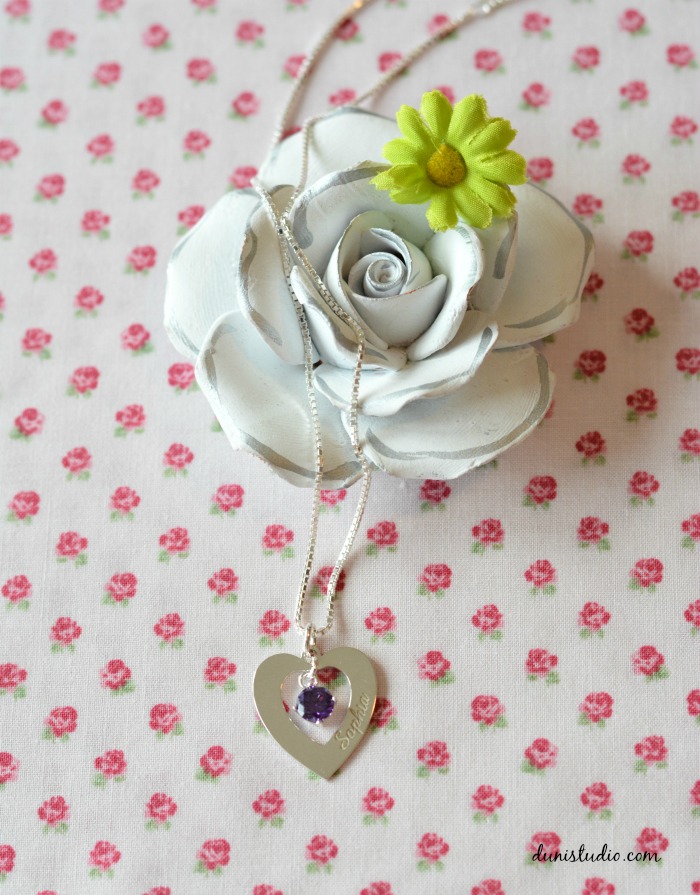

Die Kaufabwicklung verlief unkompliziert und es gibt etliche Zahlungsmöglichkeiten. Beeindruckend fand ich die schnelle Lieferzeit. Über jeden Schritt der Bestellung wurde ich per Mail informiert und trotz Feiertage erhielt ich meine Bestellung in nur wenigen Tagen. Bei Schmuck finde ich auch die Verpackung immer ganz wichtig. Die Halskette kam in einer dezenten goldenen Box mit brauner Schleife. Der Anhänger an sich ist gut verarbeitet mit stabiler Öse und die Gravur ist einwandfrei. Der hier ausgewählte Anhänger mit Kette, beides .925 Silber kosten zusammen circa €47,-. Hier stimmt das Preis-Leistungsverhältnis. Ein weiteres Plus: Names4ever bietet kostenlosen Versand. Ein Besuch lohnt sich!
*
The ordering process was uncomplicated and there are several payment options to choose from. My order arrived within a few days, even though it was peak holiday season. I was informed every step of the way via email. Impressive. Surprisingly the necklace came in an elegant gold box with a brown bow - not the tacky coloful ones I've seen on other blogs and which they must have previously used! The pendant itself is quite solid and nicely finished. I'm especially pleased with how the engraving turned out and I'm pretty sure my niece will love it.  Names4ever offer free shipping and all prices quoted include sales tax and are final. Check them out!

*dieser Post ist in Zusammenarbeit mit der Webseite NamesForever
*this post is in collaboration with the website NamesForever
 photo signature_zpscqkypdzs.png

Wednesday, April 13

Coastline Cardigan

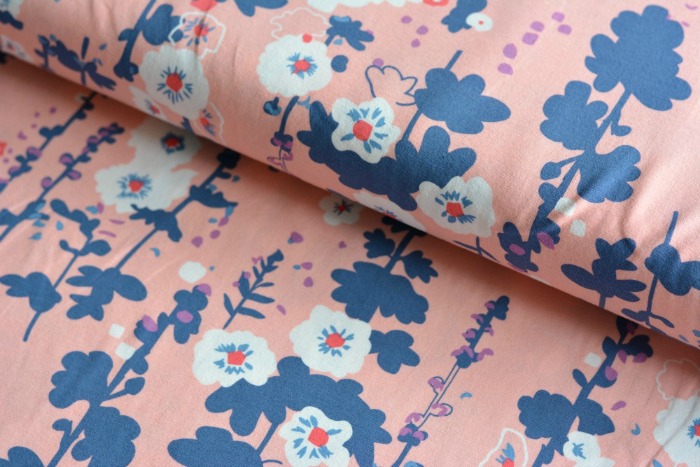
I'm a cardigan girl. More out of necessity as the weather over here is unpredictable, even in summer. While I appreciate the classic cardigan style, especially while working, I was looking to update my spring wardrobe with something more fun. Preferably with fringe. When I received Coastline, a soft jersey knit fabric by designer Sharon Holland, I knew straight away that it was the perfect choice for my sewing project!
*
Ich bin ein "Cardigan Girl" (lässt sich schwer übersetzen). Da das Wetter hier in meiner Gegend selbst im Hochsommer unberechenbar ist, sind Strickjacken für mich unverzichtbar. Obgleich ich den klassischen Cardigan schätze, vor allem bei der Arbeit, wünschte ich mir ein pfiffigeres Outfit, z.B. mit Fransen! Neulich ist Coastline, ein weicher Jersey von Designerin Sharon Holland im Lädchen eingetroffen und ich wusste sofort, das ist der Stoff für meine neue Jacke!

source
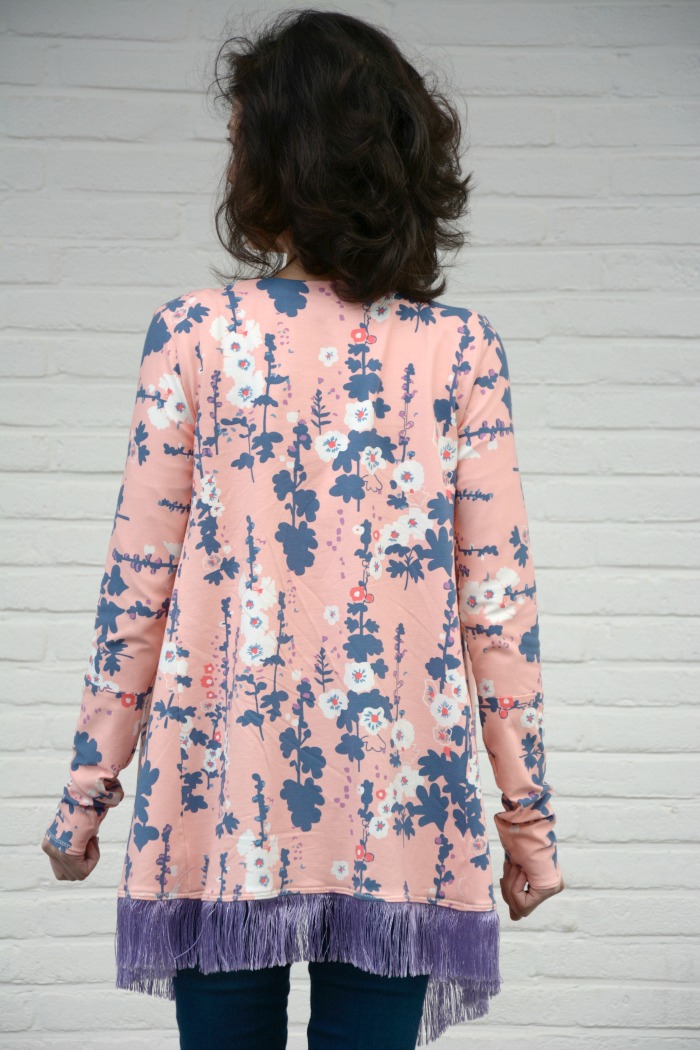
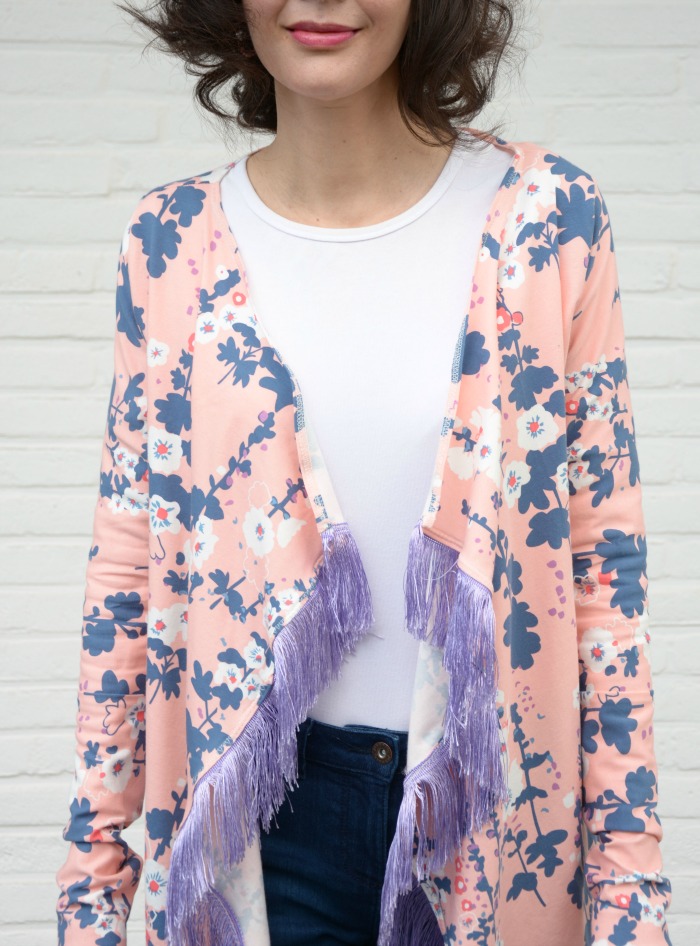
This fabric features a coral, white and navy floral pattern on a soft peach background. And if you look closely you will discover some pops of lavender on there too! This is the color I picked up for the fringe. The overall look is fresh, spring-y and casually chic. The front has two asymmetric panels a little bit longer than the back. It's an open style cardigan without any closures, thus it is fairly easy to sew. Btw, I didn't use a paper pattern. I copied the style from a wool cardigan that I own. This isn't too difficult for someone with dressmaking experience. Also, I elongated the sleeves, because I love narrow sleeves that go halfway up my hands :) Those who sew will notice that I cut the sleeves perpendicular to the grainlain to save on fabric...normally, you shouldn't be doing this, but since the fabric is pretty stretchy I got away with it. #bendtherules


Dieser hochwertige Jersey hat ein florales Muster in Koralle,Weiß und Navy auf einem sanften pfirsichfarbenen Hintergrund. Und wer genau hinschaut entdeckt ein paar Tupfen in Lavendel! Die Fransen habe ich auf die letztere Farbe abgestimmt. Das enstandene Teil ist lässig schick und frühlingshaft frisch. Das Vorderteil ist asymmetrisch und etwas länger als der Rücken. Es ist eine verschlusslose Jacke und somit ziemlich einfach zu nähen. Übrigens, es gibt kein Schnittmuster. Ich habe den Schnitt von einer Wollstrickjacke, die ich besitze kopiert. Mit etwas Näherfahrung im Bekleidungsbereich ist dies gar nicht so schwierig. Zudem habe ich die Ärmel verlängert, weil ich überlange Ärmel, die bis mittig der Hände reichen einfach sehr mag :) Diejenigen unter Euch, die ebenfalls nähen haben sicherlich festgestellt, dass ich die Ärmel senkrecht zum Fadenlauf zugeschnitten habe...dies sollte man niemals tun, aber um Stoff zu "sparen" und da er ziemlich elastisch ist und ich dünne Arme habe ging es nochmal gut. #bendtherules


Actually, attaching the silky fringe was the most challenging. It's very slippery and I had to take care not to get the threads under my needle! The fringe trim was kindly sponsored by Union Knopf.
*
Die seidige Fransenborte anzunähen hat ein wenig länger gedauert. Ich musste beim Nähen total aufpassen die Fäden nicht unter die Nadel zu bekommen! Die Fransenborte wurde mir von Union Knopf gesponsert.


Have you made some spring-y item for yourself or your children lately? Do you like the current fringe trend?
*
Habt Ihr auch schon etwas frühlingshaftes für Euch (oder eure Kinder) genäht? Wie findet Ihr den Fransen-Trend?
photo signature_zpscqkypdzs.png

Friday, April 8

The Denim Studio [ by Art Gallery Fabrics ]


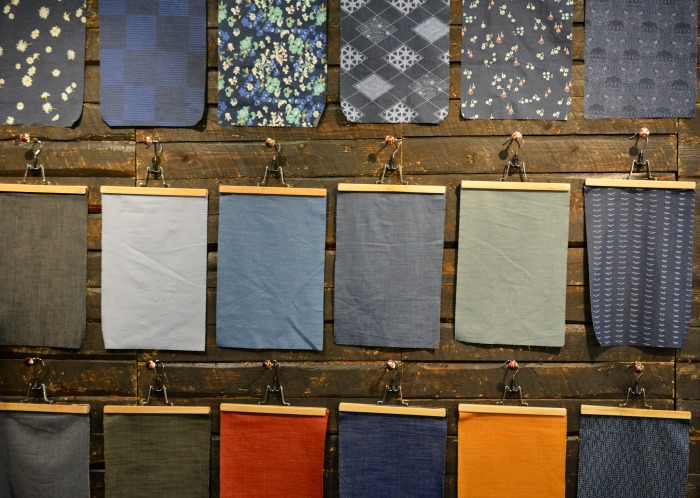
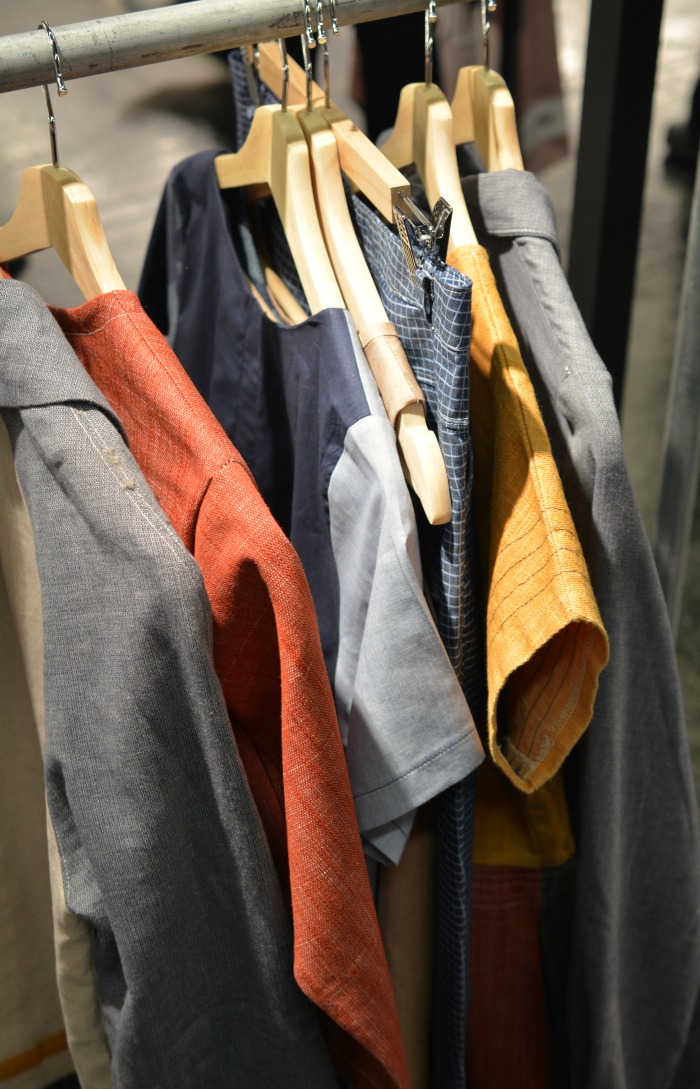
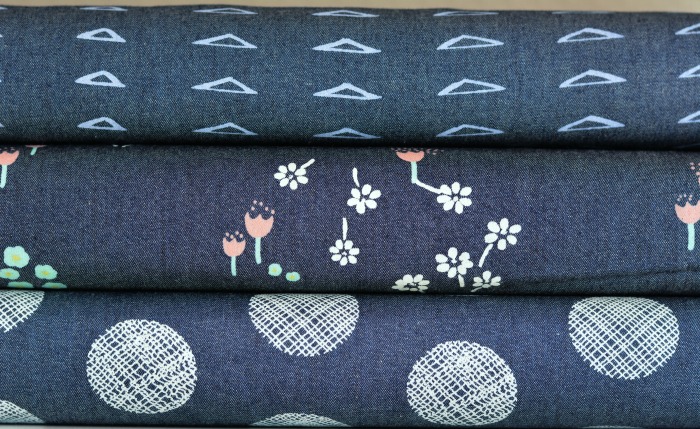
As I mentioned in a previous post, I spent quite a long time at the The Denim Studio by AGF booth. I love how they arranged the new denim swatches against a rustic backdrop! The range offers a couple of floral and graphic prints, as well as solids in both smooth and textured surfaces.
*
Wie schon in diesem Post erwähnt, bin ich absolut begeistert von den bedruckten Bekleidungsstoffen in Jeansoptik von The Denim Studio by AGF. Die obigen Stofflaschen zeigen die aktuellen floralen und grafischen Muster und Unis mit glatter sowie strukturierter Oberfläche.  

source
The above small flower print is simply adorable! This denim fabric is apparel weight and comes in 58" width. 
Dieser oben gezeigte süße florale Druck ist einfach bezaubernd! Der leichte Jeansstoff hat eine Breite von 150 cm.
This cool denim video is sure to inspire all my readers who sew and even those who don't! Grab a cup of coffee or tea and enjoy - it's just under 4 minutes. If you watch closely you can see that the girls are all wearing clothes made with one or two of the new denims! Side note - one of these days I'd like to own a studio that is big enough to accomodate a couch :) p.s. if you can't see the video, you can watch is on you tube instead: https://youtu.be/cFu_-Lb2Lp4
*
Das tolle Denim Video dient als Inspirationsquelle für alle Nähbegeisterten unter Euch! Schnappt Euch eine Tasse Kaffee oder Tee und schaut es Euch an - es dauert keine 4 Minuten. Die Mädels im Video tragen alle Teile aus dem einen oder anderen Denim. So toll! Randnotiz - so ein großes Studio mit Sofa könnte ich gut gebrauchen :) p.s. falls das obige Video nicht funktioniert, probiert es mal bei you tube: https://youtu.be/cFu_-Lb2Lp4


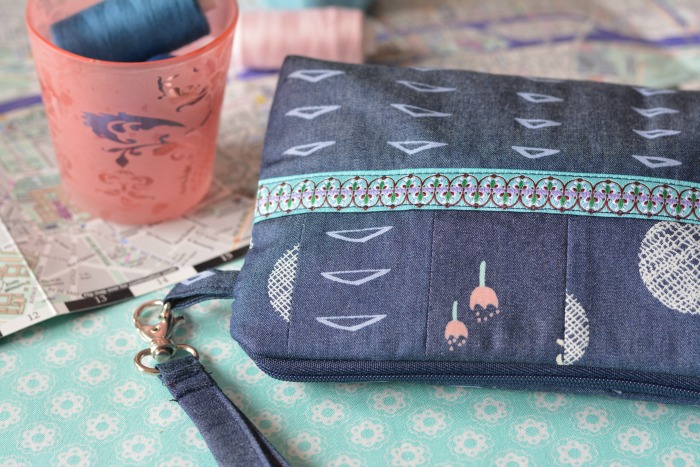
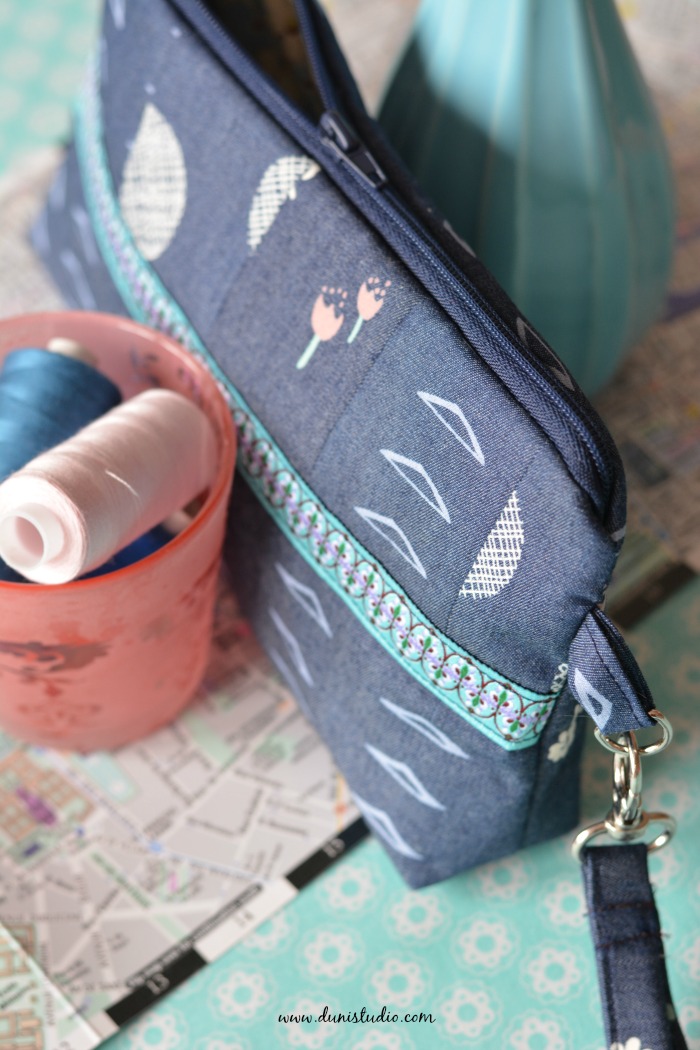
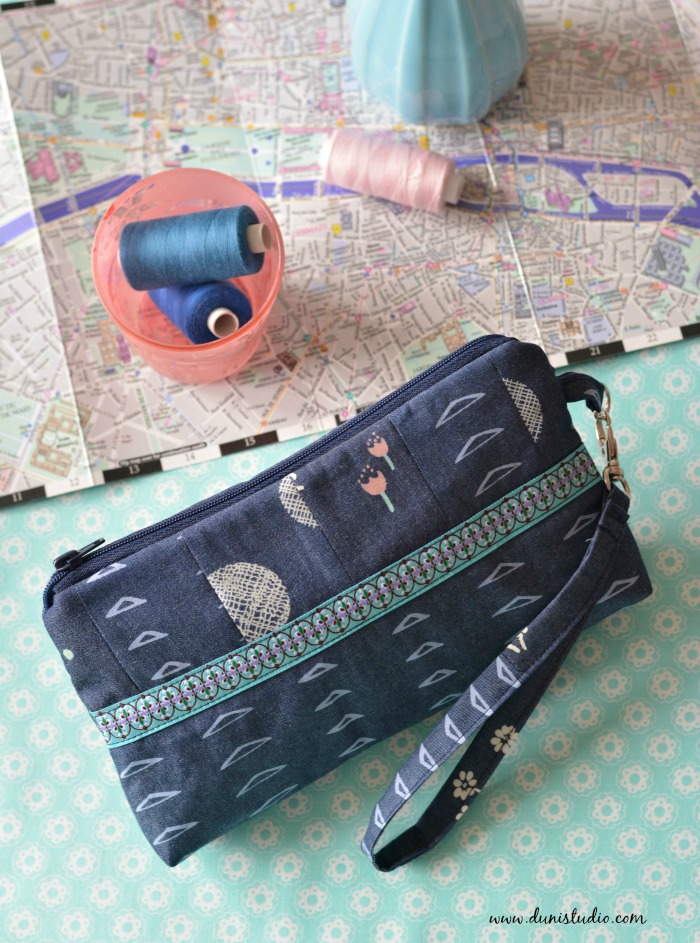
I couldn't resist making a little something from these cute fabrics, so I designed a little travel pouch. It's the perfect size to keep all your daily necessities in one place, but not so bulky to take up a lot of space in your carry-on! The pouch is fully lined and padded and includes a (detachable) strap so that you can hang it from a hook in the washroom or dangle it from your wrist to keep your hands free to do other stuff, like texting :)

Ich konnte nicht widerstehen aus diesen grandiosen Stoffen etwas Nützliches zu nähen, so habe ich dieses Reisetäschchen entworfen. Es hat die perfekte Größe für sämtlichen Krimskrams den frau so braucht, nimmt aber im Handgepäck kaum Platz weg! Das Täschchen ist gefüttert und leicht gepolstert und hat eine (abnehmbare) Trageschlaufe. So lässt sich das Täschchen an einen Haken aufhängen, während man sich die Hände wäscht oder man trägt es lässig am Handgelenk und hat damit beide Hände frei für's Simsen :)


The lovely turquoise trim and the hardware is kindly sponsored by the friendly people over at Union Knopf, German button and accessory manufacturer.
*
Das hübsche Webband in Türkis sowie der Karabiner wurde mir freundlicherweise von den lieben Kollegen von Union Knopf zur Verfügung gestellt.


Which of these inspire you most? Floral or graphic? If you sew, have you made anything with denim before? Looking forward to your comment!
*
Was sagt Ihr zu den obigen Drucken? Mögt Ihr lieber Floral, Grafisch oder Uni? Und habt Ihr schon mal etwas mit Jeansstoffen genäht? Freue mich auf Eure Kommentare!


 photo signature_zpscqkypdzs.png

Wednesday, November 4

Advent, Advent... { 5 Minute DIY }


Hi everybody!        Hallo, ihr Lieben!


Okay, this post isn't supposed to make you feel anxious or anything. Just a gentle reminder that the first advent happens to be end of this month, yes this month ;-)
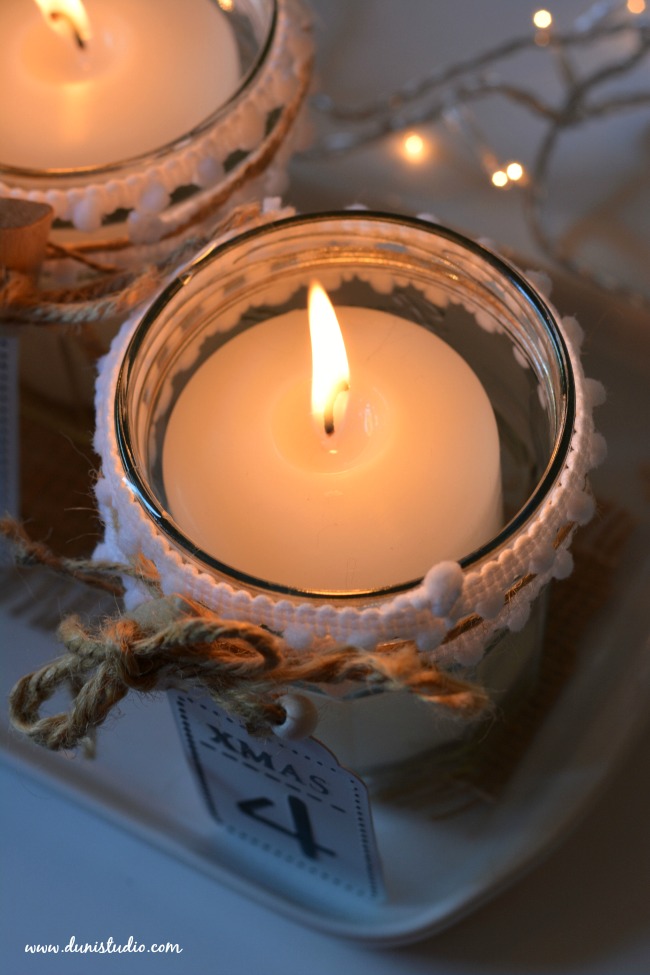
Of course there are plenty of traditional advent wreaths available, but for a crafty and non-traditional person like me I like to make my own unique version! What I like about this project is that you'll probably find many of the materials in your house already! I like easy projects with quick results.
*
Vielleicht mag dieses weihnachtliche Bastelprojekt dem einem oder anderen zu früh vorkommen, aber tatsächlich ist der erste Advent schon Ende diesen Monats! Traditionelle Kränze gibt es ja bereits zu kaufen, aber für nicht-traditionelle Menschen wie mich sind selbstgemachte einfach schöner und individueller :) Das Gute an diesem Projekt - das Material habt Ihr sicherlich schon zuhause! Ich mag einfache DIY Ideen.


This Christmas I've decided on a rustic/shabby chic theme
*
Dieses Weihnachten dekoriere ich im rustikalen/shabby chic Look

You'll need | Ihr benötigt

4 clean jam jars | 4 saubere Marmeladengläser
jute twine | Jutekordel
4 wooden buttons with large holes | 4 Holzknöpfe mit großen Löchern
numbered tags | nummerierte Anhänger
4 white pillar candles | 4 weiße Stumpenkerzen
rectangular cake platter | rechteckige Kuchenplatte

  1. you can make the numbered tags yourself or you can get them at craft stores
  2. wrap a length of minipompom trim around the top of the jam jar twice. Tuck in the ends.
  3. wrap a piece of jute twine around the top and secure with a knot. 
  4. thread the ends of the twine through the button holes and tie a bow. Fix the tag to the button
Repeat for remaining three jars. All that's left to do is place a candle in them and arrange on the cake platter. Easy, right?

  1. the nummerierten Anhänger selbst machen oder im Bastelladen kaufen
  2. ein Stück Minipompomborte zwei Mal um die obere Kante des Marmeladenglases wickeln, die Enden darunter einstecken.
  3. Jutekordel drumwickeln und verknoten.
  4. Enden durch die Knopflöcher ziehen und Schleife binden. Anhänger um den Knopf binden
Schritte 1 - 4 dreimal wiederholen. Nun die Kerzen in die Gläser stellen und auf der Kuchenplatte arrangieren. Wie gesagt, einfach und schnell :)


Rustic wooden buttons kindly supplied by Union Knopf 
*
große Holzknöpfe wurden mir von Union Knopf zur Verfügung gestellt


Please do not leave burning candles unattended!
Kerzen niemals unbeaufsichtigt brennen lassen!
Happy Crafting!

Wednesday, August 19

DIY Rustic Fabric Tags


Here's another easy fabric-scrap-busting idea! Of course, the idea isn't original. There are tons of similar ones on Pinterest. I decided to go for the homespun rustic look :)
*
Heute gibt es wieder eine einfache DIY Idee, welche gleichzeitig der Stoffresteverwertung dient! Natürlich stammt diese Idee nicht von mir - davon gibt es etliche bei Pinterest. Allerdings sind meine Anhänger im rustikalen Look :)

bunny fabric // Häschenstoff
You'll need // Ihr braucht

Kraft paper tags // Kraft Papieranhänger
Cotton fabric scraps // Stoffreste aus Baumwolle
Pinking shears // Zackenschere
Rustic Trims // Borten im rustikalen Look
Sewing machine // Nähmaschine
Basic sewing kit // Basic Nähutensilien 


How to:

1. Measure tags - scraps need to be slightly smaller to fit.
2. Iron fabric scraps and cut to size.
3. Position on Kraft tag and straight stitch, pivoting at corners. Remember to backstitch. I recommend using a strong needle suitable for heavy weight material.
4. Cut trim* into 20 cm (approx. 7.87") pieces. Double up and thread through hole. Pull the ends through loop and tighten. Repeat as often as you like :)
*
Und so wird's gemacht:

1. Papieranhänger abmessen - die Stoffstücke sollten etwas kleiner sein.
2. Stoffreste bügeln und zuschneiden.
3. Auf Anhänger platzieren und im Geradstich steppen, an den Ecken drehen. Rückstiche nicht vergessen. Für dieses Projekt empfehle ich eine stärkere Nadel für dicke Stoffe.
4. Von der Borte* je 20 cm Stücke abschneiden. Doppelt legen und durch das Loch führen. Enden durch die Schlinge ziehen und verknoten. So oft wiederholen wie Ihr möchtet :)


* Trims kindly sponsored by leading German button and accessories manufacturer Union Knopf. These are premium quality cotton trims and come in natural and beige colours with embroidered leaf design.
http://www.unionknopf.com/?pk_campaign=Blogger&pk_kwd=DuniStudio
* diese Borten wurden mir von der Firma Union Knopf zur Verfügung gestellt. Die hochwertigen Borten aus Baumwolle in Natur und Beige mit gesticktem Blattmotiv gibt es im gut sortierten Kurzwarenhandel. Natürlich lassen sich damit auch Bekleidung und Taschen aufhübschen!


I made quite a few of these! I have a whole box full of unique gift tags - simply write the recipients name on the back. Can be used as cute bookmarks too!
*
Nun habe ich eine ganze Schachtel voll mit diesen rustikalen Geschenkanhängern! Beim nächsten Anlass beschrifte ich die Rückseite einfach mit dem Namen des Empfängers. Auch als Lesezeichen zu verwenden!

Happy crafting!

Friday, May 22

Outfit post {Nautical Glamour}

Hi there lovelies!  Hallo Mädels!


I recently received another parcel from the good people over at Union Knopf. It contained lots of black, silver and gold fashion accessories, anchor appliqués, beaded bib necklaces, sequins and rhinestones. It immediately reminded me of the hugely popular 80s TV series Dynasty :)
My idea for an outfit came together quickly - nautical meets 80s glamour!
I actually had a whole different location planned for this shoot, however (as so often happens here) the sun was shining one minute and then the next it was absolutely bucketing down. We had to run for cover and this spot was it. Not the prettiest of backdrops and the light wasn't great either, but because I didn't want to wait for the rain to stop we just took a couple of photos right here.


Neulich habe ich wieder ein Päckchen von den netten Kollegen von Union Knopf erhalten. Drin waren jede Menge Strass, perlenbestickte Kragen, Anker Motive sowie schwarze, silberne und goldfarbende Fashion Accessoires. Es erinnerte mich sofort an die beliebte 80er Jahre Sendung Dynasty :) So kam mir die Idee Anker und Glitzer zu vereinen = Maritim + 80er Glanz!
Eigentlich war eine andere Location für dieses Photoshoot gedacht, aber wie so oft in dieser Gegend fing es von einer Minute zur anderen heftig an zu regnen. Also schnell ein trockenes Plätzchen gesucht - zugegeben nicht besonders schön - und ein paar Bilder geknipst, denn ich hatte keine Lust den Regen abzuwarten.


This fashion accessory is actually a beaded bib necklace. It's got tons of silver seed and facetted beads and a pretty crystal in the center on a felt backing. If you look closely the pattern resembles stripes matching my stripey nautical shirt. Since the necklace didn't work for me, I cut off the chain and stitched the collar on by hand at strategic points. This method works well with medium weight woven and knit fabrics.
*
In diesen perlenbestickten Kragen (eigentlich eine Kette) hatte ich mich sofort verliebt. Kleine silberne Rocailles, Facettenperlen und ein hübscher Kristall in der Mitte zieren ihn. Wer genau hinschaut erkennt ein Streifenmuster, welches sich gut mit dem Streifenshirt ergänzt. Als Kette gefiel er mit nicht so recht, daher habe ich den Filzkragen mit ein paar unsichtbaren Handstichen am Ausschnitt des handgemachten Shirts genäht. Mittelschwere Stoffe sind dafür am besten geeignet.


To fit the theme I chose the large silver anchor appliqué and simply ironed it to the back pocket of my vintage black palazzo pants. This was a lucky find from years ago! The pants are a wool blend and the motif adhered to it easily. When applying iron-on appliqués always cover with a thin cotton cloth and press evenly. Those round black gems with the tiny crystals surrounding it? Those are actually iron-on appliqués as well! You can iron them on clothing, bags, jeans etc.  However, I decided to make a pair of earstuds instead. For this I cut a piece of clear vellum and stuck in on the back of the motif. I then glued that to a large earstud pad and let it dry overnight.The earstuds complement the beaded collar well and they are just the right size too.


Passend zum Thema habe ich mich für den großen silbernen Anker entschieden. Das hochwertige Bügelmotiv ziert nun die rückwärtige Tasche meiner schwarzen Vintage Palazzo Hose aus Wollmischgewebe, ein Glücksgriff  aus dem Second Hand Laden. Das Motiv haftete nach nur 20 Sekunden gut auf dem Stoff. Beim Aufbügeln solcher Motive decke ich es vorher immer mit einen dünnen Baumwolltuch ab.
Die runden schwarzen Schmucksteine mit den Zierkristallen ringsherum sind ebenfalls Aufbügelmotive! Man kann sie auf Bekleidung, Jeans oder Taschen aufbügeln. Allerdings habe ich daraus Ohrstecker gebastelt :) Dafür habe ich auf die jeweilige Rückseite runde Stücke durchsichtige Folie befestigt, diese dann auf große Ohrstecker-Rohlinge mit Schmuckkleber geklebt und über Nacht trocknen lassen. Als Ohrstecker finde ich passen sie gut zu dem bestickten Kragen und haben auch genau die richtige Größe.


Thanks for stopping by and reading along! What's your take on wide-legged pants? Or are you a skinny jeans forever kinda girl?
*
Freut mich, dass Ihr wieder vorbeigeschaut habt! Wie findet Ihr weite Hosen? Oder seid Ihr ausschließlich Skinny Jeans Fan?

Thursday, March 12

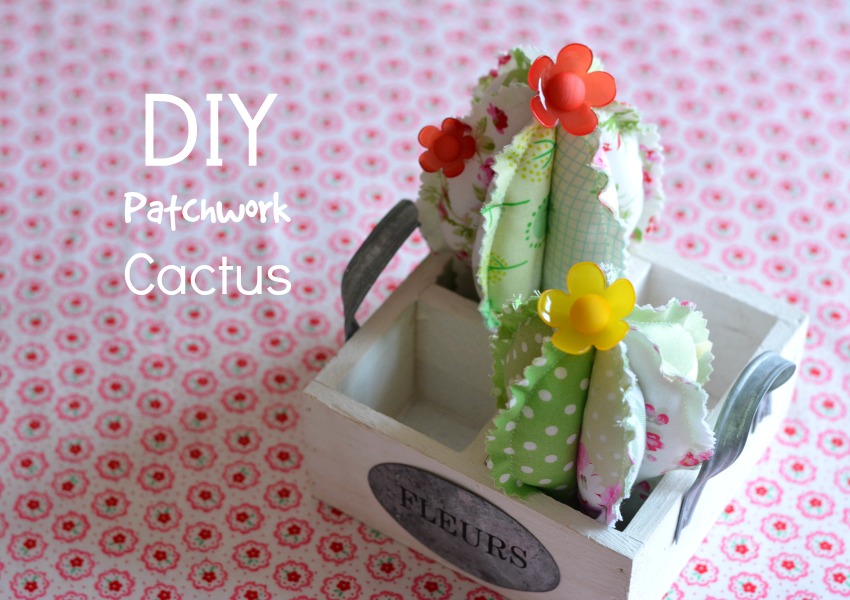
DIY Patchwork Cactus [Free Pattern]

Hello there lovelies!            Hallo Mädels!


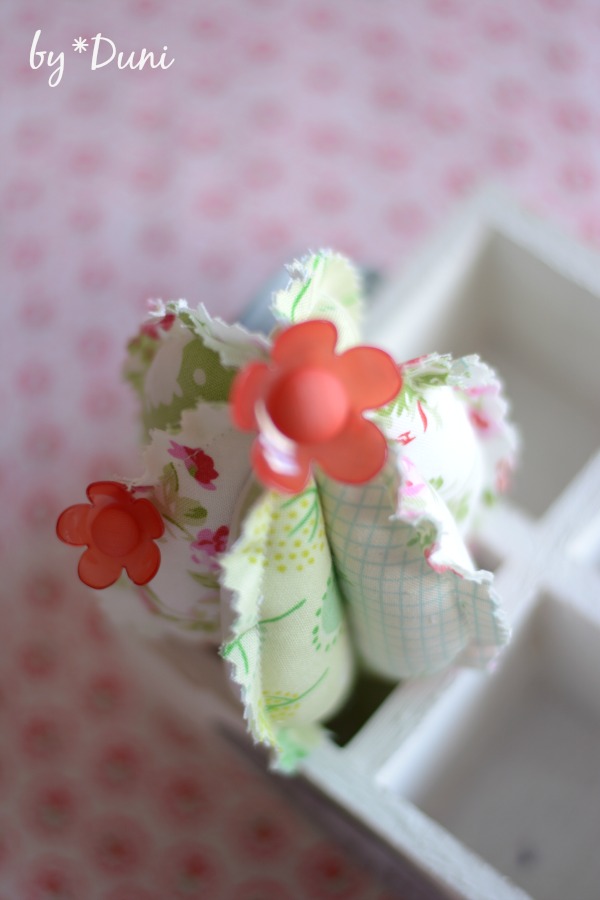
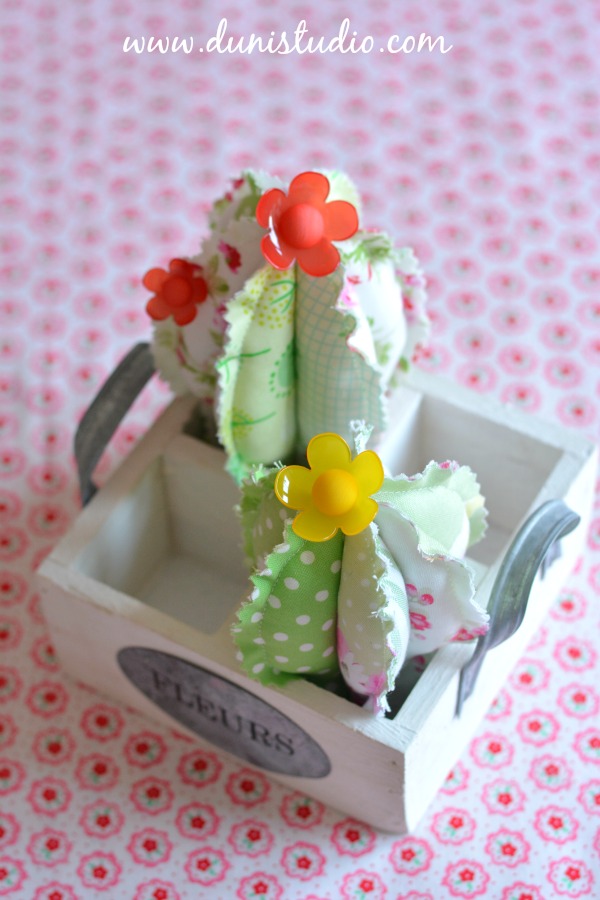
Here's a fun way to use up those fabric scraps: Patchwork Cactii. Those whimsical flower buttons kindly supplied to me by Union Knopf inspired me to make these! The buttons come in two sizes and fun colours. I chose yellow and red for this project. Btw, sewing these is very simple - it's the stuffing them that requires some patience ;-)
*
Heute zeige ich Euch wie man diese Patchwork Kakteen näht. Dieses Projekt eignet sich gut für die Stoffresteverwertung! Zu dieser Idee inspiriert haben mich die witzigen Blumenknöpfe , die mir freundlicherweise die Firma Union Knopf zur Verfügung gestellt hat. Die Knöpfe gibt es in zwei Größen und in verschiedenen bunten Farben. Ich habe mich für Gelb und Rot entschieden. Die Kakteen an sich sind sehr einfach zu nähen, allerdings benötigt man für das Ausstopfen ziemlich viel Geduld ;-)


You will need

Fabric scraps (cotton)
Disappearing ink marker
Pinking Shears
Polyfill Fiber
Flower buttons
Sewing machine & basic sewing kit


Ihr benötigt

Stoffreste (Baumwolle)
Stoffmarker (selbstauflösend)
Zackenschere
Füllwatte
Blumenknöpfe
Nähmaschine & Standard-Nähutensilien


The pattern includes one large and one small cactus. Make sure your printer is set to print at 100%. Print the page and cut out the template. With two fabric scraps wrong sides together trace the cactus directly onto the fabric. Leave enough margin for cutting out (pic 1).
Sew along this line, but leave bottom open. Cut out with pinking shears about 4 mm away from stitches. Repeat twice. You should end up with three cactus shapes (pic 2).
*
Das Schnittmuster enthält einen großen und einen kleinen Kaktus. Darauf achten, dass Eure Druckereinstellung bei 100% ist. Die eine Seite ausdrucken und Vorlagen ausschneiden. Jeweils zwei Stoffreste links auf links zusammenlegen und mit dem Stoffmarker direkt auf dem Stoff den Umriss nachzeichnen (Foto 1). Entlang dieser Linie nähen, dabei den Boden offen lassen. Mit der Zackenschere circa 4 mm von der Naht ausschneiden. Zweimal wiederholen. Insgesamt solltet Ihr drei Teile haben (Foto 2).


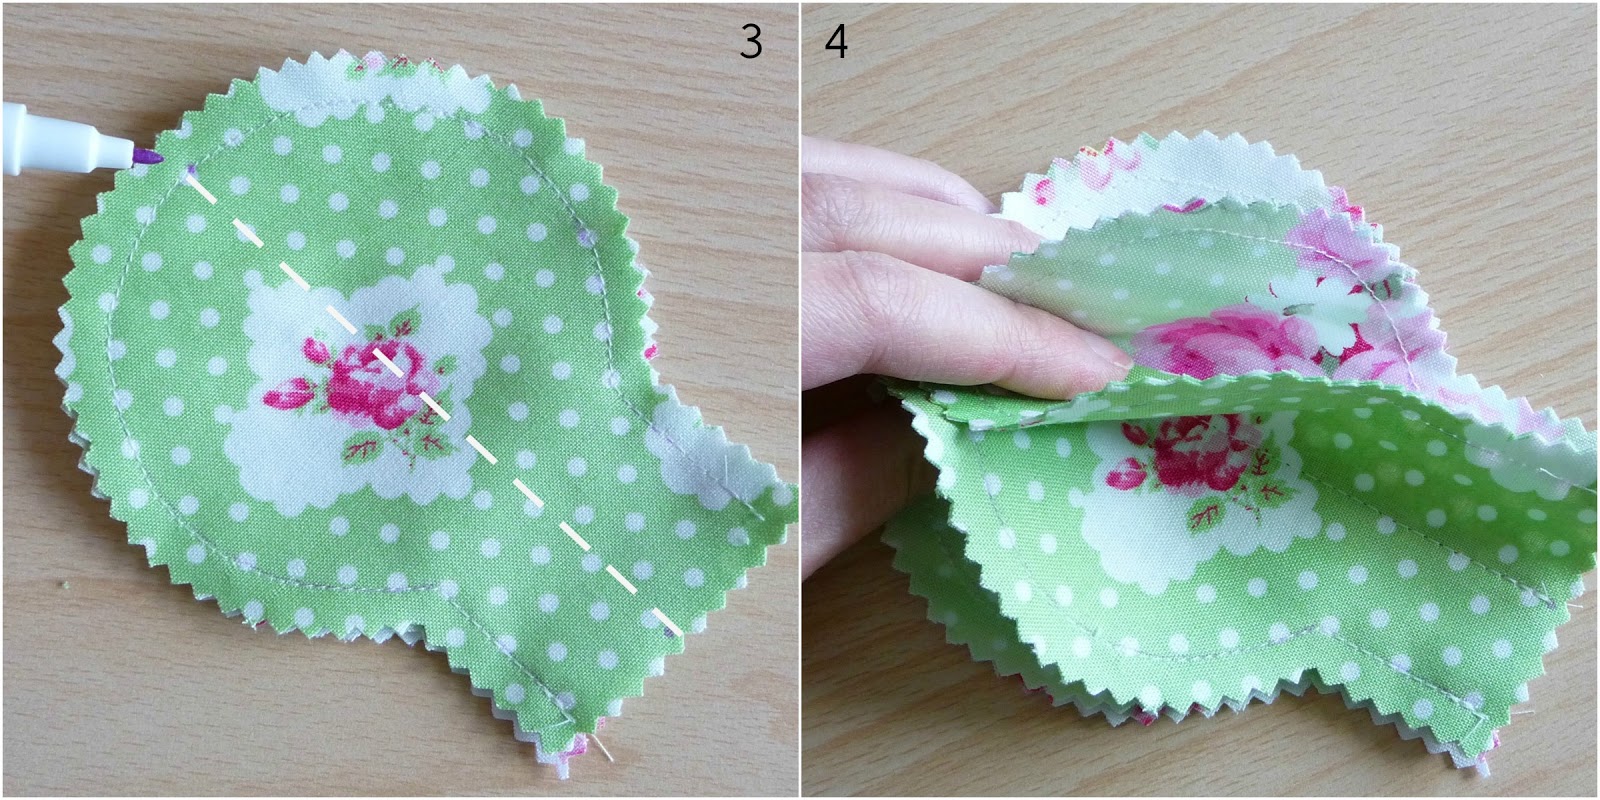
Lay all three pieces on top of each other. Mark top and bottom center and stitch a straight line down the middle through all layers (pic 3). You should now have six individual compartments to fill with polyfill fiber (pic 4).
*
Nun die drei Teile aufeinander legen. Obere und untere Mitte markieren. Durch alle Lagen von der oberen Naht bis unten geradlinig nähen (Foto 3). Ihr solltet nun sechs einzelne Fächer zum Befüllen haben (Foto 4).


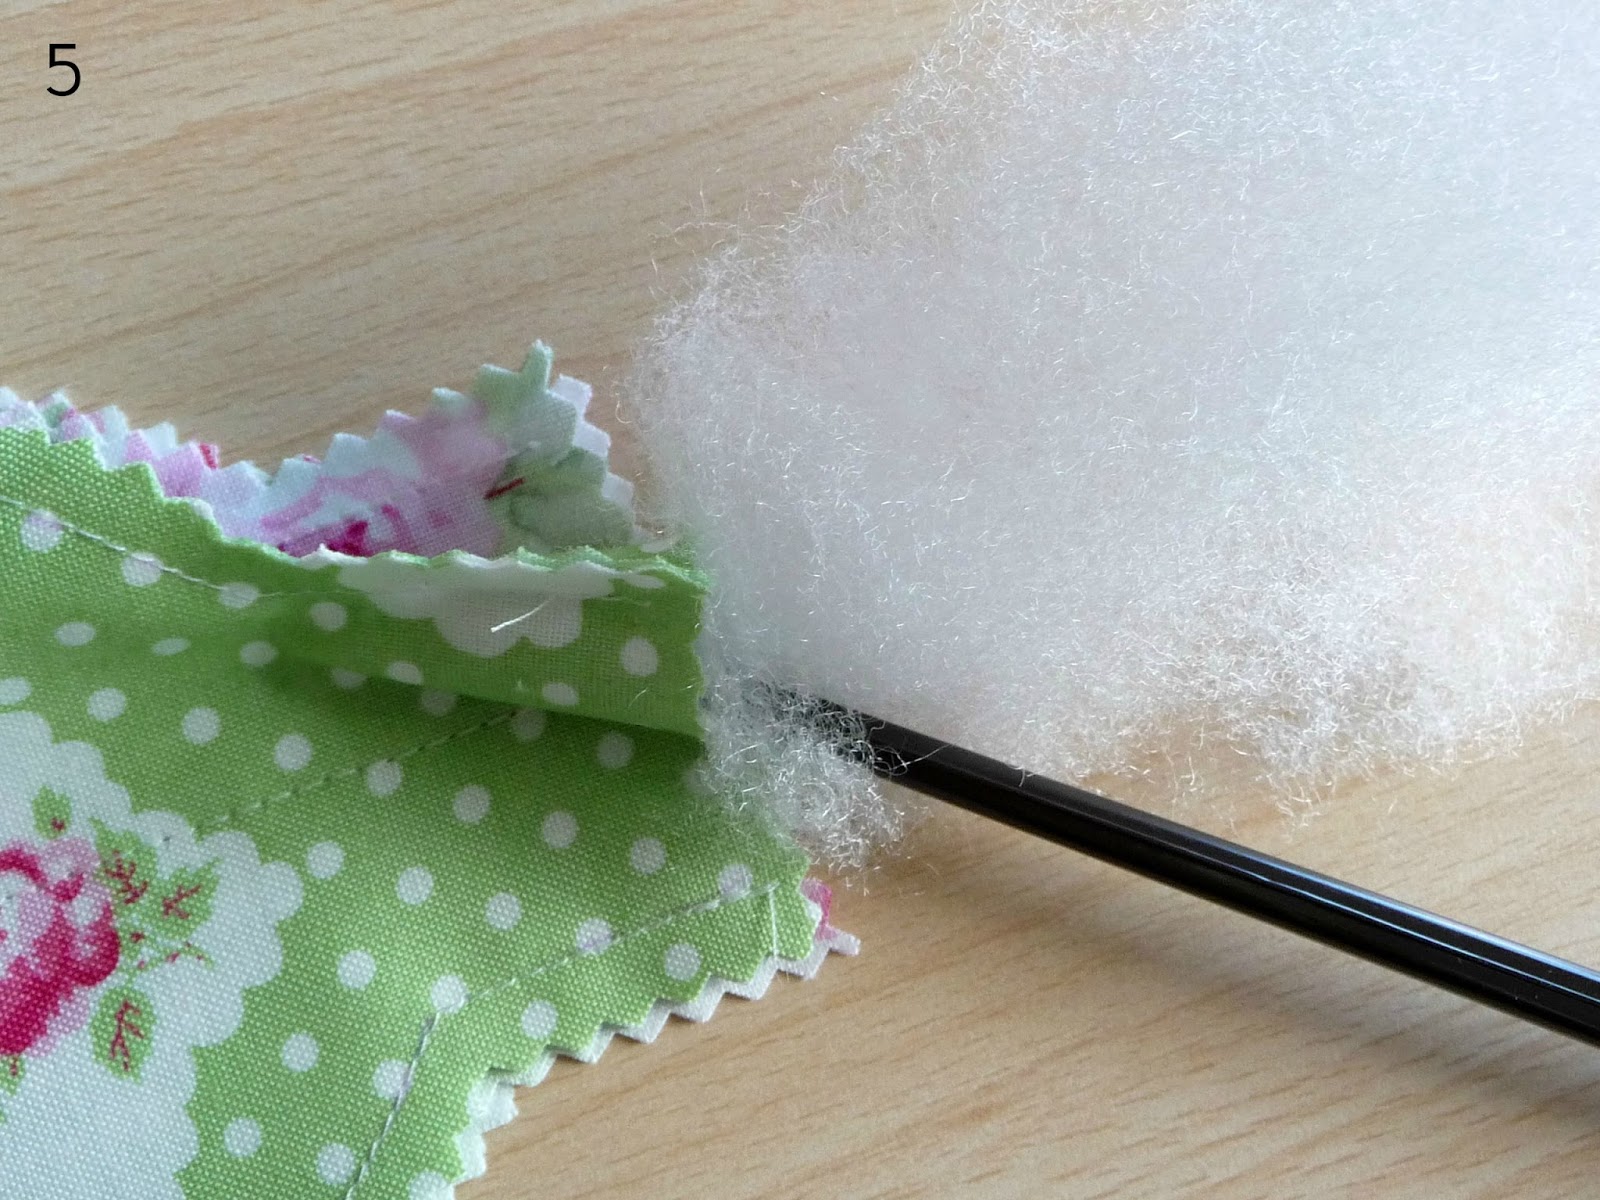
Now comes the part where you need A LOT of patience! Start filling the compartments one by one. It helps to push the fiber in with a chopstick or knitting needle. Using small bits of fiber is easier than one large piece (pic 5).
*
Und nun ist VIEL Geduld gefragt! Die einzelnen "Fächer" mit Füllwatte ausstopfen. Dies geht am besten mit Hilfe eines Essstäbchens oder einer Stricknadel. Lieber kleinere Stücke Füllwatte verwenden als ein großes Stück (Foto 5).


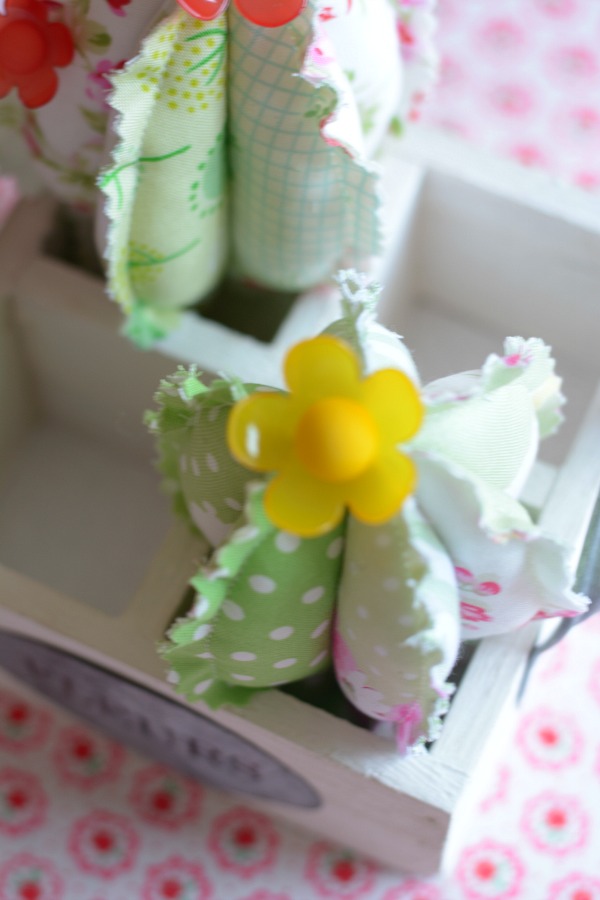
Lastly, sew on the button or buttons of your choice at or near the top. Now all that's left to do is to pop the cactus in a mini terracotta pot, a votive, an egg cup or other small container and you're done! Yay!
*
Zuletzt den Blumenknopf oder die Blumenknöpfe per Hand oben mittig oder seitlich annähen. Nun könnt Ihr den fertig genähten Kaktus in einen kleinen Behälter stecken, z.B. Mini-Terracottatopf, Eierbecher etc. Ich hatte diesen kleinen Deko-Blumenkasten zur Hand also habe ich meine da rein gesetzt!


As always, if you have any questions at all or need help downloading the template, simply drop me a line via email!
*
Falls Ihr noch Fragen habt oder Hilfe zum Download benötigt könnt Ihr mir gerne eine Email schreiben!

Happy Crafting!

Friday, March 6

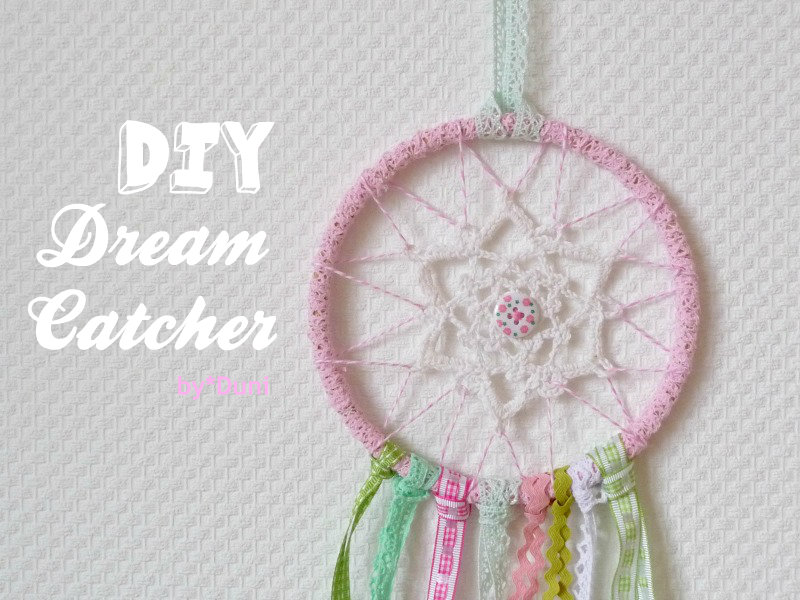
Shabby Chic Dream Catcher


In my effort to dispel the winter blues I've been creating a lot of Spring-themed items! I was happily surprised when the good people at Union Knopf, a leading German manufacturer of buttons and misc. haberdashery sent me a box full of trims and laces in lovely pinks and greens :)
Since I wanted to utilize as many ribbons and trims as possible I came up with this shabby chic dream catcher DIY idea! This project can easily be done with school-age kids.
*
Allmählich bin ich des Winters überdrüssig. Umso mehr habe ich mich gefreut als ich neulich von den netten Kollegen von der Firma Union Knopf ein Paket mit sämtlichen frühlingshaften Bändern und Spitzen bekommen habe. Spontan kam mir diese DIY Traumfänger Idee, da ich so viele Bänder wie möglich in einem Projekt benutzen wollte! Dieses Projekt ist auch für Schulkinder geeignet.


You will need

one Ø 16 cm (about 6") ring (the inside ring of an embroidery hoop works perfectly)
one crochet doily to fit in the center of the ring
one button
twine
a needle with a large eye (i.e. wool needle)
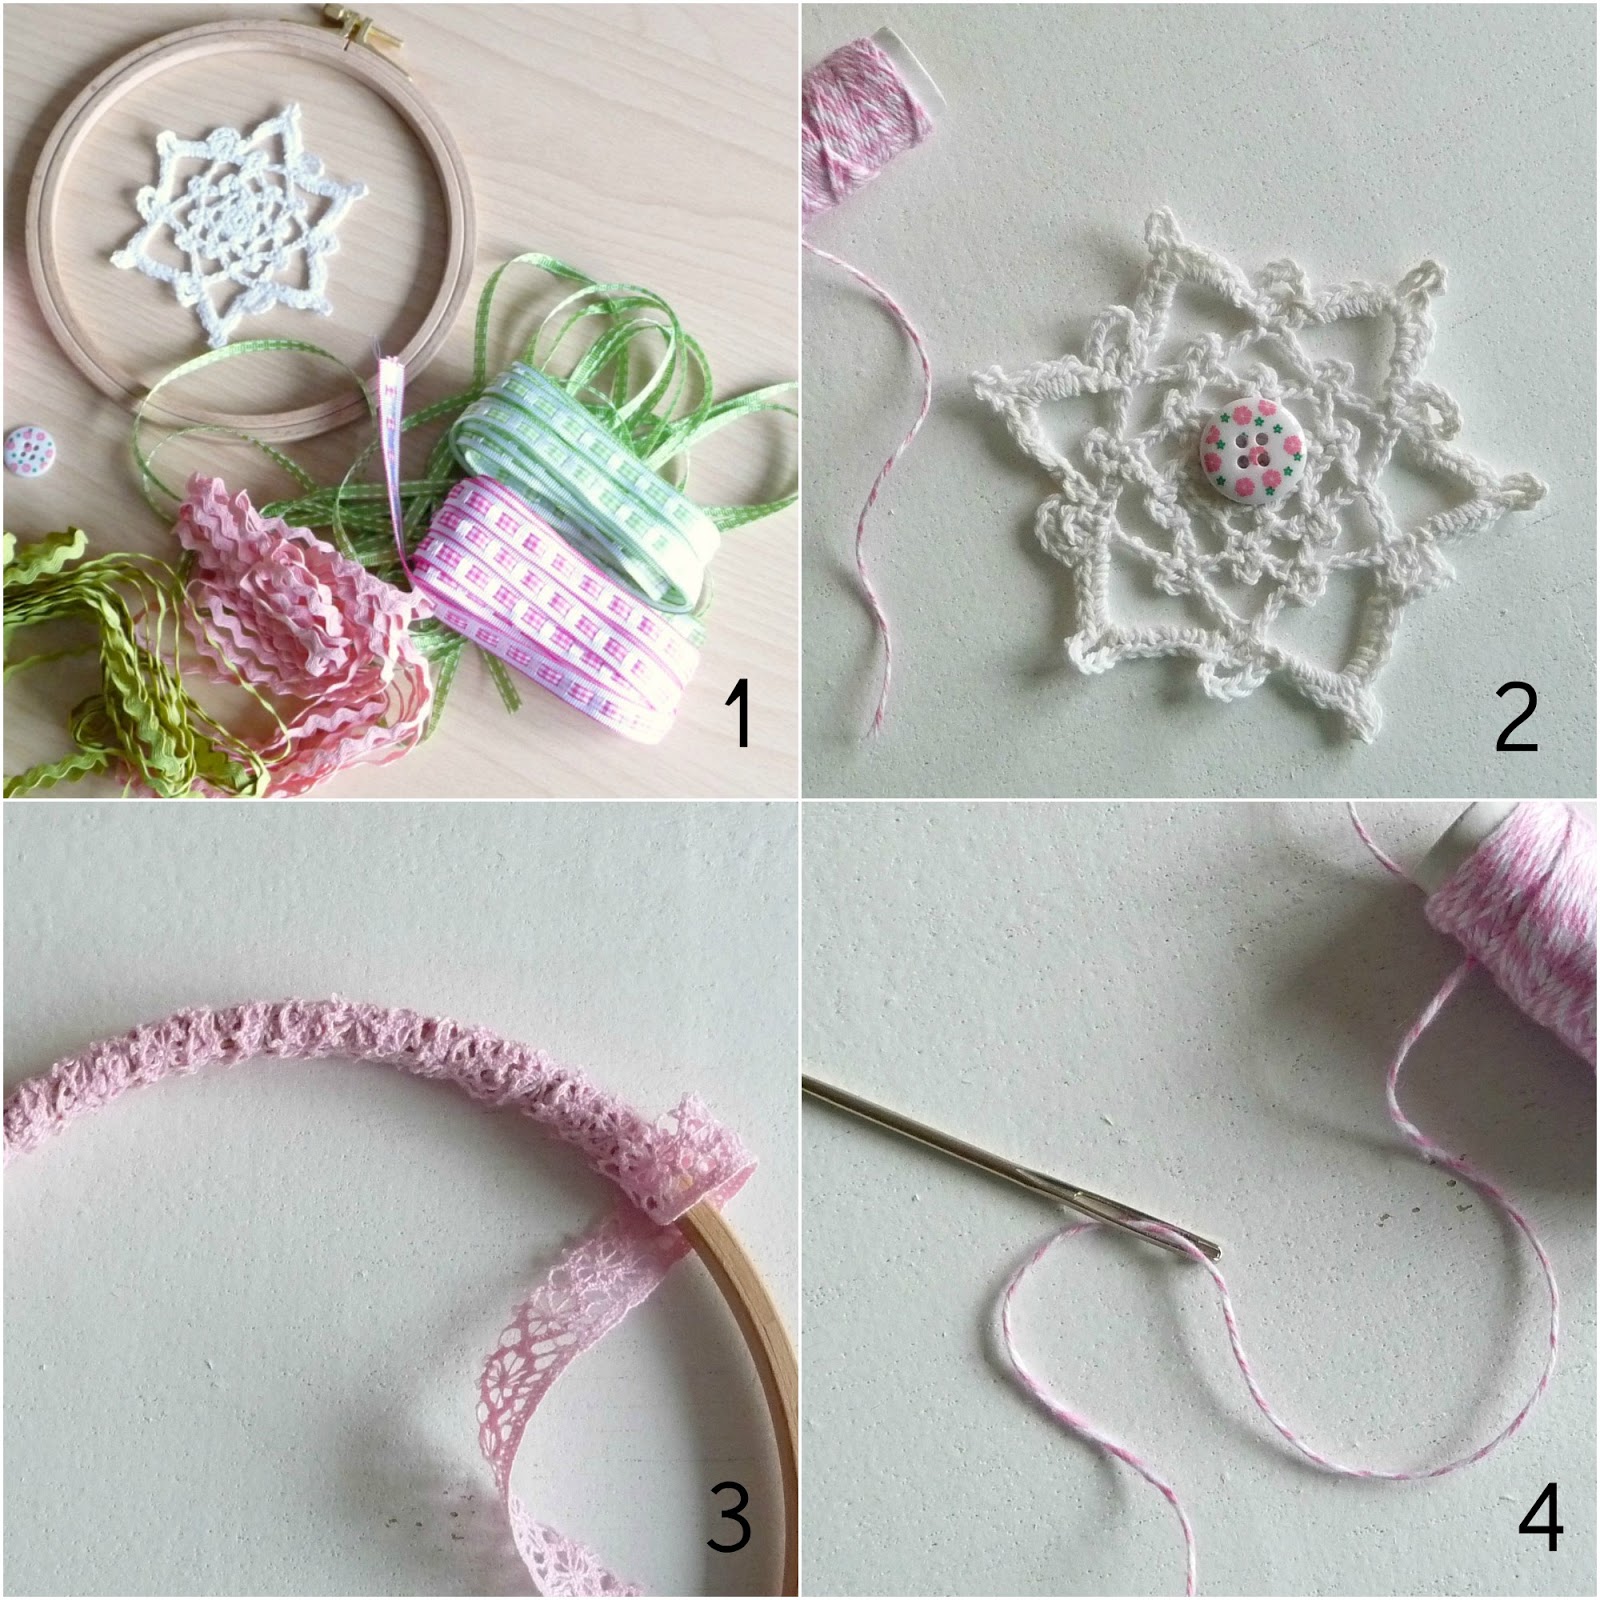
assortment of trims, lace, ribbons, rick rack (picture 1)
tape measure
*
Ihr benötigt

ein Ø 16 cm Ring (z.B. Innenring eines Stickrahmens)
ein/e Häkelstern- oder blume
ein Knopf
Kordel
Nadel mit großem Öhr (z.B. Wollnadel)
verschiedene Bänder, Spitze, Borten, Zackenlitze (Foto 1)
Maßband

The pictures aren't great as it's been gloomy here for ages. Sorry about that! Anyway, start by sewing on the button to the middle of your crochet doily (picture 2). Next, cut a length of lace and wind it round and round the hoop until it is covered completely (picture 3). You may want to add a dab of glue to the beginning and end to secure. Thread the needle with the twine (picture 4).
*
Da es hier seit Wochen düster ist sind die Fotos entsprechend dunkel. Tut mir leid! Zunächst den Knopf mittig am Häkelstern oder der Häkelblume annähen (Foto 2). Dann ein langes Stück Spitze abschneiden und den Ring damit komplett umwickeln (Foto 3). Eventuell am Anfang und Ende mit einem Klecks Leim fixieren. Die Kordel in die Wollnadel einfädeln (Foto 4).


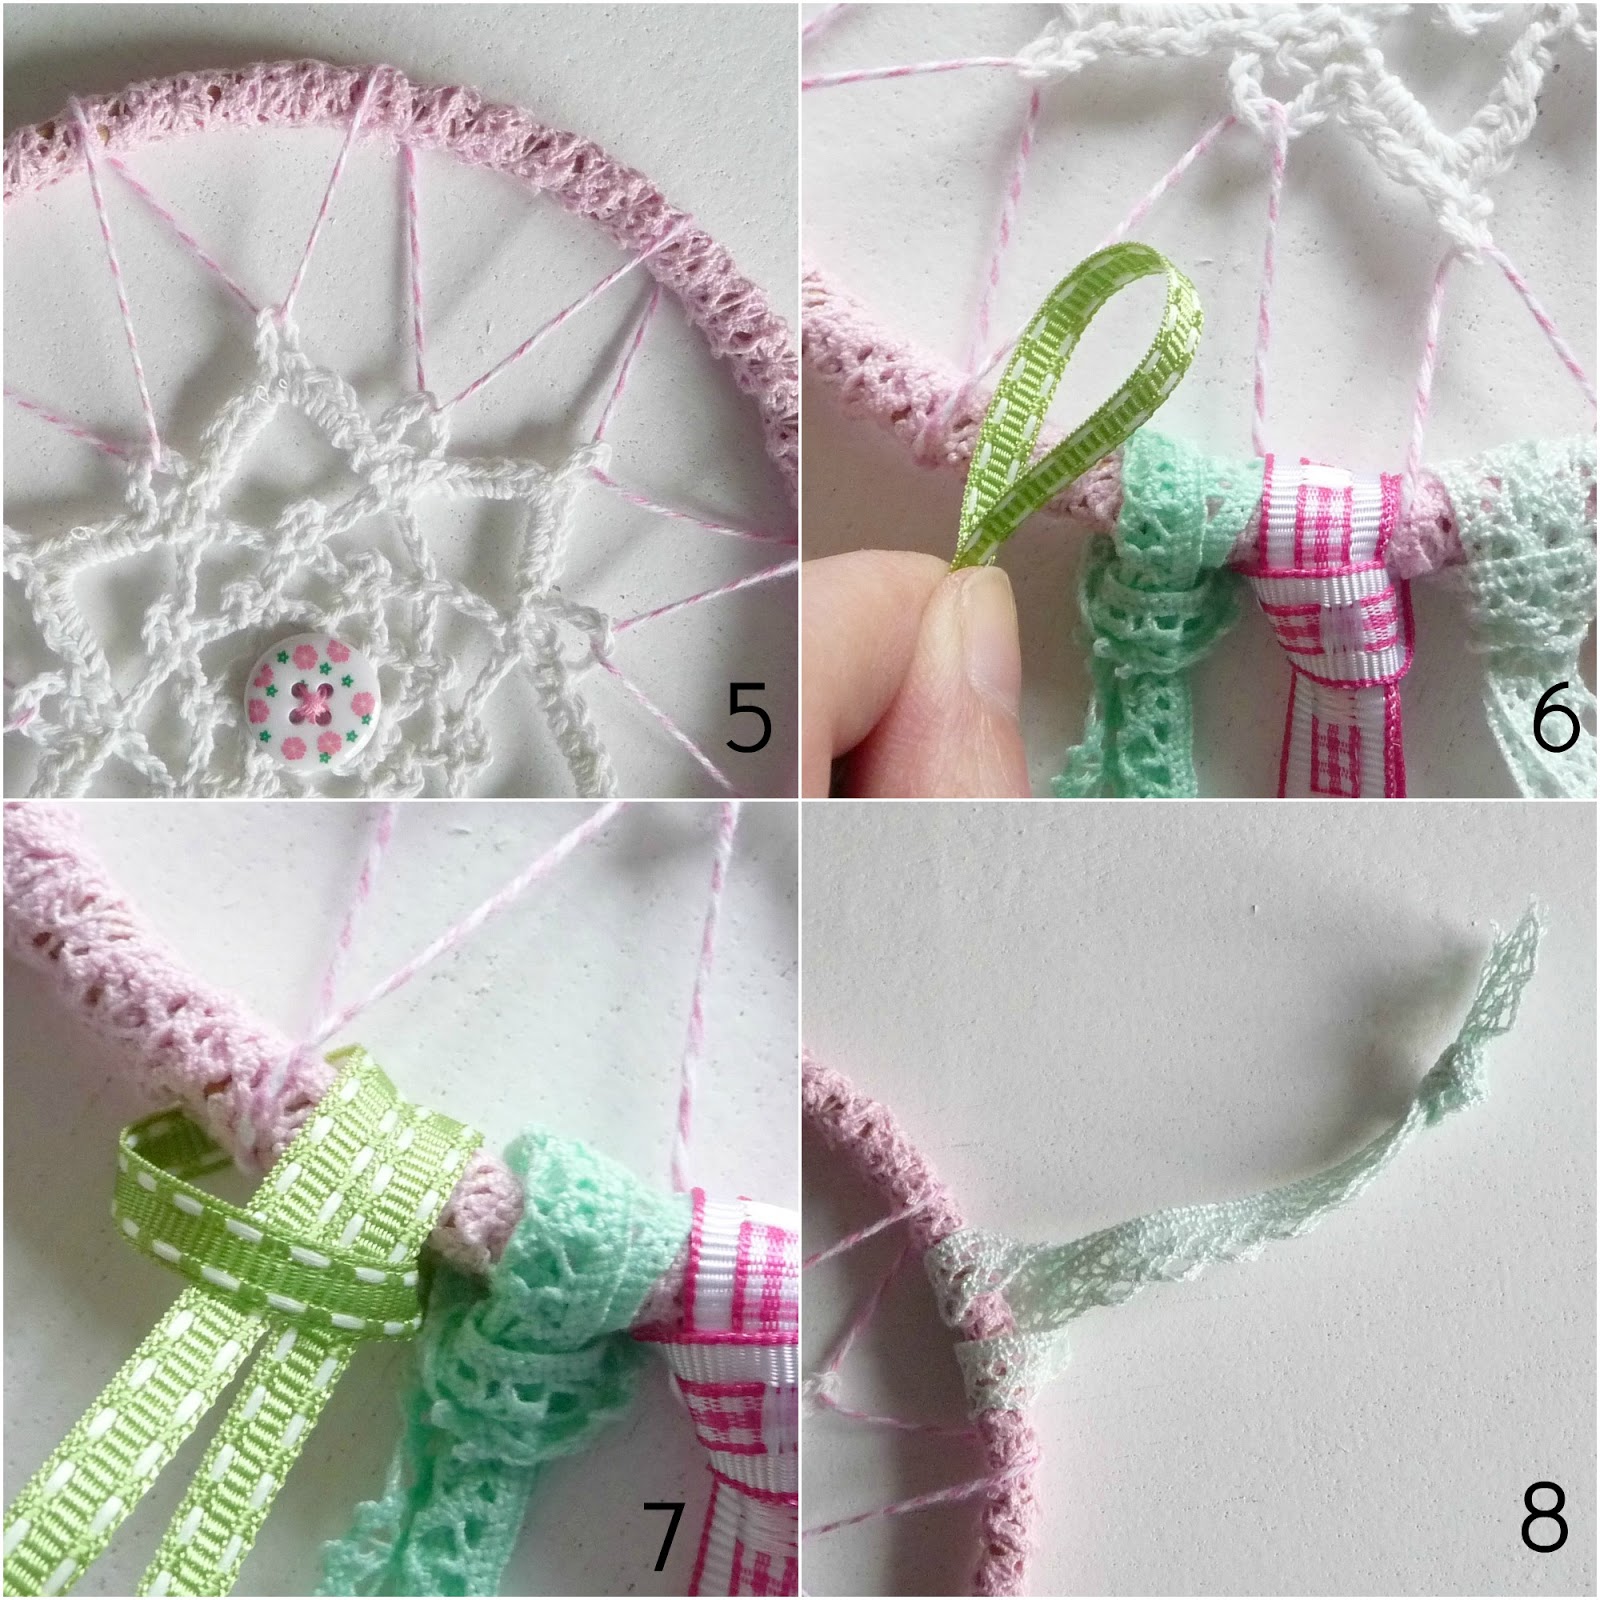
Place doily in center of hoop and push needle through one loop, then around the hoop and come up underneath and push through the next loop of the doily and so on...until you have attached it all around (picture 5). Adjust as necessary, cut twine and tie an unobtrusive knot. From trims cut lengths of 80 cm (about 31") each, double over and form a loop (picture 6). Loop around bottom of hoop and pull the two ribbons through. Tighten (picture 7). Tip: about 7 - 9 ribbons work quite well, spaced close together. Lastly, attach a piece of lace at the top for hanging (picture 8).

Den Häkelstern oder die Häkelblume in die Mitte des Rings platzieren. Nadel mit Kordel durch eine Schlaufe ziehen, um den Ring herum und von unten in die nächste Schlaufe etc....bis zum anderen Ende (Foto 5). Eventuell Kordel anpassen und Stern ausrichten. Kordel abschneiden und einen unauffälligen Knoten binden. Von den Borten je 80 cm abschneiden, doublieren und oben eine Schlaufe bilden (Foto 6). Schlaufe um den Ring legen und die zwei Enden der Borte durch und festziehen (Foto 7). Tipp: 7 - 9 Borten passen perfekt wenn sie nah beieinander geknotet werden. Zuletzt oben am Ring eine Spitzenschlaufe zum Aufhängen anbringen (Foto 8).

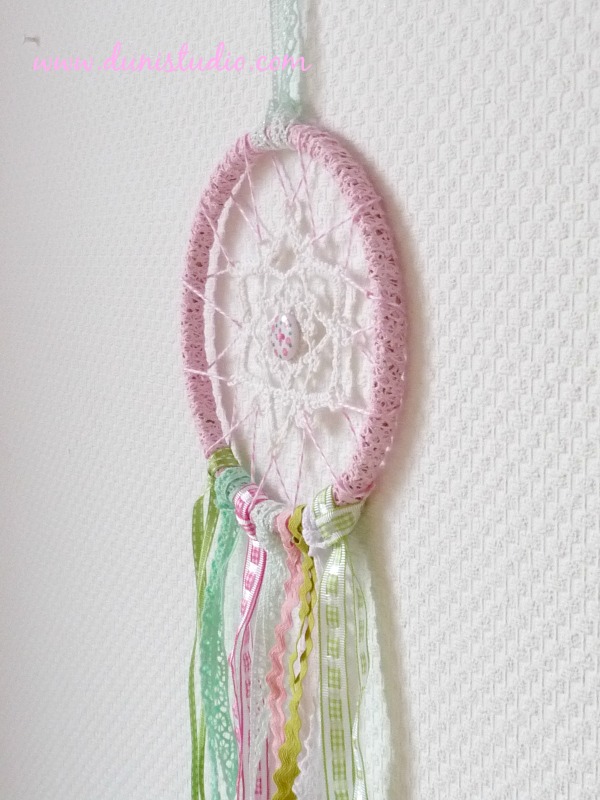
Enjoy the shabby chic dream catcher hung in the window or above your bed. Sweet pastel dreams :)
*
Nun kann der Traumfänger entweder vor dem Fenster oder über dem Bett aufgehängt werden. Ich wünsche süße pastellige Träume :)