Showing posts with label Christmas decor. Show all posts

Sunday, November 10

Tilda fabrics, Paper Goods & New Sashiko Threads

[Werbung/Anzeige/Advertisement]

Tilda Old Rose

Hello dear readers!

This year has gone by so fast; I can't believe Christmas will be here in 6 weeks. Looking back I have  spent a good chunk of my precious time in doctor's offices, so a lot of my planned projects had to be put on hold. I am one step closer to figuring out what is causing my persistent symptoms, so there's that. A while ago I decided to focus less on the physical pain and more on the things that bring me joy. The Tilda fabrics seen in the picture above definitely make my heart skip! There are matching buttons in two sizes and woven jacquard ribbon with rose motif as well. I made some Christmas decor using the small red rose and the large grey rose fabric.


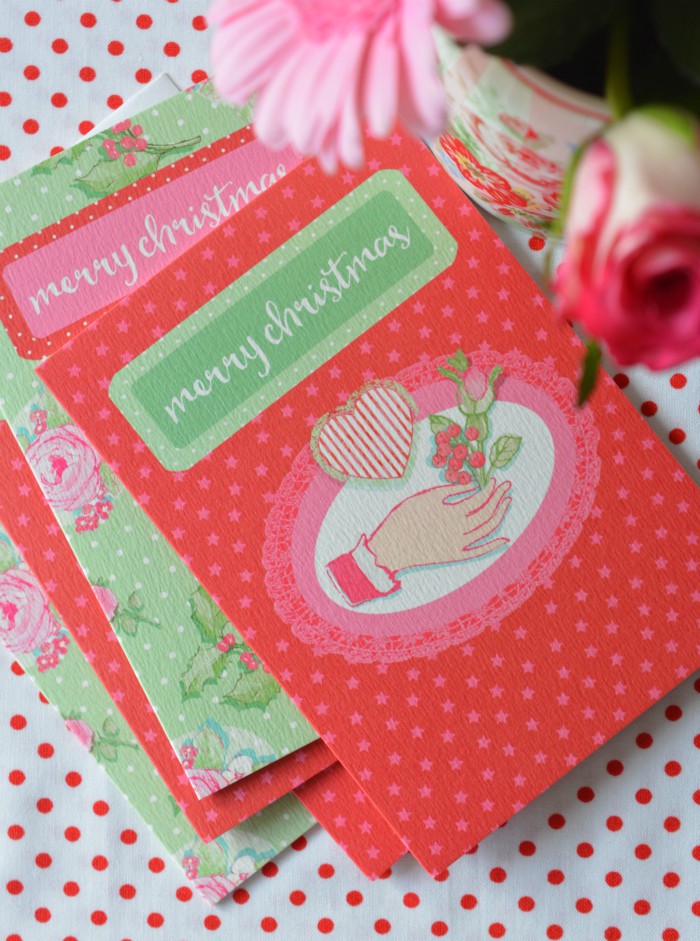
If you are looking for unique Christmas cards, check out these vintage-style card sets from April Rose. They come in sets of 8, with two designs and include a white envelope. There are four sets to choose from! Premium quality printed in England.

April Rose Card Sets

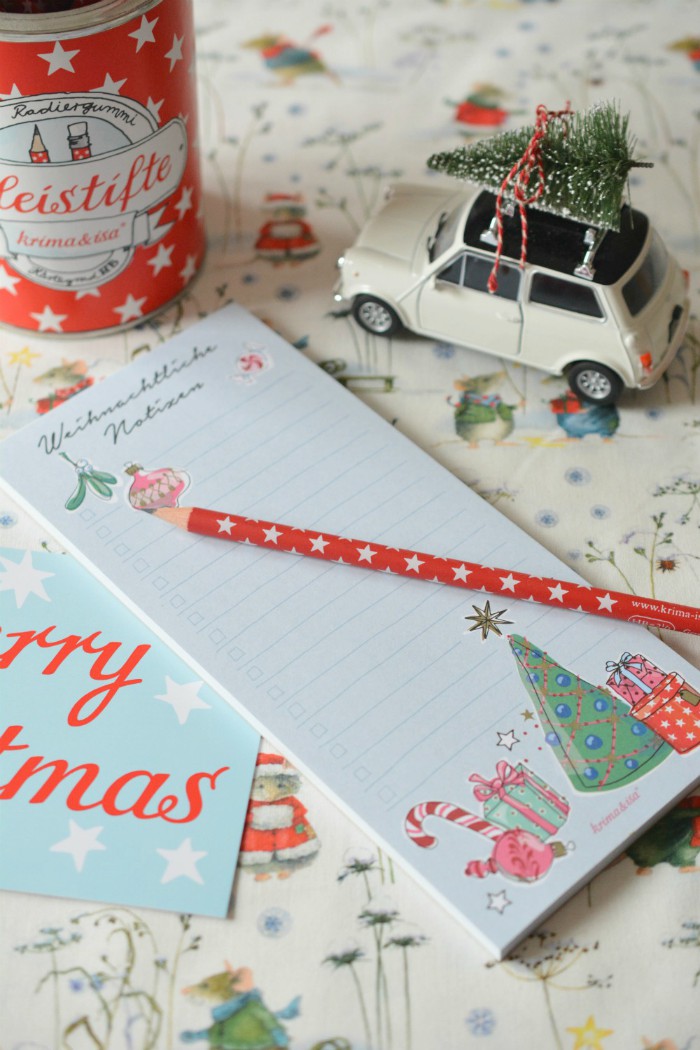
Jot down your Christmas gift or to-do list on these fun and practical Christmas-themed note pads from German paper goods supplier Krima & Isa. Matching pencils available too! Apart from these, there's a fun range of Christmas postcards, gift bags, tags, ribbons and advent stickers.

Krima & Isa

***

New in are these sweet and romantic fabrics from well-known Japanese fabric supplier Lecien. I had ordered these a long time ago, and I have to admit it's becoming increasingly difficult to acquire these fabrics. The bulk of fabrics usually go to the huge craft stores - independent stores like mine are at the bottom of the list. I'm lucky if I even get half of what I ordered. Nevertheless I love these floral prints from the Antique Flower 2019 collection!

Antique Flower in Pastel

Speaking of Japan, some of you might be familiar with Sashiko, the simple stitching tradition of northern Japan. Sashiko means "little stabs" creating little stitches that look a bit like rice grains. Originally this technique was used to mend and recycle garments with white thread. Nowadays Sashiko has developed into richly patterned and often brightly colored designs. I have been studying and practicing the art of Sashiko embroidery for several months now. I am still learning, but I find the results of the mostly geometric patterns quite satisfying. And now that we've entered the winter season, those long evenings at home are perfect for some meditative Sashiko stitching! You can find the original Sashiko threads in several colors in my shop. I especially like that they come on practical cones. To get started all you need is a long needle with a large eye and some fabric with an open weave, like linen, jeans fabric, cotton flannel etc. You don't require a hoop for this embroidery technique.

I am working on traditional pattern - Shippou

Mini Tutorial using Sashiko Thread


Apart from traditional Sashiko stitching, the thread is suitable for crossstitch, crochet and other crafts, such as tiny tassels or these wrapped beads - Here's my little tutorial for making a Sashiko thread bead necklace!


You will need:


wooden beads with large hole (as used for Makramee)
Sashiko thread
needle with large eye
glue
cord
small wooden beads (optional)

Cosmo Sashiko Thread

How to:


Thread the needle with a very long piece of Sashiko thread, double it up and tie a knot at the end. Dab a little bit of glue on the inside of the wooden bead and press the knotted end of the thread into it. Then start "wrapping" the bead with the thread, carefully pulling it through the hole. Make sure that all areas of the bead are covered. Weave the end through two or three threads on the inside and snip off. You can add a tiny bit of glue to secure on the inside. Make two more. 
Cut a piece of cord to the length you wish your necklace to be. Thread your Sashiko beads and (optional) smaller wooden beads and tie the ends. And you're done! Enjoy :)


 photo signature_zpscqkypdzs.png

Wednesday, December 9

Wordless Wednesday (Almost)

picture taken with smartphone

The Christmas Pyramids are one of the favourite products of the German Erz Mountains. Pictured is the giant version. (The figurines are revolving, therefore the image is a bit wobbly.) Typically people have a table top version that comes in various sizes from one to six tiers. When the candles are lit it creates a unique festive atmosphere and spreads warm light all over your living room.
*
Weihnachtspyramiden aus dem Erzgebirge sorgen für eine besonders festliche und gemütliche Stimmung in der Advents- und Weihnachtszeit. Oben seht Ihr ein gigantisches Exemplar. (Da sich die Pyramide dreht ist das Bild etwas verwackelt.) Für den Tisch zuhause gibt es sie von eins bis sechs stöckig. Die ruhige Drehbewegung sowie die detailreichen Figuren schaffen eine ganz besondere Atmosphäre.

linking up with my friend Verena today!

Friday, November 6

Rustic Miniature Christmas Tree DIY

I had so much fun creating these rustic fabric gift tags, and these rustic jam jar candles that I decided to create a rustic themed Christmas tablescape! In this tutorial I will show you how to make individual miniature Christmas trees and cute handstamped Kraft cards too! After all, Christmas is just around the corner...
Mir hat mein rustikales Stoff-Anhänger-DIY  und das Marmeladenglas-Upcycle so viel Spaß gemacht, dass ich gleich eine weitere DIY Idee im rustikalen Look zeigen möchte!  Es gibt drei Anleitungen für süße Mini-Bäumchen als Tischdeko und dazu gestempelte Karten aus Kraft Papier. Immerhin, bis Weihnachten ist es nicht mehr weit...


The cards are possibly the easiest you'll ever make :) From Kraft cardstock cut as many rectangles as you require to the size of 7" x 3.5". Score down the middle and fold. Using black ink stamp little Christmas motifs in the lower right corner. Christmas-themed rubber stamps can be found in most craft stores or online. Tie a piece of black gingham ribbon along fold. Done!
Diese Kärtchen aus Kraft Papier (cardstock) sind im Nu gemacht :) Aus dem Papier so viele 18 cm x 9 cm Rechtecke schneiden wie Ihr benötigt. Mittig falzen und zusammenklappen. Rechts unten mit kleinen weihnachtlichen Motiven bestempeln (Stempelkissenfarbe Schwarz). Die Gummistempel gibt es für wenig Geld im Bastelladen oder Internet. Mit schwarzem Dekoband an der Innenkante verzieren. Fertig!


And now the trees Und jetzt die Bäumchen

You'll need | Ihr benötigt

approx. 4.5" styrofoam™ cones | 11 cm Styropor® Kegel
burlap twine | Jutegarn
decorative wire | Basteldraht
assorted rustic ribbons and lace | verschiedene rustikale Borten und Spitze
wide burlap ribbon | breites Rupfenband
small white buttons | kleine weiße Knöpfe
thin double sided clear tape | schmales doppelseitiges Klebeband, durchsichtig
short steel pins A LOT  | kurze Stecknadeln aus Stahl SEHR VIELE
small wooden stars (such as tabletop confetti) | kleine weiße Holzsterne (Streuartikel)


Let's start with the easiest of all three ~ burlap twine and decorative wire

1. take one cone and stick a few double sided tape strips on it. The glue-y bit is clear, so it's not visible later on. 
2. + 3. make a knot in the twine and pin it to the top of the cone. Then proceed to wind it evenly around entire cone, until you reach the bottom. Cut of end and secure it by tucking it in the last row. The tape should hold everything in place nicely, but if need be you can secure the twine with a couple of pins here and there. 
Finish by winding some decorative wire around the cone and use a tiny piece of double sided tape to stick the wooden star on top :)


Wir fangen mit dem einfachsten Bäumchen an ~ Jutegarn und Basteldraht

1. Einige Streifen doppelseitiges Klebeband auf den Kegel kleben. Folie vorsichtig abziehen, darunter befindet sich der extrem haftende durchsichtige Leim. 
2. + 3. Ein Ende des Garns verknoten und mit einer Stecknadel an der Spitze fixieren. Dann das Garn gleichmäßig um dem Kegel bis zum Boden wickeln. Abschneiden und Ende unter die letzte Reihe stecken. Wer absolut sicher gehen will, dass das Ganze hält fixiert das Garn hier und da mit Stecknadeln.
Zum Schluß ein Stück Basteldraht (hier mit Sternen) um das Bäumchen wickeln und einen kleinen weißen Holzstern mit einem winzigen Stück doppelseitiges Klebeband oben aufkleben :)


The second one requires a little more time ~ rustic ribbon tree
Das zweite Bäumchen dauert etwas länger ~ rustikale Borten und Spitzen


1. for this tree you'll need plenty of steel pins. This is where my magnetic pin bowl comes in handy! Cut ribbon and lace into 3.2" pieces. 
2. fold over ribbon pieces and starting at the bottom pin around circumference of cone. Line up the next row to overlap the first one.
3. Continue pinning ribbons and lace until you reach the top.
4. Glue a small piece of ribbon horizontally, so it covers the raw edges of the top row.
Once again finish by sticking a small wooden star to the top!
1. für dieses Bäumchen benötigt Ihr sehr viele Stecknadeln. Da kommt meine DIY magnetische Nadelschale gerade recht! Die Borten und Spitze in 8 cm Stücke schneiden.
2. Borten und Spitze zur Hälfte legen. Von unten ringsherum mit Stecknadeln fixieren. Die nächste Reihe überlappend anbringen.
3. genauso weitermachen bis knapp unter die Spitze des Kegels.
4. mit doppelseitigem Klebeband ein Stückchen Dekoband um die Spitze wickeln, so dass die Kanten der obersten Reihe abgedeckt sind.
Zuletzt wie beim Bäumchen Nr. 1 einen kleinen Holzstern obendrauf fixieren!


you will need some dexterity for the final tree ~ burlap ribbon, rustic ribbon and buttons
das letzte Bäumchen benötigt etwas Fingerfertigkeit ~ Rupfenband, Borte und Knöpfe


1. start by sticking a few double-sided tape strips over the cone. Cut pieces of burlap and apply diagonally until cone is covered. You'll need to pin it here and there to hold the shape.
2. now wind the rustic ribbon diagonally over the burlap and fix with pins as before. Stick little buttons all over. Tip ► if you push the pins in at a 45° angle, the buttons won't fall off.
Finally, stick a little wooden star on top!


1. wie schon beim ersten Bäumchen zunächst ein paar Streifen doppelseitiges Klebeband aufkleben und Folie vorsichtig abziehen. Das Rupfenband in kleinere Stücke schneiden und diagonal um den Kegel kleben. Damit alles gut in Form bleibt hier und da mit Stecknadeln fixieren.
2. Rustikale Borte diagonal um den Kegel wickeln und mit Stecknadeln fixieren. Dann mit kleinen Knöpfen verzieren. Tipp ► Stecknadeln im 45° Winkel durch die Löcher im Knopf stecken - so halten sie besser.
Wie auch bei den anderen beiden Bäumchen: oben auf die Spitze ein Holzsternchen draufkleben!


Writing up this post not to mention waiting for a bright day to photograph the decor and trees took longer than actually making them! Really. But anyway, I hope you enjoyed this tutorial:)
 ♡♡♡
Diesen Post zu schreiben und die Fotos zu bearbeiten hat länger gedauert als das Basteln! Ehrlich. Aber hauptsache Euch hat dieses Tutorial gefallen :)


Wednesday, November 4

Advent, Advent... { 5 Minute DIY }


Hi everybody!        Hallo, ihr Lieben!


Okay, this post isn't supposed to make you feel anxious or anything. Just a gentle reminder that the first advent happens to be end of this month, yes this month ;-)
Of course there are plenty of traditional advent wreaths available, but for a crafty and non-traditional person like me I like to make my own unique version! What I like about this project is that you'll probably find many of the materials in your house already! I like easy projects with quick results.
*
Vielleicht mag dieses weihnachtliche Bastelprojekt dem einem oder anderen zu früh vorkommen, aber tatsächlich ist der erste Advent schon Ende diesen Monats! Traditionelle Kränze gibt es ja bereits zu kaufen, aber für nicht-traditionelle Menschen wie mich sind selbstgemachte einfach schöner und individueller :) Das Gute an diesem Projekt - das Material habt Ihr sicherlich schon zuhause! Ich mag einfache DIY Ideen.


This Christmas I've decided on a rustic/shabby chic theme
*
Dieses Weihnachten dekoriere ich im rustikalen/shabby chic Look

You'll need | Ihr benötigt

4 clean jam jars | 4 saubere Marmeladengläser
jute twine | Jutekordel
4 wooden buttons with large holes | 4 Holzknöpfe mit großen Löchern
numbered tags | nummerierte Anhänger
4 white pillar candles | 4 weiße Stumpenkerzen
rectangular cake platter | rechteckige Kuchenplatte

  1. you can make the numbered tags yourself or you can get them at craft stores
  2. wrap a length of minipompom trim around the top of the jam jar twice. Tuck in the ends.
  3. wrap a piece of jute twine around the top and secure with a knot. 
  4. thread the ends of the twine through the button holes and tie a bow. Fix the tag to the button
Repeat for remaining three jars. All that's left to do is place a candle in them and arrange on the cake platter. Easy, right?

  1. the nummerierten Anhänger selbst machen oder im Bastelladen kaufen
  2. ein Stück Minipompomborte zwei Mal um die obere Kante des Marmeladenglases wickeln, die Enden darunter einstecken.
  3. Jutekordel drumwickeln und verknoten.
  4. Enden durch die Knopflöcher ziehen und Schleife binden. Anhänger um den Knopf binden
Schritte 1 - 4 dreimal wiederholen. Nun die Kerzen in die Gläser stellen und auf der Kuchenplatte arrangieren. Wie gesagt, einfach und schnell :)


Rustic wooden buttons kindly supplied by Union Knopf 
*
große Holzknöpfe wurden mir von Union Knopf zur Verfügung gestellt


Please do not leave burning candles unattended!
Kerzen niemals unbeaufsichtigt brennen lassen!
Happy Crafting!

Monday, December 1

Monday Moodboard

Hi everybody! So, the first Advent has come and gone. This year I'm back to traditional red and green decor, but apart from my handmade wreath and Christmas elf I haven't done much in the way of decorating. How about you? Have you put up any decorations yet? Anyway, below are my favourite Christmas decor finds on Etsy :)
*
Hallo zusammen! Ich hoffe Ihr hattet einen schönen ersten Advent. Außer meinen Kranz und die Weihnachts Wichteline habe ich noch nicht viel dekoriert. Dieses Jahr mag ich es wieder klassisch Rot/Grün. Und habt Ihr schon alle weihnachtlich dekoriert? Nachfolgend meine MontagsCollage mit meinen persönlichen Deko-Favoriten :)
 

 1 -- 2 -- 3 -- 4

Thursday, November 29

Vorfreude...

...means pleasant anticipation.
I've been happily admiring the Christmas decor on other people's blogs! I'm later than usual at bringing on the Christmas cheer this year plus I haven't written a single card yet. The other day I finally got out my boxes containing all manner of Christmassy stuff. I'm sticking with traditional colours this year as well. I just love red, white and green with a sprinkling of gold!


Beim Blogrunde drehen habe ich schon viele bezaubernde Weihnachtsdeko entdeckt! Ihr seid alle so wahnsinnig kreativ; das ist so schön inspirierend! Ich bin spät dran dieses Jahr, und Karten habe ich auch noch keine geschrieben. Vor ein paar Tagen habe ich dann endlich meine Kisten mit Weihnachtsdeko alt und neu rausgeholt. Dieses Jahr wird wieder traditionell in Rot, Weiß, Grün mit etwas Gold geschmückt!


Apart from Christmas we have St. Nicholas Day coming up on the 6th of December. I like to keep some candy bags ready for little guests. These cute DIY bags can be downloaded from Serena's fabulous Farm Chicks site. They are so easy to make and look really festive!
*
Für den Nikolaustag habe ich diese hübschen Bonbontüten gebastelt. Die Vorlagen gibt es als kostenloses Download von der lieben Serena von The Farm Chicks. Die Anleitung ist zwar komplett auf Englisch, aber die Anleitungsbilder zeigen sehr gut wie man die Vorlage falten muss, damit diese Tüten enstehen. Wirklich ganz einfach!


We're thinking about getting a fake tree this year. Only a little one that can be placed on the sideboard. We never have a real tree, because we share our home with cats. We think it's too dangerous as they would either try to climb it or chew it (poisonous for cats). Most likely the tree would come crashing down at some point...
Anyway, I've made some decorative heart ornaments to hang on the tree if we ever find one. If not they look equally pretty hung in the kitchen, on a doorknob or dangling from a gift. You can purchase a set of three in my Etsy shop!


Kein Weihnachten ohne Herzen! Diese hier sind von mir handgefertigt und sind für den künstlichen Baum gedacht, den wir aber noch nicht gefunden haben ;-) Wir suchen nur ein kleines Bäumchen welches wir auf die Anrichte stellen können. Ein echter Baum kommt wegen unserer Stubentiger (und potentielle Baum-Kraxler) nicht in Frage. Der würde nämlich über kurz oder lang samt Deko umstürzen. Außerdem sind die Tannennadeln für Haustiere giftig, mal abgesehen davon, dass der Baum in der Plantage höchstwahrscheinlich mit Spritzmitteln behandelt worden ist.

***

I totally love this snow globe. The bottom part is a music box and I wish you could hear the sweet music (silent night)! This is one of my favourite decorations. The Santa and Snowman look so cheerful and always put a smile on my face :)
*
Diese Schneekugel ist eine meiner liebsten Weihnachtsdekorationen. Im Sockel befindet sich ein Spielwerk - wenn man es aufzieht ertönt "Stille Nacht", das wohl bekannteste Weihnachtslied der Welt. Dieses Weihnachten werden wir es wohl wieder öfter hören. hihi


So what about you? Are you ready for Christmas yet? I hope my post got you in the mood at least!!
*
... und von Euch weiß ich ja, dass Ihr fleissig am Basteln und Dekorieren seid :) In diesem Sinne -

Happy Decorating!