
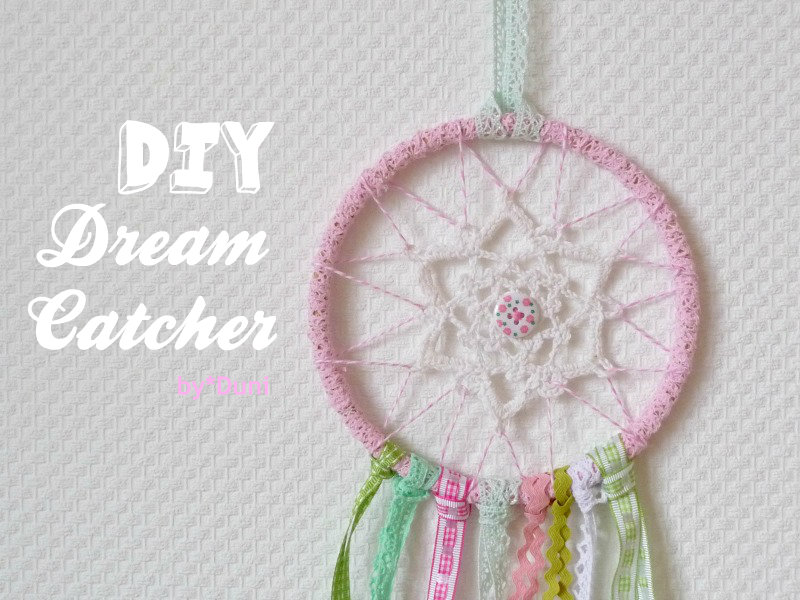
In my effort to dispel the winter blues I've been creating a lot of Spring-themed items! I was happily surprised when the good people at Union Knopf, a leading German manufacturer of buttons and misc. haberdashery sent me a box full of trims and laces in lovely pinks and greens :)
Since I wanted to utilize as many ribbons and trims as possible I came up with this shabby chic dream catcher DIY idea! This project can easily be done with school-age kids.
*
Allmählich bin ich des Winters überdrüssig. Umso mehr habe ich mich gefreut als ich neulich von den netten Kollegen von der Firma Union Knopf ein Paket mit sämtlichen frühlingshaften Bändern und Spitzen bekommen habe. Spontan kam mir diese DIY Traumfänger Idee, da ich so viele Bänder wie möglich in einem Projekt benutzen wollte! Dieses Projekt ist auch für Schulkinder geeignet.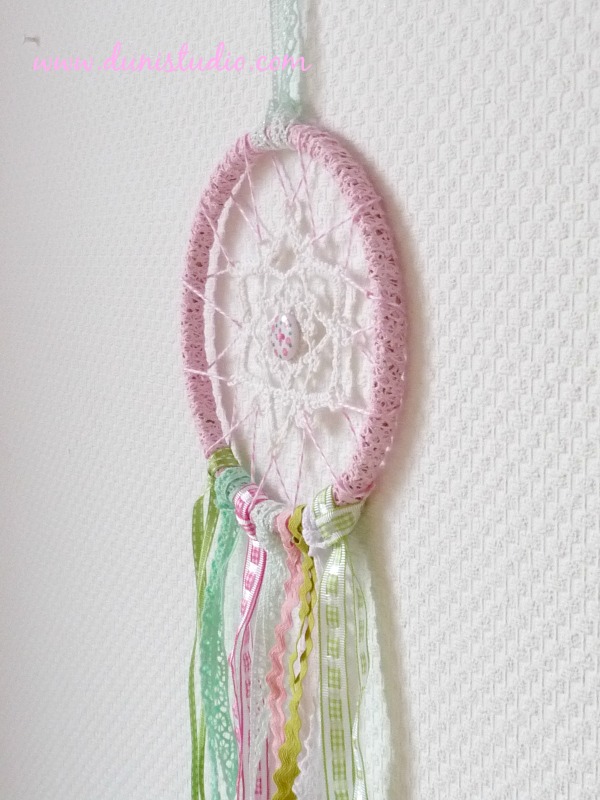
You will need
one Ø 16 cm (about 6") ring (the inside ring of an embroidery hoop works perfectly)
one crochet doily to fit in the center of the ring
one button
twine
a needle with a large eye (i.e. wool needle)
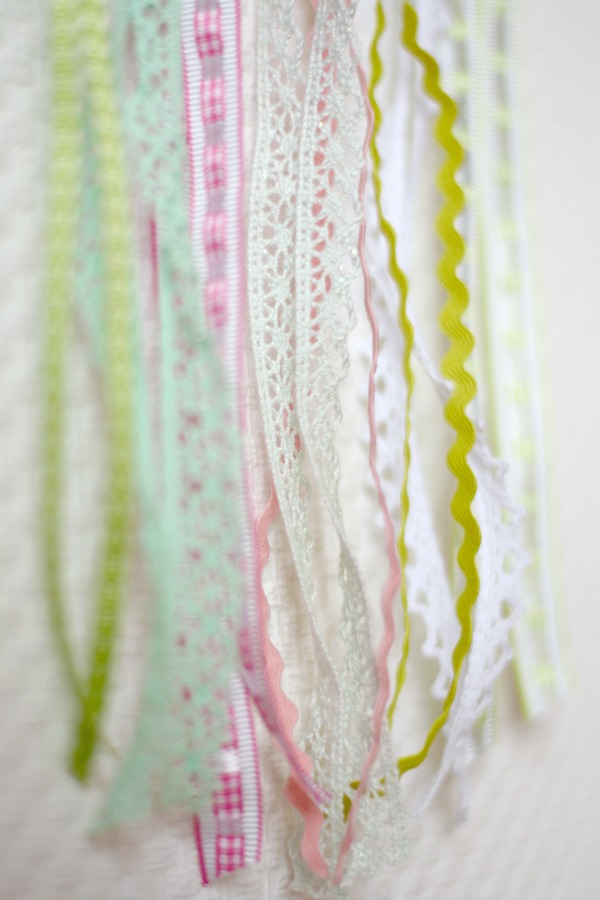
assortment of trims, lace, ribbons, rick rack (picture 1)
tape measure
*
Ihr benötigt
ein Ø 16 cm Ring (z.B. Innenring eines Stickrahmens)
ein/e Häkelstern- oder blume
ein Knopf
Kordel
Nadel mit großem Öhr (z.B. Wollnadel)
verschiedene Bänder, Spitze, Borten, Zackenlitze (Foto 1)
Maßband
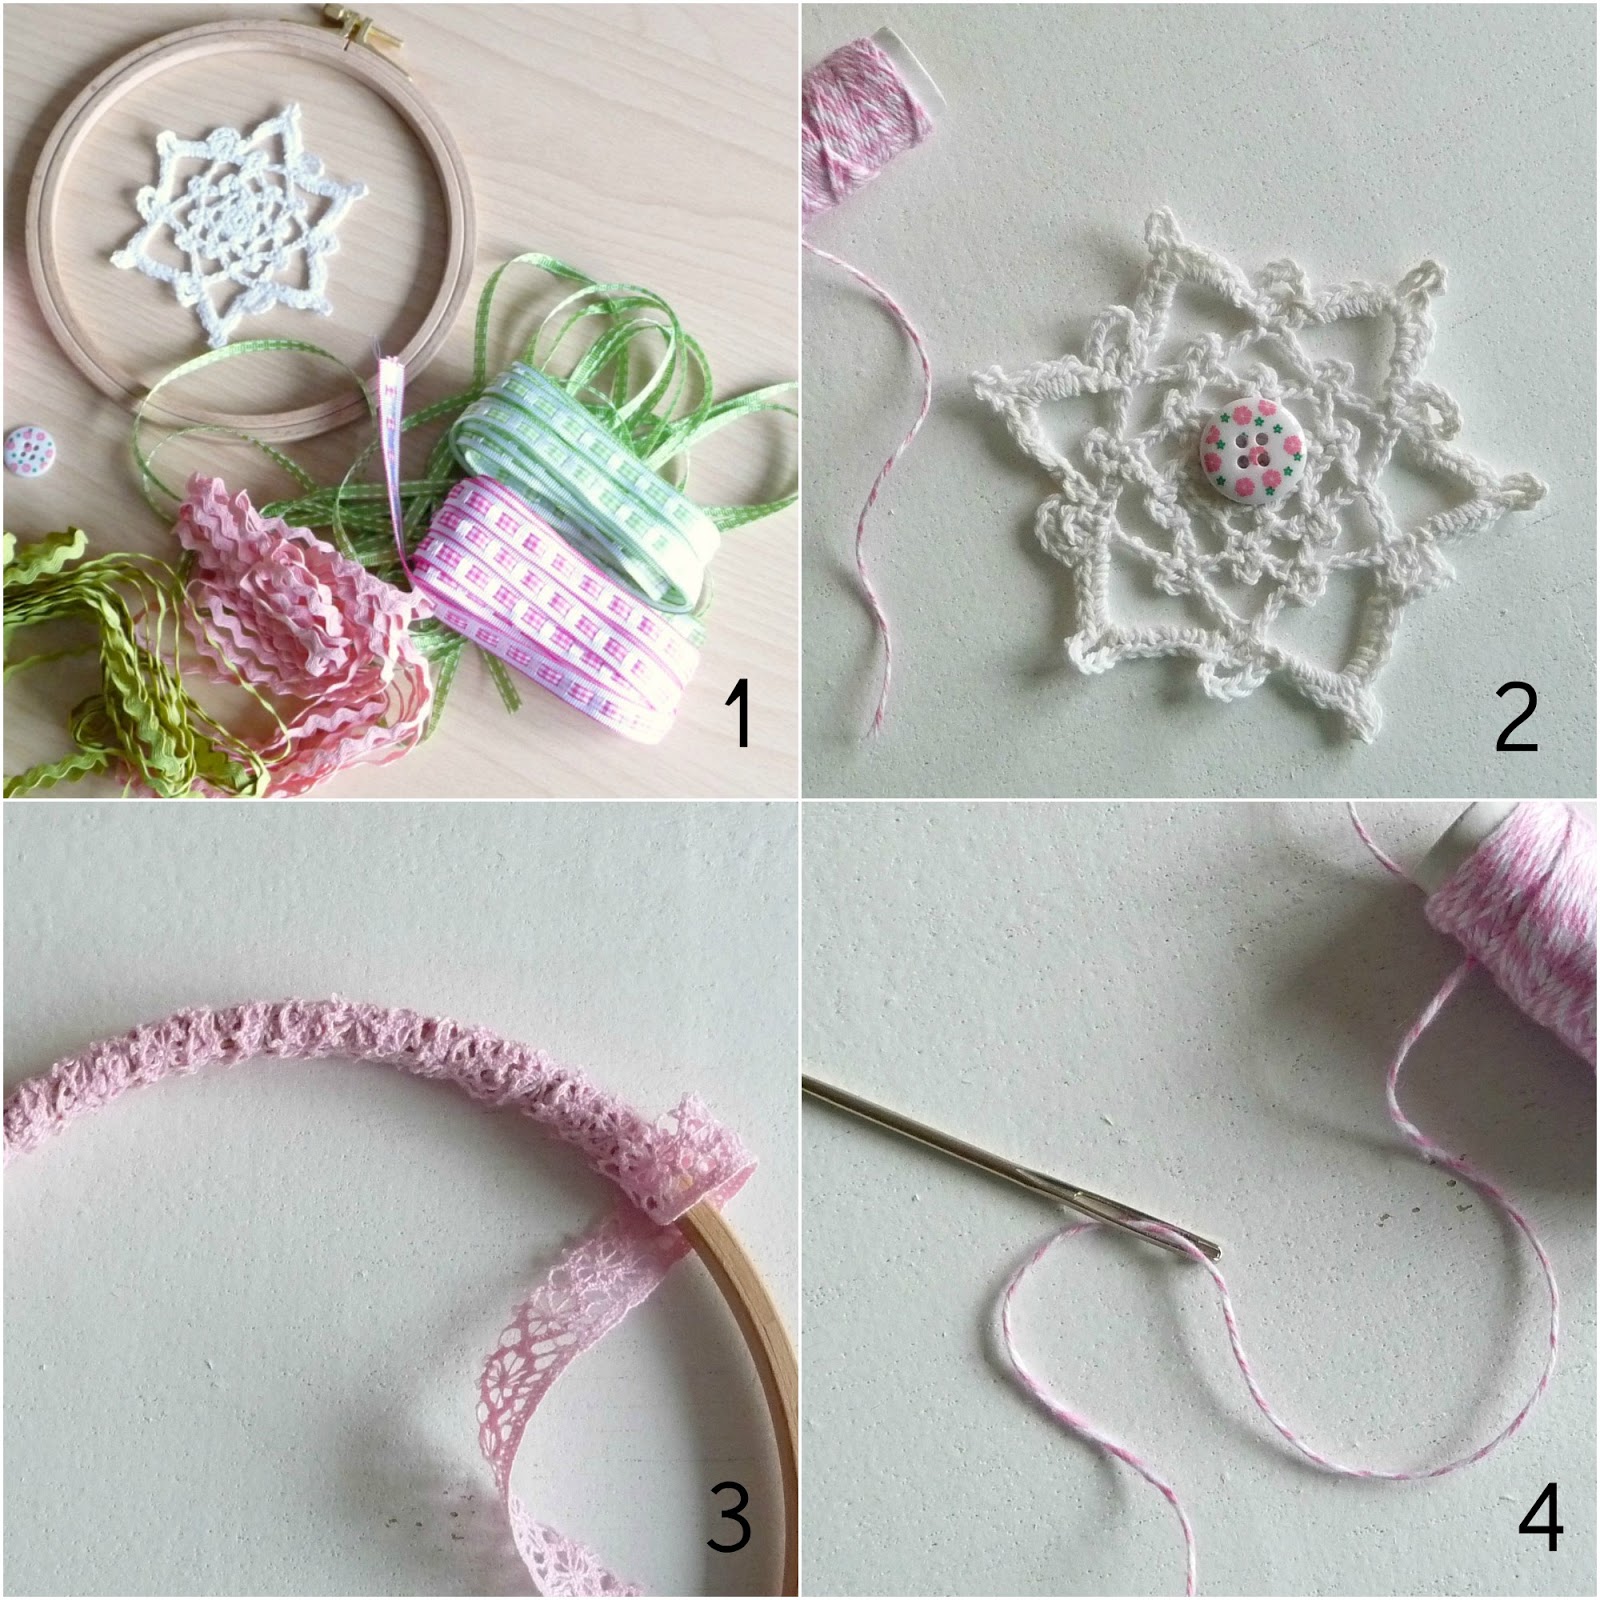
The pictures aren't great as it's been gloomy here for ages. Sorry about that! Anyway, start by sewing on the button to the middle of your crochet doily (picture 2). Next, cut a length of lace and wind it round and round the hoop until it is covered completely (picture 3). You may want to add a dab of glue to the beginning and end to secure. Thread the needle with the twine (picture 4).
*
Da es hier seit Wochen düster ist sind die Fotos entsprechend dunkel. Tut mir leid! Zunächst den Knopf mittig am Häkelstern oder der Häkelblume annähen (Foto 2). Dann ein langes Stück Spitze abschneiden und den Ring damit komplett umwickeln (Foto 3). Eventuell am Anfang und Ende mit einem Klecks Leim fixieren. Die Kordel in die Wollnadel einfädeln (Foto 4).
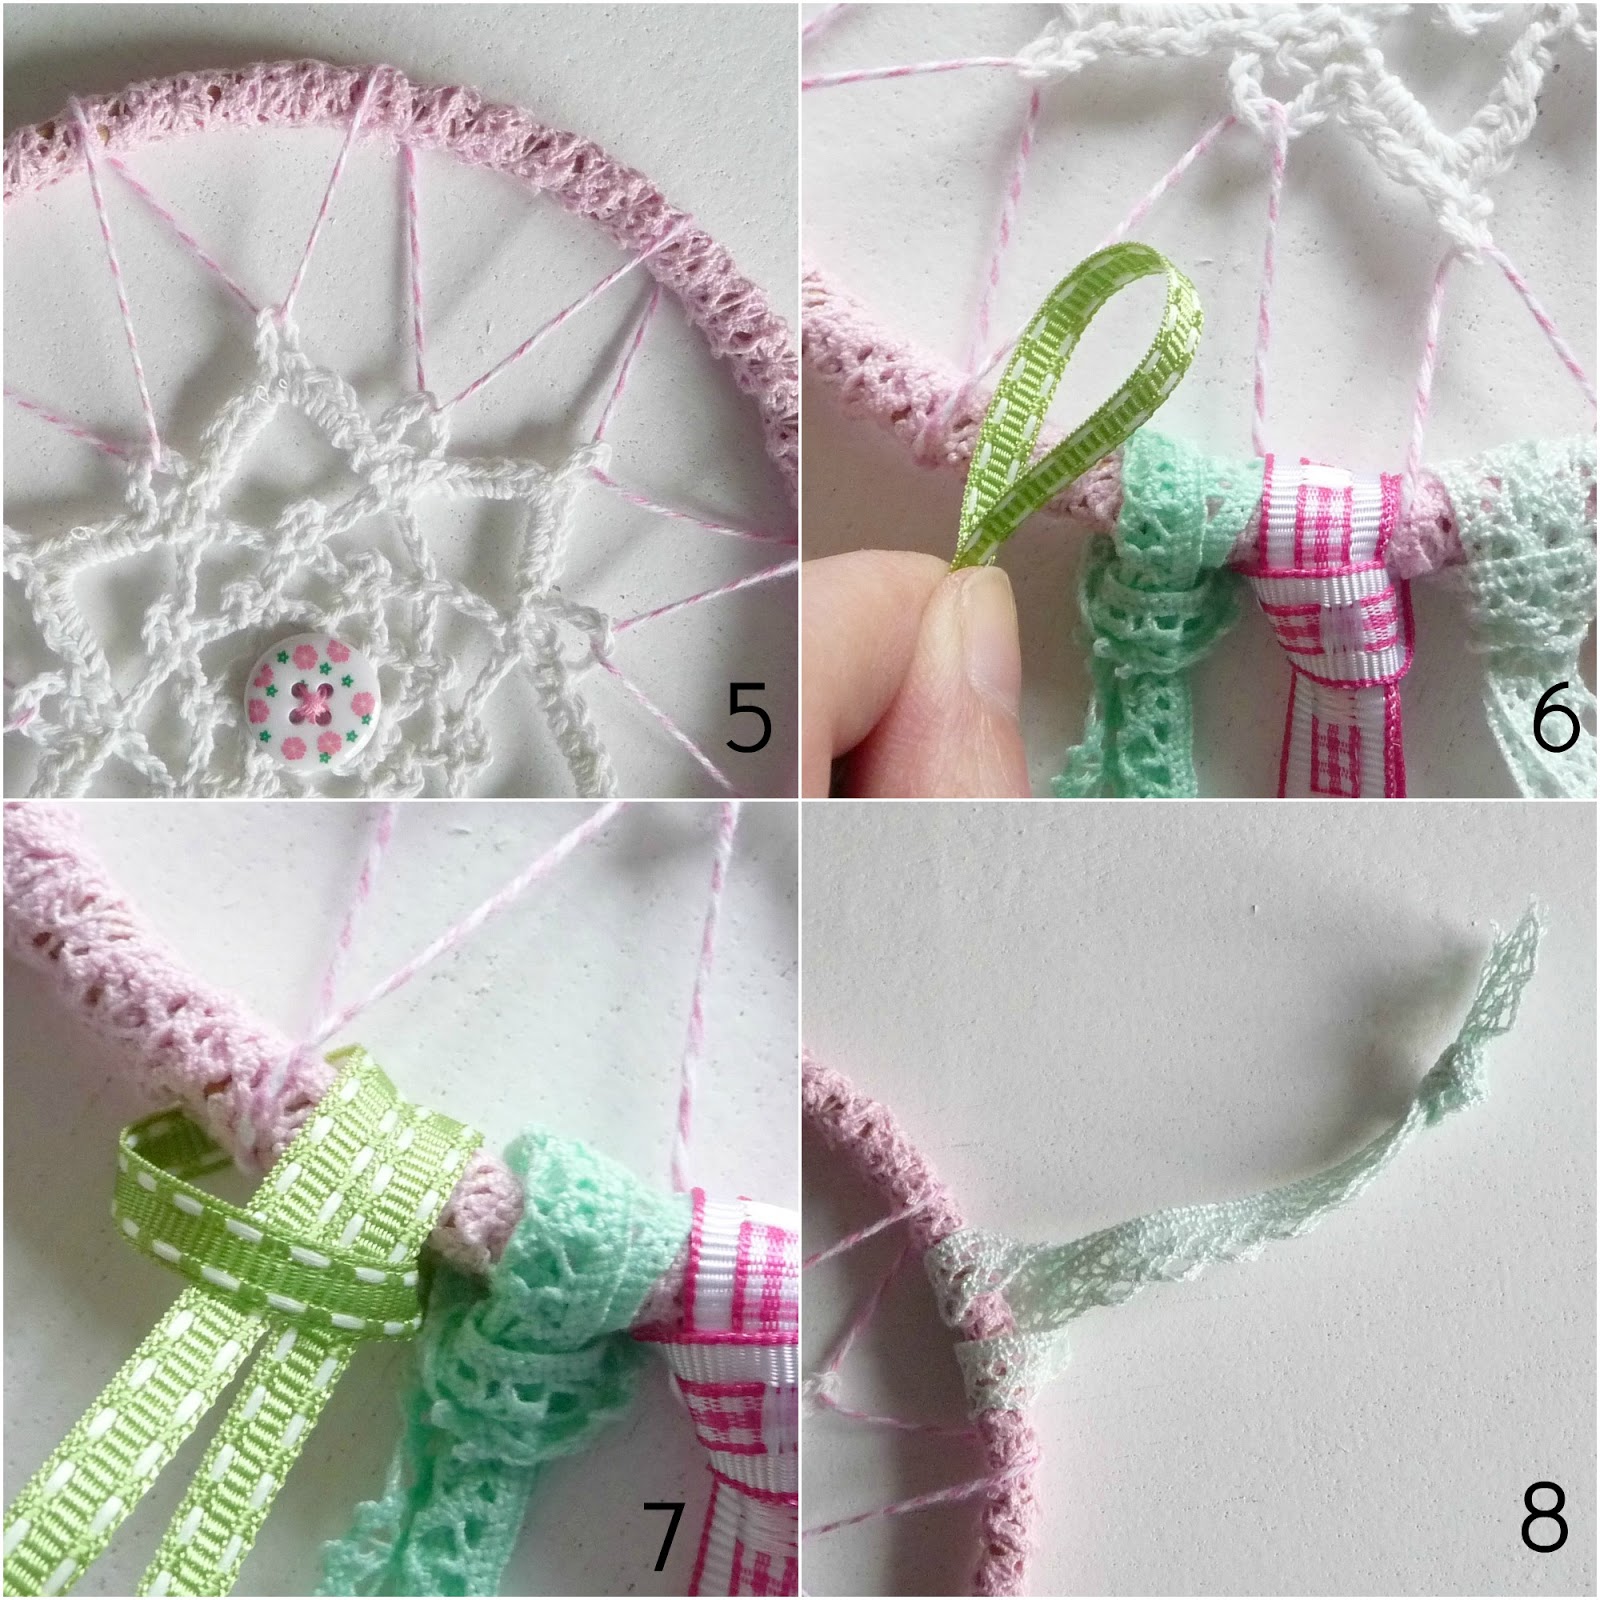
Place doily in center of hoop and push needle through one loop, then around the hoop and come up underneath and push through the next loop of the doily and so on...until you have attached it all around (picture 5). Adjust as necessary, cut twine and tie an unobtrusive knot. From trims cut lengths of 80 cm (about 31") each, double over and form a loop (picture 6). Loop around bottom of hoop and pull the two ribbons through. Tighten (picture 7). Tip: about 7 - 9 ribbons work quite well, spaced close together. Lastly, attach a piece of lace at the top for hanging (picture 8).
Den Häkelstern oder die Häkelblume in die Mitte des Rings platzieren. Nadel mit Kordel durch eine Schlaufe ziehen, um den Ring herum und von unten in die nächste Schlaufe etc....bis zum anderen Ende (Foto 5). Eventuell Kordel anpassen und Stern ausrichten. Kordel abschneiden und einen unauffälligen Knoten binden. Von den Borten je 80 cm abschneiden, doublieren und oben eine Schlaufe bilden (Foto 6). Schlaufe um den Ring legen und die zwei Enden der Borte durch und festziehen (Foto 7). Tipp: 7 - 9 Borten passen perfekt wenn sie nah beieinander geknotet werden. Zuletzt oben am Ring eine Spitzenschlaufe zum Aufhängen anbringen (Foto 8).

Enjoy the shabby chic dream catcher hung in the window or above your bed. Sweet pastel dreams :)
*
Nun kann der Traumfänger entweder vor dem Fenster oder über dem Bett aufgehängt werden. Ich wünsche süße pastellige Träume :)


Guten Morgen liebe Duni,
ReplyDeleteDu wirst lachen - meine Tochter hat sich erst vor zwei Wochen, zusammen mit ihrer Freundin, einen Traumfänger selbst gemacht.
Und jetzt sehe ich Deinen. Er ist so hübsch, Deine Farbzusammenstellung ist mal wieder einmalig.
Und, dass Du auch einen Häkelstern in die Mitte gesetzt hat, sieht so hübsch aus.
Danke für die tolle Beschreibung, den muss ich mal meiner Tochter zeigen.
Liebe Grüße an Dich, ich wünsche Dir ein sonniges Wochenende!
ANi
Liebe Duni,
ReplyDeletedas ist ja wohl der süßeste Traumfänger, den ich jemals gesehen habe, und noch dazu spielend einfach nachzumachen! Jetzt rate mal, was ich am nächsten grauen Nachmittag mit Tochter Klein (und Groß vielleicht auch) machen werde?
Grüße aus dem (ich traus mich gar nicht zu sagen) sonnigen München,
Karin
Awww meine allerliebste Duni ❤ Endlich komm ich wieder dazu hier mal ein bisschen rumzustöbern :> Und gleich seh ich wieder den tollen Shabby Chic Style *__* Ich liebe es wie du deine Sachen anfertigst! Allein die ganzen Bänder sehen zusammen echt schick aus ❤ Da bekommt man sicher ganz süße Träume hihi ;D
ReplyDeleteFühl dich geknuddelt meine Liebe und hab ein super tolles Wochenende :*
Deine Duni ❤
Hallo liebe Duni,
ReplyDeleteDein Dreamcatcher ist so wunderschön !
Und die Anleitung ist einfach und gut geschildert. Vielen Dank, da weiß ich jetzt, wie ich meine Bändchenreste sinnvoll upcyceln kann.
Viele liebe Grüße, Synnöve
this is just lovely Duni! and what a great idea for those winter blues. I know I have them!!
ReplyDeleteNice use of trims and colors perfect for lovely spring!!! This reminded me of my time of teaching in elementary - we done a lot of weaving and crafts! Happy spring and happy women international day! Wishing you my friend a lot of sweet wishes!!! hugs)))
ReplyDeleteOm my gosh. That is so cute. I love the colors. What a great idea.
ReplyDeleteThis came out so lovely! What a fantastic idea!
ReplyDeleteI got a embroidery hoop a while ago at the thrift shop for 10 cents. That and the ribbons I always buy without having a project in mind, might make an awesome dreamcatcher, thanks for sharing. And I hope you'll have a lovely start of the weekend!
ReplyDeleteLiebste Duni,
ReplyDeletedas ist ein ganz zauberhafter Dreamcatcher! Danke auch, daß Du Dir die Mphe gemacht hast, das so gut zu beschreiben, für die, die es auch mal versuchen wollen:O)
Ich wünsche Dir ein wunderschönes frühlingshaftes Wochenende!
♥ Allerliebste Grüße , Claudia ♥
How pretty and feminine! And very easy!
ReplyDeleteawesome! I've been seeing dreamcatchers on Pinterest and wonder if they are becoming popular again! They are definitely very simple to make.
ReplyDeleteI love this Duni! Dreamcatchers are so in right now and I love how unique this one is. Can't wait to make one.
ReplyDeleteWhat a gorgeous project - I love it!
ReplyDeleteSarah
I would have never thought of that but I just love it! But then, what's not to love about pink and green?!
ReplyDeleteReally beautiful and calming Duni! I have been wanting to make a dream catcher with wire, beads and charms. Someday I'll get to that project!
ReplyDeleteSo sweet! I had a dreamcatcher as a young child, and I've noticed they're coming back into fashion this year. Yours is such a soft, beautiful take on the theme. Pinning!
ReplyDeleteQue Deus te dê um esplendoroso dia, com raios luminosos que te possam clarear os olhos para ver o quanto és importante. Deus Pai te fez assim: mulher importante e figura do próprio amor. Ele te moldou como uma rosa: forte e justa como os espinhos, linda e suave como as pétalas. (fonte:aqui)
ReplyDeleteFELIZ DIA INTERNACIONAL DAS MULHERES!
Um doce abraço, Marie.
oh I really like this and pastel dreams sound pretty inviting :)
ReplyDeleteWhat a fun piece! I love how you used a doily for the center. Now this is "sewing" even I can do :)
ReplyDeleteThat is so pretty! I think I could even make it too!
ReplyDeleteVery cute idea! So easy!
ReplyDeleteLiebe Duni ...
ReplyDeleteso mädchenhaft zart ist dein Traumfänger geworden ...
Soooooooooo schöööööööööööön ...
Herzliche Grüße
Jutta
such a pretty dream catcher!
ReplyDelete