
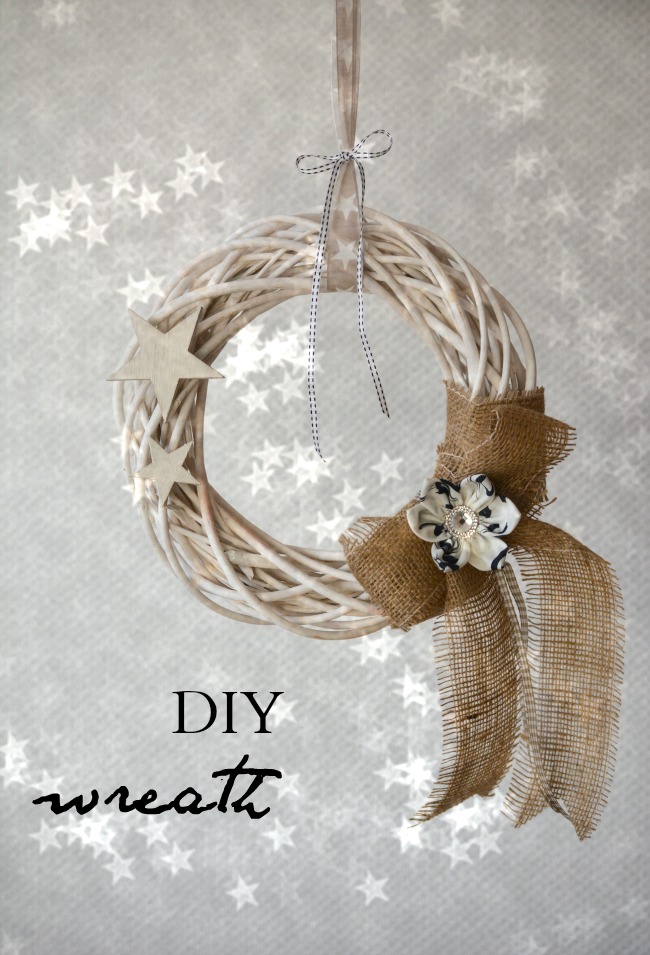
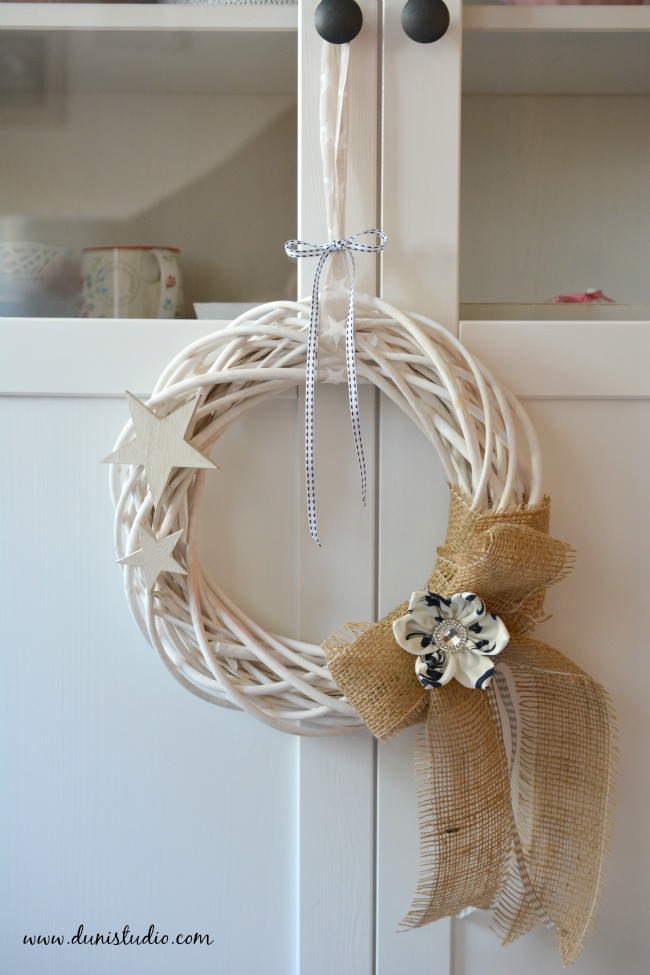
Holiday crafting is my favourite part in the run up to Christmas. True to this year's rustic & shabby chic theme I have created this simple wreath. It's easy to make and adds a subtle rustic touch to your home!
*
Weihnachtliche Deko basteln macht mir jedes Jahr besonders viel Spaß. Passend zum Rustikal-Shabby Chic Thema habe ich diesen Kranz kreiert. Er geht ganz einfach und macht trotzdem was her!
You'll need || Ihr braucht
white painted twig wreath | geweißter Weiden-Kranz
wide jute ribbon | Rupfenband
assorted ribbons | verschiedene Bänder
wooden stars | Holzsterne
fabric scrap | Stück Stoff
button | Knopf
hot glue gun | Heißklebepistole
basic sewing kit | Basic Nähutensilien

How to:
1. I decided on an asymmetrical design with the bow slight off-center to the right. Hot glue this area all around.
2. Wrap jute ribbon around the glued part a few times to create a base.
3. Cut a length of jute ribbon and overlap to create a "bow" shape. Pinch the middle.
4. Attach to base by winding gingham ribbon around the middle a few times and secure with a knot.
(hidden at back). Snip the ends of jute ribbon to create pointy tips.
*
So geht's:
1. Mein Design ist asymmetrisch, d.h. die Schleife sitzt etwas rechts von der Mitte unten. Dieses Stück großflächig mit Heißkleber bedecken.
2. Ein Stück Rupfenband zweimal darum wickeln und gut andrücken. Dieses bildet die Basis.
3. Längeres Stück Rupfenband abschneiden und zur Schleife legen. Mittig zusammendrücken.
4. Schmales Karoband mehrmals um die Mitte wickeln und mit Knoten (auf Rückseite) fixieren. Enden hängen lassen. Enden des Rupfenbandes so einschneiden, dass je zwei Spitzen entstehen.
Finishing touches | das Werk vollenden

The fabric flower is the icing on the cake! Here's my quick and lazy easy way to do it:
1. & 2. For six petals draw three circles (I used a container with 4" diameter) on the wrong side of fabric and cut out. 3. Halve each circle to make six semi-circles. 4. Fold each in half, right sides facing and edge stitch as shown. 5. Turn right side out and place seam at the back. 6. Use a basting stitch at rounded edge. Sew one right after the other. 7. You should end up with something like this. 8. Carefully pull on the bobbin thread from each side to create petals, tighten and knot each end. 9. Stitch first and last petal together to form a flower. Turn over and handstitch around raw edge through all petals to secure.
*
Die Stoffblume ist das i-Tüpfelchen am Kranz! Die Blume ist ruck-zuck genäht, so geht's:
1. & 2. Für sechs Blütenblätter drei Kreise (ich habe einen Übertopf mit Durchmesser 10 cm benutzt) auf die Rückseite des Stoffes zeichnen und ausschneiden. 3. Kreise halbieren. 4. Halbrunde rechts auf rechts zusammenlegen und knappkantig steppen (siehe Foto). 5. Auf Rechts drehen und Naht nach hinten legen. 6. Mit einem langen Geradstich die Blüten nacheinander steppen. 7. So sollte es aussehen. 8. Vorsichtig von beiden Seiten den Unterfaden anziehen, so dass sich die Blütenblätter zusammenziehen. Beide Enden verknoten. 9. Erstes und letztes Blütenblatt zusammennähen. Umdrehen und mit Handstichen rundum mittig alle Blütenblätter fest miteinander vernähen.

1. Hot glue fabric flower to center of bow and glue a big button (or in my case a round crystal) to the center.
2. Hot glue wooden stars to wreath.
3. Attach ribbon(s) for hanging.
Letzte Schritte:
1. Mit Heißkleber die Stoffblume mittig auf die Schleife kleben und einen großen Knopf (oder in meinem Fall einen runden Kristall) aufkleben.
2. Holzsterne mit Heißkleber am Kranz fixieren.
3. Band zum Aufhängen anbringen.

And now hang up your handmade Christmas wreath to be enjoyed by everybody! This craft project is part of my Etsy team BBA December challenge brought to you by yours truly.
Sources: black and white ribbon, gingham ribbon and crystal appliqué from Union Knopf | Happy Home fabric from here | everything else from craft store
*
Bezugsquellen: schwarz/weiß Borte, Karoband und Kristall Applikation von Union Knopf | Happy Home Stoff von hier | alles andere aus dem Bastelladen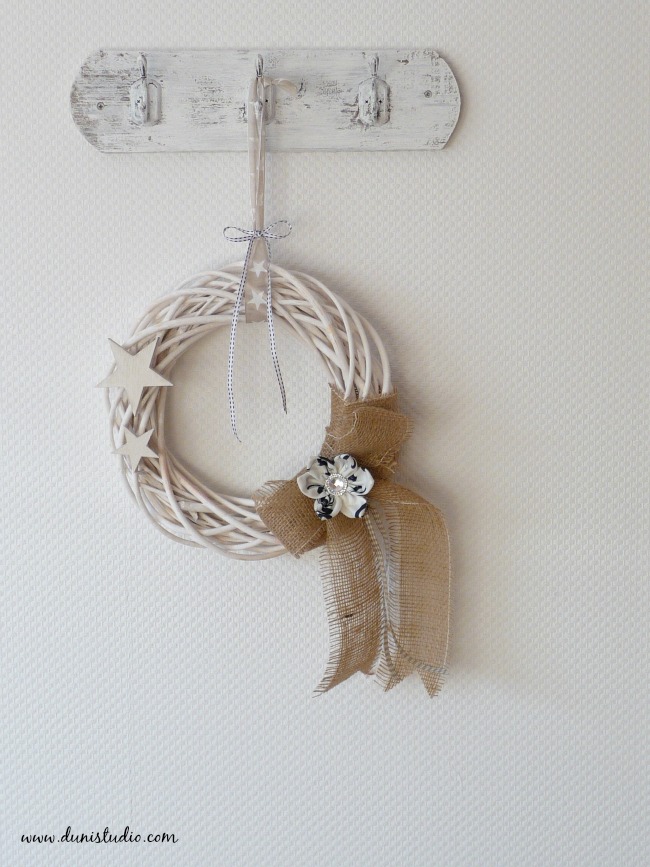


Hallo liebe Duni,
ReplyDeleteder Kranz ist absolut bezaubernd und Deine Anleitungen sind ganz wunderbar.
Viele liebe Grüße, Synnöve
I love the look of this wreath. What a simple way to make a bow that looks great too.
ReplyDeleteDein Kranz sieht aber schön aus, liebe Duni!! :-)
ReplyDeleteSelber machen ist doch immer das Beste, oder?
Liebe Grüße
ANi
This looks so great - I especially like that it looks like it will stand up to a number of seasons (wreaths can be so fragile and hard to store!)
ReplyDeleteThis is beautiful Duni!
ReplyDeleteThat is just so pretty.
ReplyDeleteI really love the look of this wreath! So simple too.
ReplyDeleteThis is beyond pretty, Duni! Lovely tutorial on the fabric flower too. You are always so generous with your ideas. Hope you are having a lovely Advent!
ReplyDeletebeautiful Duni! love this rustic chic look
ReplyDeleteThis looks great Duni! I want one for my home. Thanks for the tutorial.
ReplyDeleteVery sweet. I love the fabric flower. Pinning!
ReplyDelete