

Hello and welcome back to Part 2 of my sheep tutorial. Check out Part 1 here and if you haven't already you can download the free PDF template here. Remember to print it, so the sheep is horizontal on the paper. Just a note: I worked hard to design and create this sheep and write the tutorial. Please kindly don't use my template for commercial purposes. Thank you!
*
Hallo und willkommen zurück zu Teil 2 meiner Nähanleitung. Teil 1 könnt ihr hier nachlesen und falls ihr es verpasst habt - die kostenlose PDF Vorlage gibt es hier. Denkt dran das Schaf so auszudrucken, dass es horizontal auf dem Papier liegt. Anmerkung: in dieser Anleitung steckt sehr viel Überlegung und Arbeit, daher bitte ich höflich diese Vorlage nicht für kommerzielle Zwecke zu missbrauchen. Vielen Dank!
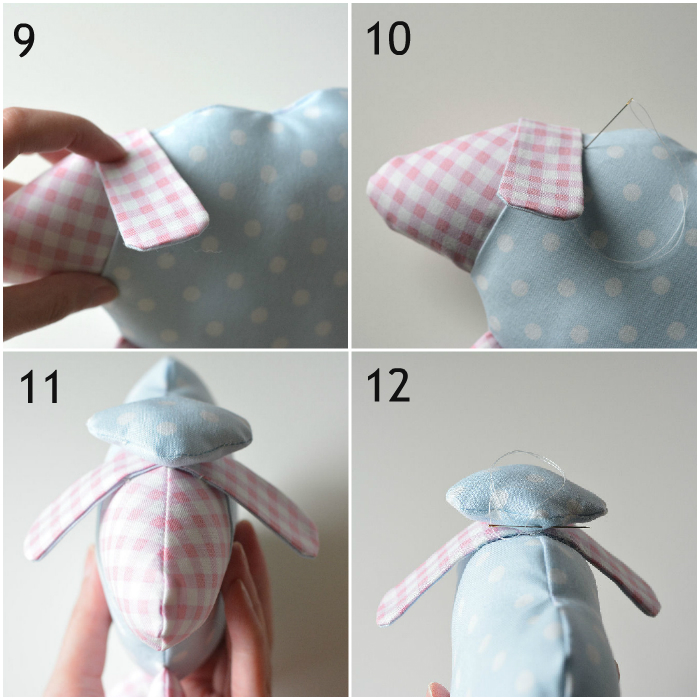
Step Nine
By now the sheep body should be nicely stuffed and "puffy" and the gap at the back hand stitched closed. It is time to attach the ears and hair piece. Close the gap in the ear piece with a little fabric glue. Then find the middle and glue on top of the head as pictured. Be sure to have the fabric that you used for the head on the outside. Leave to dry for about 10 minutes.
Step Ten
To keep the ears from flapping around you will need to make tiny hand stitches about an inch down from the top of the head. Do this front and back. Try to make the stitches as "invisible" as possible.
Step Eleven
Stuff the hair piece with a bit of fiberfill. You don't need much, just enough to fill the shape. Then put a little fabric glue on the snip you made earlier. Place the hair piece on top of the head and press down firmly. Leave to dry for about 10 minutes.
Step Twelve
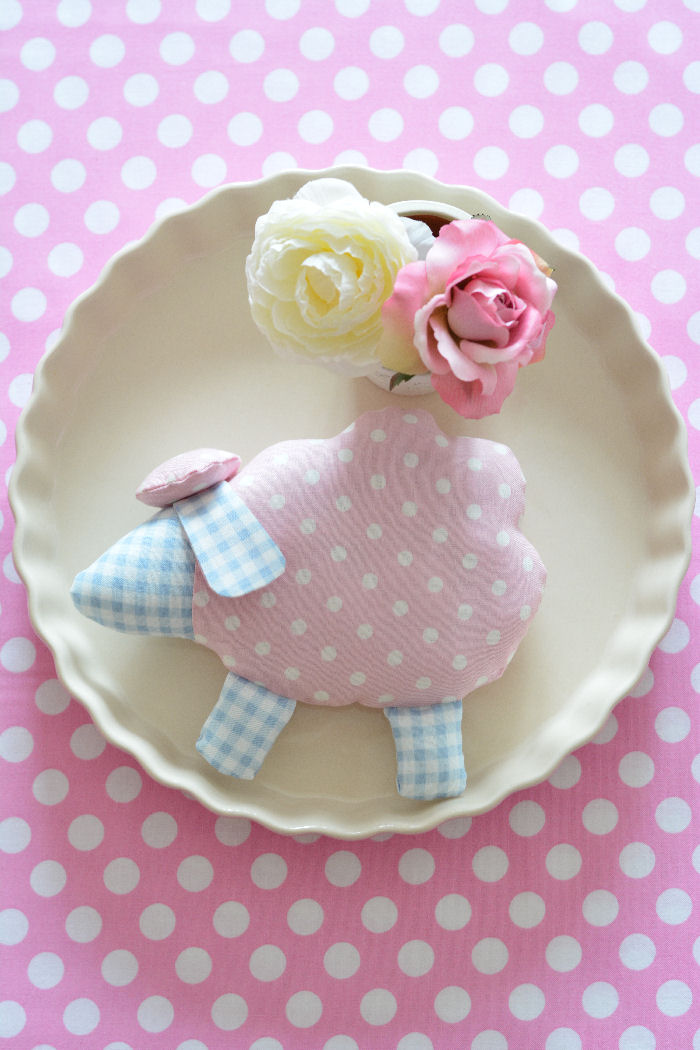
To secure the hair piece make a few "invisible" stitches at the back, attaching it to the neck. Congratulations, you have just made your own little cloud sheep!
🐑 🐑 🐑 🐑 🐑
Schritt Neun
Gestern habt ihr bereits den Körper mit Füllwatte ausgestopft sowie die hintere Öffnung mit ein paar Handstichen geschlossen. Nun das Ohrteil nehmen und die kleine Öffnung mit wenig Textilkleber zukleben. Mittig etwas Kleber geben und auf den Schafskopf platzieren und gut andrücken. Achtet darauf, dass der Stoff der auch für den Kopf verwendet wurde nach außen zeigt. Etwa 10 Minuten trocknen lassen.
Schritt Zehn
Damit die Ohren fest am Kopf bleiben, etwa 1,5 cm von der oberen Mitte aus das Ohrteil beidseitig mit "unsichtbaren" Stichen am Kopf befestigen. Sowohl vorne als auch hinten.
Schritt Elf
Das Haarteil mit Füllwatte ausfüllen. Es muss nicht viel sein. Dann etwas Textilkleber auf den Schnitt geben, der zum Wenden notwendig war. Auf den Kopf setzen und fest andrücken. Etwa 10 Minuten trocknen lassen.
Schritt Zwölf
Damit das Haarteil nicht verrutscht ;-) hinten mit ein paar "unsichtbaren" Stichen am Nacken festnähen. Herzlichen Glückwunsch. Ihr habt euer eigenes Wolkenschaf genäht!
I hope you enjoyed this tutorial. As always, if you have any questions simply drop me a line via email or in the comments. I will be taking a break through Easter Sunday, but you can still keep in touch with me via Instagram. Thanks for reading along and have a lovely Easter holiday!
👯
Ich hoffe es hat euch Spaß gemacht ein Wolkenschaf nach meiner Anleitung zu nähen! Zeigt es auf Instagram mit dem hashtag #diywolkenschaf damit wir es alle bewundern können :) Falls ihr noch Fragen habt schreibt mir gerne eine Mail oder hinterlasst hier unter diesem Post einen Kommentar. Ich gönne mir bis Ostersonntag eine kleine Pause. Aber via Instagram bin ich eigentlich immer zu erreichen. Ich wünsche euch allen wunderschöne Ostern!

 DIY, crafts & mixed media art. I've been running this blog since 2008. Thanks for joining me on my creative journey.


Dein Wolkenschaf ist so niedlich. Ganz sicher werde ich es bald mal nacharbeiten.
ReplyDeleteAuch dir schöne Ostertage.
Herzlichst Ulla
So sweet! Perfect for spring. :)
ReplyDeleteWhat a lovely sheep, and I like the pastel fabrics you used!
ReplyDeleteHallo liebe Duni,
ReplyDeletewunderbar sind diese Wolkenschafe und Deine Anleitung dazu auch.
Viele liebe Grüße, Synnöve
Liebste Duni,
ReplyDeletedanke auch für Teil 2 der wunderschönen Schäfchennäherei!
Ich wünsche Dir noch einen schönen Nachmittag und ein frohes Osterfest!
♥ Allerliebste Grüße,Claudia ♥
Such a sweet sheep. I like the fabrics you chose for it
ReplyDeleteVery creative and super cute! Enjoy your break!
ReplyDeleteThat came out so cute! :D
ReplyDelete