

A few of my lovely readers have inquired about how to finish necklines and hems on knits, such as T-shirts, tops etc., because sewing with knits is fun, but finishing the neckline is tricky and requires practice and patience. So, I've finally put together a little tutorial with step-by-step instructions and photos. Hope all you sewists out there feel more confident sewing with knits after reading this post!
*
Ein paar meiner nähbegeisterten Leserinnen hatten mich vor einiger Zeit gefragt, ob ich eine Anleitung für T-shirt-Ausschnitte schreibe, denn obgleich das Nähen mit Jersey super viel Spaß macht, sind die Ausschnitte meist doch recht knifflig. Nun habe ich endlich eine Nähanleitung inklusive Fotos für Euch. Ich hoffe sie ist verständlich. Bei Rückfragen einfach mailen!
I'm assuming that you have finished your Tshirt right up to the point where all you need to do now is finish the hems on the sleeves and bottom plus add a neckband to the neckline. Let's start with hemming first, because that is quite simple! For sleeves, whether short or long, fold under the raw edge 0.40" twice. Pin. Top stitch at point 3 length all around using a twin needle. Don't forget to backstitch at the beginning and end. Then press.
*
Ich gehe davon aus, dass Ihr Euer Shirt bereits zusammengenäht habt und nur noch die Ärmel, Saum sowie Halsausschnitt genäht werden müssen. Fangen wir mit den Ärmeln an, denn das geht ganz einfach! Egal ob kurz oder lang, ich schlage die Kanten zweimal 1 cm nach innen um, stecke diese mit Nadeln ab und steppe ringsherum mit der Zwillingsnadel (Stichlänge 3). Rückstiche nicht vergessen. Dann bügeln.

Do exactly the same for the bottom hem, except fold under approx. 0.80" twice. Important - don't forget to press!
*
Für den Saum schlage ich gerne zweimal 2 cm ein und wiederhole die Schritte wie beim Ärmel. Anschließendes Bügeln nicht vergessen!
Adding the neckband
There are several ways to finish a knit neckline, but this method is the simplest and always looks professional. Fold the Tshirt in half and mark the center back with a pin. Measure circumference and jot down the number. Remember that the neckband needs to stretch in the curves in order to lay flat, therefore you'll need to deduct a couple of inches from this number. There is no hard-and-fast rule, as every knit fabric is a little different, but after much trial and error I find that deducting at least 2" from your circumference makes for a nice flat neckband later on. The width of the neckband is a matter of preference. For a regular neckline such as above a 1.5" - 1.75" width works best.
Cut the neck band according to your measured length x 1.5" (or wider) width. Be sure that you cut the neckband perpendicular to the grainline. Fold short ends right sides facing and stitch 1/4" seam. Open seam, press and fold lengthwise wrong sides facing to form a circle. Press again, so that folded edge is clearly defined. You should end up with this:

Bündchen an Halsausschnitt annähen
Es gibt mehrere Ausschnittlösungen, aber diese Methode ist die einfachste und sieht immer professionell aus. Das T-Shirt zur Hälfte falten und hintere Mitte mit einer Stecknadel markieren. Den Halsausschnitt abmessen und die Zentimeter notieren. Denkt bitte daran, dass das Bündchen in den Kurven gedehnt werden muss, damit es später flach anliegt, daher müsst Ihr von dieser Zahl mehrere Zentimeter abziehen. Es gibt keine pauschale Regel, da Stretchstoffe sich unterschiedlich verhalten, aber durch viel Ausprobieren habe ich festgestellt, dass man mindestens 3 cm (bis zu 5 cm) von der Zahl abziehen sollte. Die Breite des Bündchens ist Geschmacksache. Für einen normalen Ausschnitt wie oben funktioniert eine Breite von 3,5 cm.
Halsbündchen vertikal zum Fadenlauf schneiden. Länge x 3,5 cm (oder breiter). Die kurzen Seiten rechts-auf-rechts legen und 0,5 cm Naht nähen. Naht öffnen und bügeln. Bund längs und links-auf-links falten (Naht trifft aufeinander). Nochmals bügeln, so dass eine schöne Kante entsteht. Euer Bündchen sollte nun wie oben aussehen.

Next, divide neckline into quarters. Do the same with the neckband. Pin the neckband to the shirt, raw edges aligning. The seam on the band should match the center back. Before attaching check the overall fit by stretching the neckband between quarters. Do not stretch the shirt fabric. If your neckband is cut too large you'll end up with the dreaded "pie-crust" neckline. If it is too short the shirt fabric will pucker. NOW is the time to adjust. You can always shorten a too long neckband, but you'll have to cut anew if your original neckband is too short :-/
Once you're satisfied serge or zig-zag stitch through all layers starting from center back. Flip seam to the inside and press well.


Als nächstes den Ausschnitt und das Bündchen in Viertel teilen und markieren. Das Bündchen mit der offenen Kante nach oben zeigend am Ausschnitt feststecken, die Naht trifft auf die hintere Mitte. Vor dem endgültigen Annähen unbedingt Paßform überprüfen. Dabei das Bündchen je Viertel dehnen (aber nicht den Stoff). Ein zu langes Bündchen resultiert in einen welligen Ausschnitt; ein zu kurzes wird den Stoff am Ausschnitt kräuseln. JETZT könnt Ihr das noch anpassen, allerdings bei einem zu kurz geratenen Bündchen müsst Ihr es leider erneut zuschneiden :-/
Wenn alles stimmt, das Bündchen mit der Overlock oder mit schmal eingestelltem Zickzack-Stich beginnend an der hinteren Mitte ringsherum annähen. Anschließend die Naht nach unten legen und in Form bügeln.

Finishing touch - top stitch with twin needle (point 3 length) starting and ending at center back. Don't forget to backstitch. Woohoo, you're done!
*
Letzter Schritt - mit der Zwillingsnadel (Stichlänge 3) beginnend an der hinteren Mitte ringsherum steppen. Rückstiche nicht vergessen. Juchhu - fertig!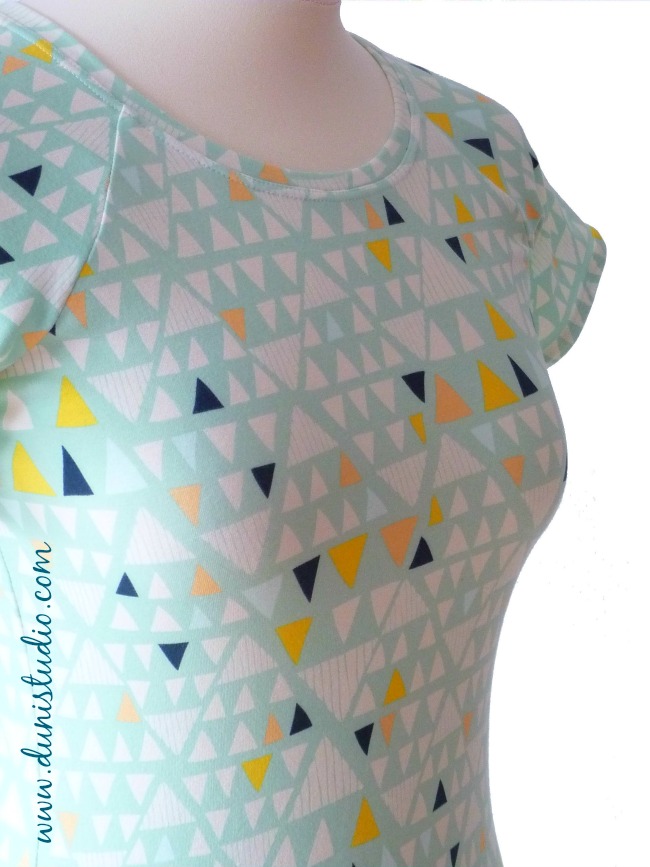
For this T-shirt I used the wonderful premium quality knit fabric Mojave Aloe by Art Gallery Fabrics
*
Für dieses Shirt habe ich den hochwertigen Jersey Mojave Aloe von Art Gallery Fabrics verwendet.
Happy Sewing!!!



 //
//