Showing posts with label upcycle. Show all posts

Friday, August 25

Lace wrapped upcycled milk bottles


I had been collecting a few small milk bottles thinking that I might use them for some craft or other. Then I discovered some beautiful lace I had forgotten about and an idea was born. This is another one of my super easy five-minute-crafts, and the perfect little DIY-idea for people who are itching to get crafty, but don't have a lot of time (or energy). I think it took longer to wash and remove the sticky label than the actual craft :)
🌸
Ich hatte ein paar dieser kleinen Milchflaschen gesammelt, aber bislang noch keine Idee. Dann habe ich diese wunderschöne breite Spitze wiederentdeckt und so sind die Milchflaschen dann doch noch zum Einsatz gekommen! Dieses DIY ist sehr einfach und in fünf Minuten fertig. Eine simple Idee und mit Blümchen dekoriert ein netter Blickfang auf der Fensterbank oder Kommode. Ehrlich gesagt hat es länger gedauert die Flaschen zu waschen und den Aufkleber zu entfernen :)

You will need // Ihr benötigt

small milk bottles // kleine Milchflaschen
wide lace // breite Spitze
transparent double-sided craft tape // transparentes doppelseitiges Klebeband
measuring tape // Maßband
scissors // Schere


Step One
Remove sticky label on milk bottle and thoroughly wash and dry. You can keep the bottle caps for another project. Measure the circumference of the lower part of bottle.

Step Two
Cut a piece of lace to that length.

Step Three
Cut three pieces of double-sided tape to that length also. Stick the tape on the wrong side of the lace. Then gently pull off the backing. 

Step Four
Wrap the lace around the bottle, aligning one side with the bottom edge. Make sure the tape sticks. Finished! 


Schritt Eins
Den Aufkleber von der Flasche entfernen und Flasche gründlich säubern und trocknen. Den Durchmesser der Flasche abmessen.

Schritt Zwei
Spitze auf das abgemessene Maß zuschneiden.

Schritt Drei
Je drei Streifen vom doppelseitigen Klebeband auf das gleiche Maß schneiden. Fest auf die linke Seite der Spitze drücken. Dann das Trägerpapier vorsichtig abziehen.

Schritt Vier
Spitze um die Flasche wickeln und gut andrücken. Fertig!


 photo signature_zpscqkypdzs.png

Wednesday, November 4

Advent, Advent... { 5 Minute DIY }


Hi everybody!        Hallo, ihr Lieben!


Okay, this post isn't supposed to make you feel anxious or anything. Just a gentle reminder that the first advent happens to be end of this month, yes this month ;-)
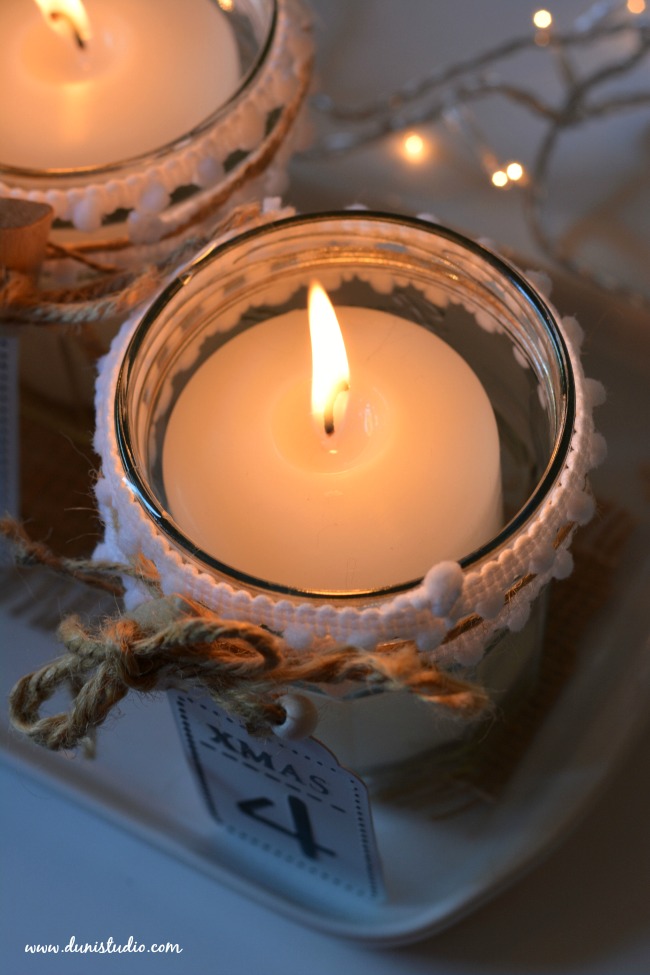
Of course there are plenty of traditional advent wreaths available, but for a crafty and non-traditional person like me I like to make my own unique version! What I like about this project is that you'll probably find many of the materials in your house already! I like easy projects with quick results.
*
Vielleicht mag dieses weihnachtliche Bastelprojekt dem einem oder anderen zu früh vorkommen, aber tatsächlich ist der erste Advent schon Ende diesen Monats! Traditionelle Kränze gibt es ja bereits zu kaufen, aber für nicht-traditionelle Menschen wie mich sind selbstgemachte einfach schöner und individueller :) Das Gute an diesem Projekt - das Material habt Ihr sicherlich schon zuhause! Ich mag einfache DIY Ideen.


This Christmas I've decided on a rustic/shabby chic theme
*
Dieses Weihnachten dekoriere ich im rustikalen/shabby chic Look

You'll need | Ihr benötigt

4 clean jam jars | 4 saubere Marmeladengläser
jute twine | Jutekordel
4 wooden buttons with large holes | 4 Holzknöpfe mit großen Löchern
numbered tags | nummerierte Anhänger
4 white pillar candles | 4 weiße Stumpenkerzen
rectangular cake platter | rechteckige Kuchenplatte

  1. you can make the numbered tags yourself or you can get them at craft stores
  2. wrap a length of minipompom trim around the top of the jam jar twice. Tuck in the ends.
  3. wrap a piece of jute twine around the top and secure with a knot. 
  4. thread the ends of the twine through the button holes and tie a bow. Fix the tag to the button
Repeat for remaining three jars. All that's left to do is place a candle in them and arrange on the cake platter. Easy, right?

  1. the nummerierten Anhänger selbst machen oder im Bastelladen kaufen
  2. ein Stück Minipompomborte zwei Mal um die obere Kante des Marmeladenglases wickeln, die Enden darunter einstecken.
  3. Jutekordel drumwickeln und verknoten.
  4. Enden durch die Knopflöcher ziehen und Schleife binden. Anhänger um den Knopf binden
Schritte 1 - 4 dreimal wiederholen. Nun die Kerzen in die Gläser stellen und auf der Kuchenplatte arrangieren. Wie gesagt, einfach und schnell :)


Rustic wooden buttons kindly supplied by Union Knopf 
*
große Holzknöpfe wurden mir von Union Knopf zur Verfügung gestellt


Please do not leave burning candles unattended!
Kerzen niemals unbeaufsichtigt brennen lassen!
Happy Crafting!

Thursday, June 12

From Men's Shirt to Girl's Skirt - DIY in Three Easy Steps


Hi everybody! Today I'd like to share another fun DIY idea that is easy enough for beginning sewists too! Give a regular men's buttondown shirt a new lease of life by turning it into a girl's summer skirt :) This will work best for young girls 8 - 10 years old. For tweens you might need a bigger/longer shirt :)


Hallo, ihr Lieben! Heute zeige ich Euch wieder ein einfaches DIY welches auch für NähanfängerInnen geeignet ist! Man nehme ein Hemd mit Knopfleiste und upcycle es in einen sommerlichen Rock für junge Mädchen ca. 8 - 10 Jahre. Für ältere Mädchen bräuchte man eventl. ein größeres bzw. längeres Hemd.

You'll need // Ihr braucht

1 regular cotton men's shirt // 1 standard Herrenhemd
2 cm wide elastic for waistband // 2 cm breites Elastikband
Minipompom trim // Minipompoms
novelty buttons // Kinderknöpfe
sewing machine & basic sewing kit // Nähma + Nähutensilien


For my project I chose these fun limegreen novelty buttons with tiny red mushrooms and hearts kindly sponsored by German button and accessories manufacturer Union Knopf. These are available in lavender and white as well. Click on the link below for more information on their products:

click

Für mein Projekt habe ich mich für diese witzigen Fliegenpilzknöpfe von der Fa. Union Knopf entschieden. Obwohl ich persönlich nicht unbedingt Fan von Knöpfen mit Steg bin, hat mich die limettengrüne Farbe und das süße Motiv überzeugt :) Diese Knöpfe gibt außerdem noch in einer fliederfarbenen und weißen Variante. Wer mehr über die Produktpalette von Union Knopf wissen möchte klickt bitte den Link oben.


Step One // Schritt Eins

To make the skirt you'll require two measurements. Measure the girls waist and cut elastic minus 1 cm. Set aside. Measure from waist to knee plus 2.5 cm. Cut straight across the shirt. If there is a button or pocket in the way, remove as necessary.
*
Um aus dem Shirt ein Rock zu nähen benötigt Ihr zwei Maße. Taillenmaß abmessen und Elastikband minus 1 cm zuschneiden. Taille bis Knie abmessen plus 2,5 cm. Geradlinig abschneiden. Eventuell vorher Pattentaschen, oder störende Knöpfe entfernen.


Step Two // Schritt Zwei

To make the casing for the elastic, fold under first 0.5cm and iron, then fold again at 2.5 cm. Pin and edge-stitch all around leaving a 6 cm gap at one side seam. Then attach the minipompom trim to the hemline starting and ending at the front opening of the shirt. Now insert the elastic through the waistband gap, pull through until it comes out at the other side and overlap ends by 1 cm. Stitch across the overlapping part several times to secure. Finish waistband by closing gap. Iron skirt.
*
Für den Bund die obere Kante 0,5 cm nach innen einschlagen und bügeln. Dann nochmals auf 2,5 cm einschlagen. Feststecken und rundherum knappkantig steppen, dabei an einer Seitennaht eine 6 cm Lücke zum späteren Durchziehen des Elastikbandes offen lassen. Dann am Saum von der Hemdmitte aus rundherum die Minipompomborte annähen. Nun das Elastikband durchziehen und 1 cm überlappend gut vernähen. Lücke schließen. Rock bügeln.


Limegreen Minipompom trim from here
*
Limettengrüne Minipompomborte von hier


Step Three // Schritt Drei

Remove the original shirt buttons and replace with novelty buttons. It' doesn't matter if they are larger than the original, since they only serve as decoration! Your girl's summer skirt is finished and ready to wear :)
*
Original Hemdknöpfe entfernen und mit Glückspilzknöpfen ersetzen. Es ist nicht schlimm wenn diese größer ausfallen, da sie rein dekorativ sind! Der sommerliche Mädchenrock ist nun fertig zum Tragen :)


Union Knopf // Union Knopf Facebook

Wanna see more easy DIYs made with Union Knopf products? Simply type "union knopf" in the search function in the side bar
*
Möchtet Ihr noch weitere einfache DIY Ideen mit Union Knopf Produkten sehen? Einfach "union knopf produkte" im Suchfeld in meiner Sidebar eingeben

  
A huge thank you to ten year old V. for her excellent modelling abilities :)
♥
Ein riesen Dankeschön an die 10-jährige V. für's hervorragende Modeln :) 

Wednesday, June 5

DIY Flower Patch Jeans


Have you seen the floral jeans in shops lately? They seem to be popular this summer! Anyway, instead of buying one I decided to upcycle an old pair of jeans that's gone a bit baggy and make use of my bazillion fabric scraps! As a nod to summer I cropped them to capri-length (mid-calf). As it so happens, upcycling is the theme chosen by my wonderful teammate Cynthia for this month's BBA challenge. Thanks Cynthia - this was a lot of fun :)
*
Überall sehe ich Jeans mit floralem Druck. Ist Euch das auch aufgefallen? Scheint wohl "in" zu sein, diesen Sommer. Nun, statt neue zu kaufen, habe ich mir überlegt eine alte Jeans mit floralen Patches aufzuwerten. Reststücke mit Blumenmuster besitze ich ja kistenweise! Zufällig passte es zum Thema Upcycling, ausgewählt von Teamkollegin Cynthia für die Juni-Challenge meines Kreativteams BBA. Als erstes habe ich jedoch die Jeans auf Capri-länge gekürzt.


Here's how I made mine // Und so geht's

Step 1 // Schritt 1

You'll need a number of floral fabric scraps. Iron on bond-a-web (fusible web) to the wrong side of each piece. Lay on table to cool off. With a pair of sharp scissors cut around floral motifs. Large motifs work best.
~
Ihr braucht mehrere Reststücke mit Blumendruck - am besten großformatig. Vliesofix jeweils auf die Rückseite bügeln und flach auskühlen lassen. Mit einer Stoffschere die Blumenmotive ausschneiden. 

Step 2 // Schritt 2

Decide where you want to place your motifs. Try out a few arrangements until you are satisfied with the look. Peel off backing and iron flower motifs onto jeans. Use enough pressure to ensure the glue bonds firmly with the jeans fabric. Lay jeans flat to cool completely. 
~
Die Blumenmotive so auf die Jeans arrangieren wie sie Euch gefallen. Dann Trennpapier abziehen und mit gleichmäßigem Druck auf die Jeans bügeln, dabei schrittweise vorgehen und das Bügeleisen eher pressen als  hin und her schieben. Jeans flach auskühlen lassen.

Step 3 // Schritt 3

You needn't worry that the motifs will come off (unless you forcibly pull them off!). They are pretty much stuck down forever. If you wish, you can stitch them down in a few places (as shown). The edges might fray a little over time, but that just adds a grungy charm :)
~
Keine Sorge, die Motive halten bombenfest :) Wer mag näht sie mit ein paar Stichen zusätzlich an (siehe Bild Nr. 3) Beim Tragen könnte es sein, dass sie etwas ausfransen - dann sieht es eben ein wenig nach "Grunge-Style" aus ;-)
 ***
I tried taking a photo of me wearing it. That wasn't easy! On the right you can see I added a rose motif to the back deliberately overlapping the pocket.
*
Mit dem Selbstauslöser habe ich versucht die Hose an mir zu fotografieren. Das war gar nicht so einfach! Rechts im Bild seht Ihr ein Rosenmotif, welches ich auf die Rückseite gebügelt habe. Das die Rose teilweise die Tasche überdeckt ist Absicht!

 I can't wait for summer and lazy weekends lounging around in my new floral capri jeans!
*
Ich kann es kaum erwarten bis der Sommer endlich da ist! Diese floralen Caprijeans sind für ein lauschiges Sommerwochende geradezu perfekt!
xoxo