
 |
 Hi everybody! Here's another fun scrapbusting idea. It's super easy, so go ahead and make a couple for your sewist friends too :)
*
Hallo! Heute zeige ich Euch ein süßes Nadelkissen DIY aus Stoffresten. Es ist wirklich einfach, so dass man an einem Nachmittag mehrere davon machen und an nähende Freundinnen verschenken kann! 
You'll need // Ihr benötigt
Fabric scraps // Stoffreste
4 buttons (15mm) // 4 Knöpfe (15mm)
iron on interfacing // aufbügelbares Volumenvlies
8 cm decorative trim / 8 cm dekoratives Webband
polyester fiberfill // Füllwatte
sewing machine // Nähmaschine
basic sewing kit // Nähutensilien
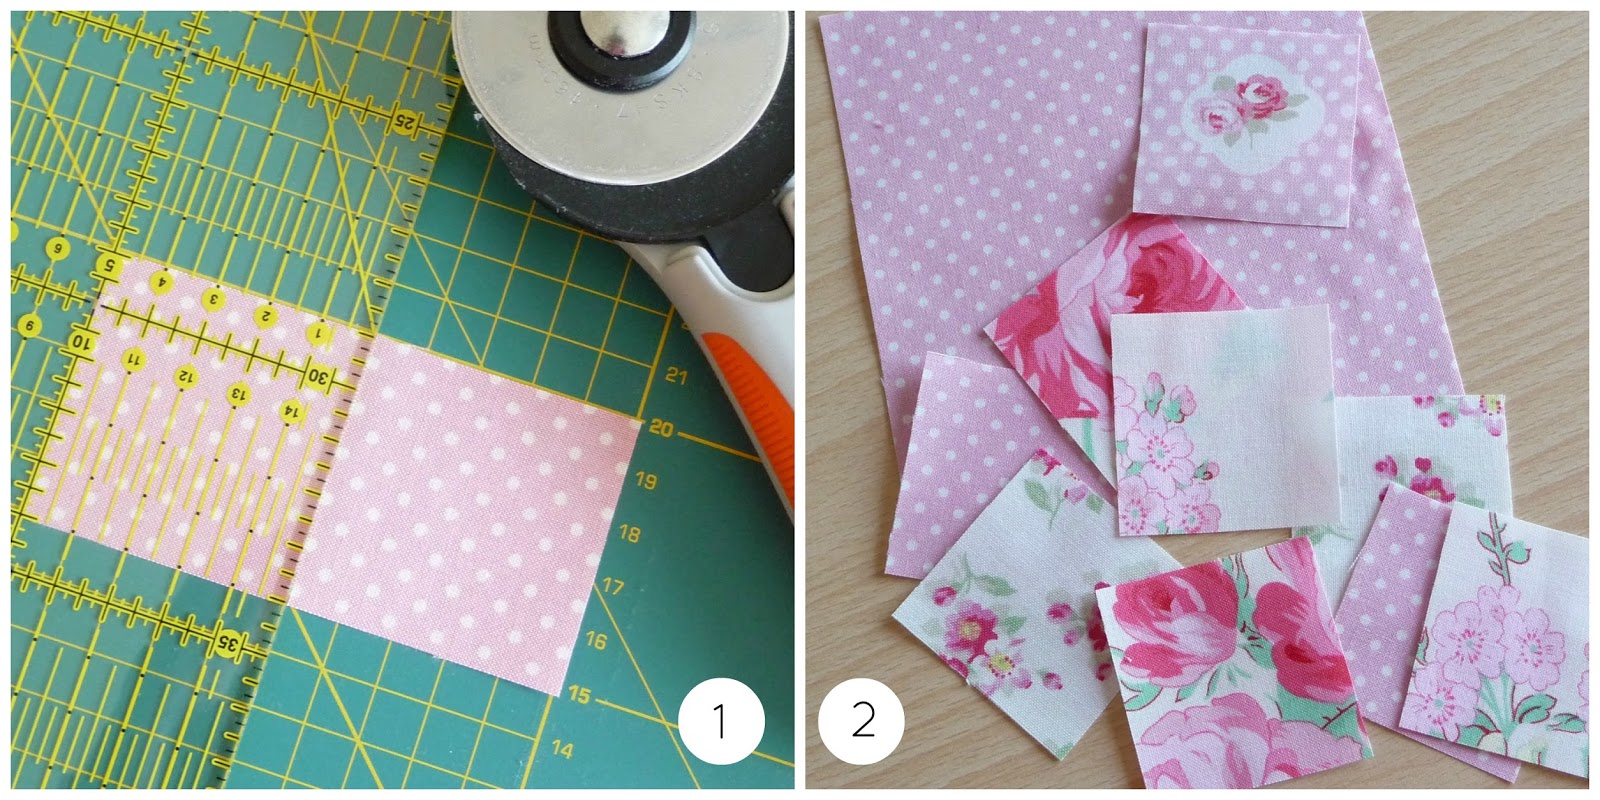
Step One + Two
From the fabric scraps cut one square piece 13 x 13 cm (5 x 5 ") for the back and nine small pieces 5 x 5 cm (2 x 2") for the front. Iron.
*
Für die Rückseite ein Quadrat à 13 x 13 cm und für die Vorderseite neun kleine Quadrate à 5 x 5 cm schneiden. Bügeln.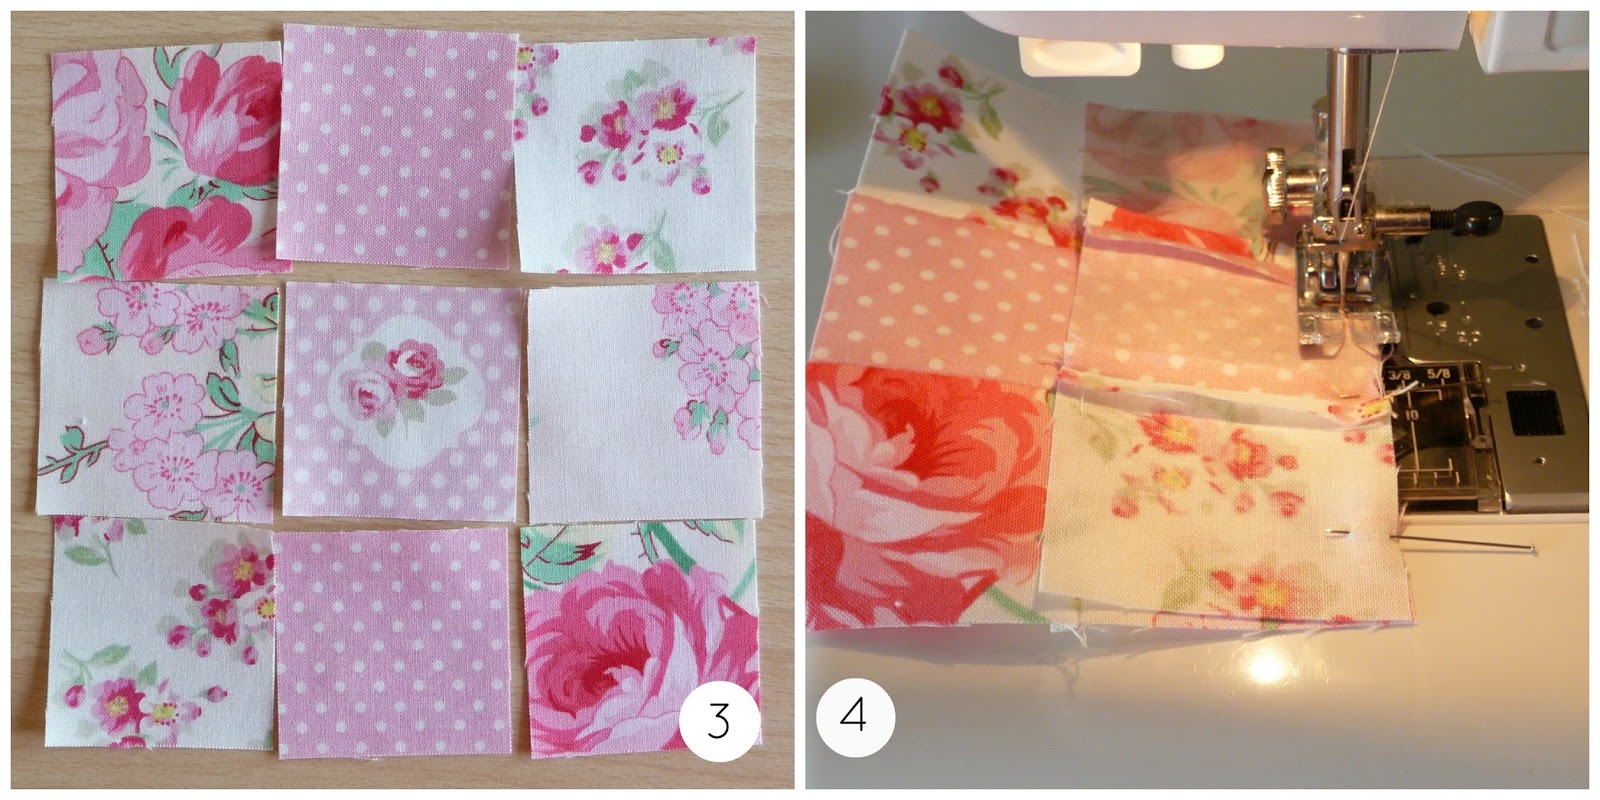
Step Three + Four
Arrange small squares as desired. Using a 0.5 cm seam allowance start by sewing the three top pieces together, right sides facing. Iron the seams open. Do the same for the second and third row. Sew the three small strips of fabric together, right sides facing, to complete the square. Iron all seams open.
Next cut two squares of interfacing to fit both front and back of pin cushion. Iron to the wrong side according to manufacturer's instructions. Lay the pieces right sides together, pin all around, but leave a 5 cm (2") gap for turning. Double the trim and slip inbetween the layers in one corner before sewing. Clip corners and gently turn right side out. Iron.
*
Die kleinen Quadrate für die Vorderseite wunschgemäß anordnen. Dann jeweils drei Quadrate rechts auf rechts zusammennähen (0,5 cm Nahtzugabe). Nähte auseinander bügeln. Die drei Streifen ebenfalls rechts auf rechts zusammenähen und Nähte auseinander bügeln. Zwei passende Quadrate Vlies zuschneiden und auf die linke Seite des Vorder- und Rückteils bügeln. Diese rechts auf rechts zusammenlegen, rundherum abstecken, dabei das gedoppelte Webband auf einer Seite dazwischen schieben. Beim Zusammennähen eine 5 cm Öffnung zum Wenden lassen. Ecken kurz vor der Naht knapp abschneiden und vorsichtig auf Rechts wenden. Bügeln.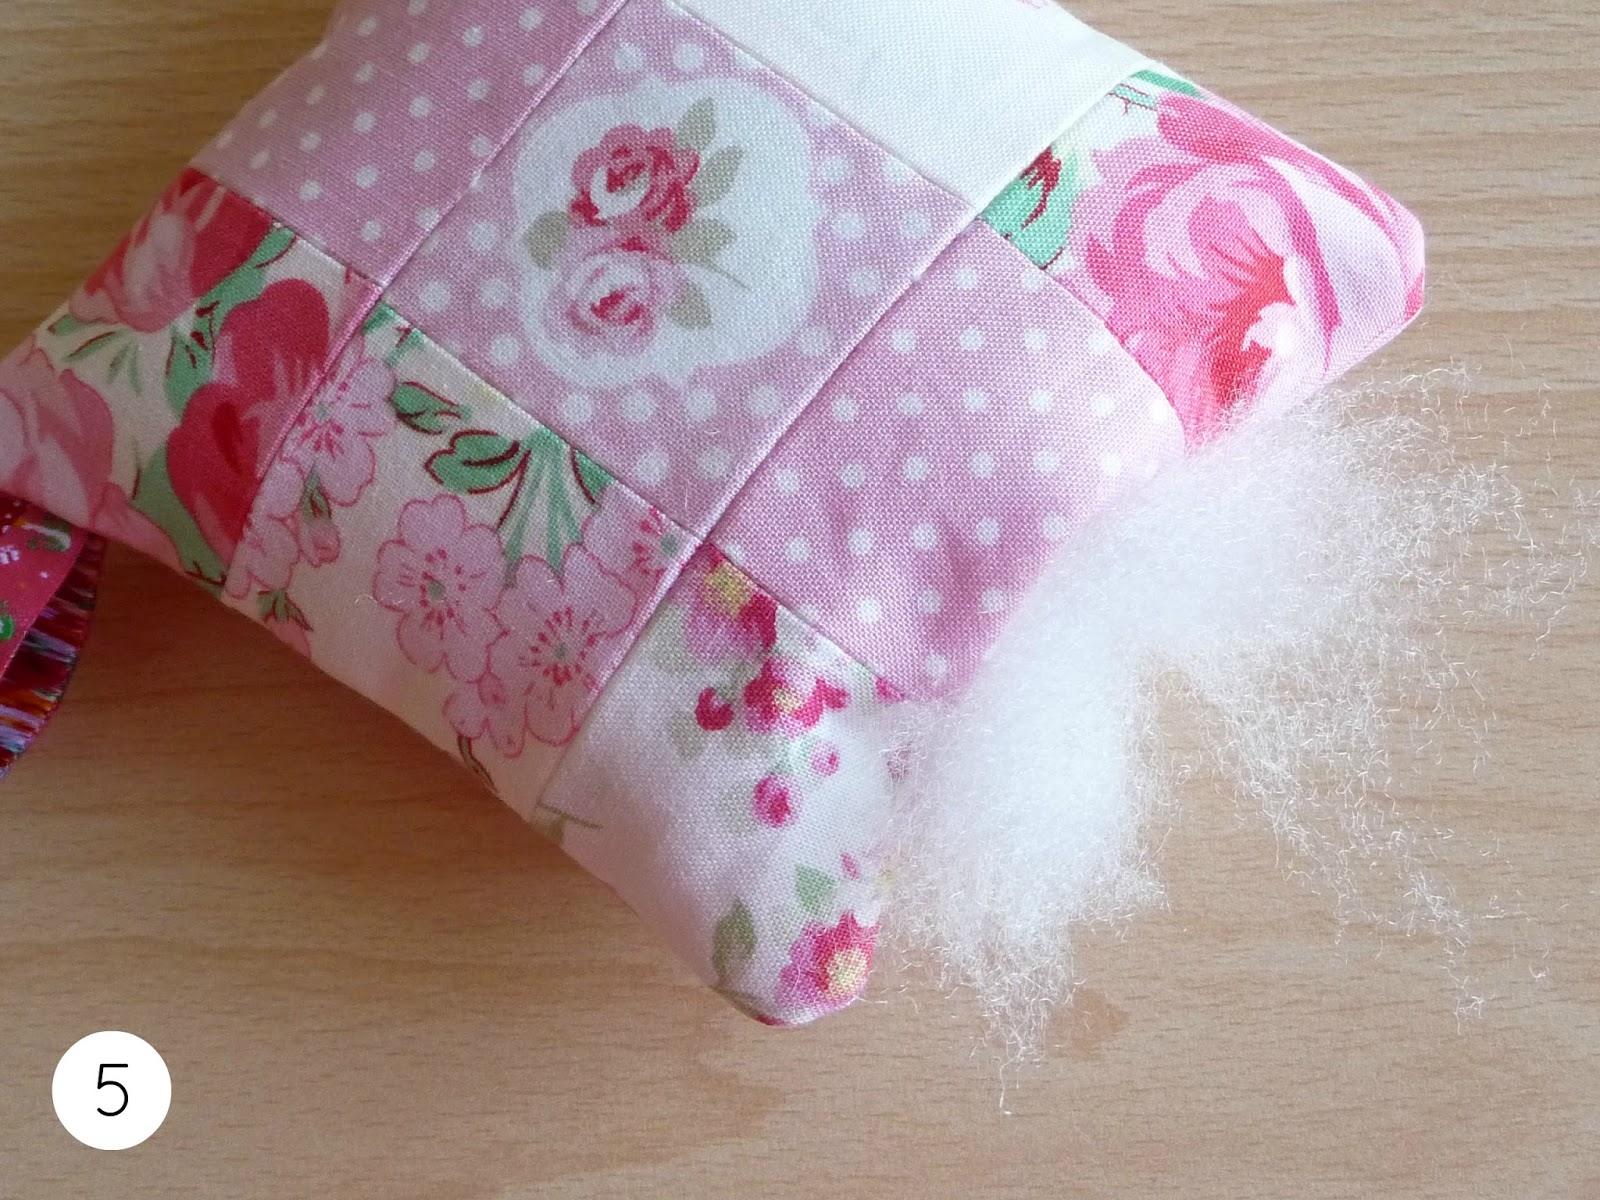
Step Five
Fill the pincushion with fiberfill through the opening. Then close the opening with a few stitches by hand. Attach the four buttons to the front and pull the thread tightly through the back, indenting the pincushion slightly. Tie off and you're done! Now that was pretty easy wasn't it?
*
Nadelkissen gut mit Füllwatte füllen. Die Öffnung mit ein paar Stichen schliessen. Nun die Vorderseite mit den vier Knöpfen verzieren, dabei den Faden nach hinten zur Rückseite führen und fest anziehen, so dass eine kleine Vertiefung ensteht. Fest knoten und fertig! Das war doch wirklich einfach, oder? |
Have fun! Viel Spaß!
Buttons and trim kindly sponsored by:
Knöpfe und Webband gesponsert von:


 //
//
22 comments:
a sweet pincushion and a great way to use up scraps. Thanks for the tutorial.
Liebe Duni,
also, leicht zu lesen ist es auf alle Fälle. ;-)
Nee, ich denke, dass könnte ich auch schaffen. Du hast Dir so viel Mühe für uns gegeben und alles Schritt für Schritt festgehalten, wie schön. Dein Nadelkissen ist auch wirklich bezaubernd. Die Stoffe sind so harmonisch miteinander und die Knöpfe passen superschön dazu. Die geben dem kleinen Kissen noch mal einen Kick. Auch Deine Aufnahme mit den Herznadeln auf dem weißen Holzuntergrund und den Rollen im Hintergrund ist ein Traum. Meine Farben, ich liebe Pastell!! :-)
Ist Dein Schriftzug neu? handmade by* Duni - sieht cool aus!
Deinen Post nehme ich mir jetzt in meine Notizen!!
Liebe Grüße an Dich.
ANI
Sind die hübschen Knöpfe in dem Paket von Union Knopf gewesen?
Na Duni, ich habe zwar bis zum Schluss gelesen, aber das Kleingedruckte habe ich wohl doch überlesen. Beim Kopieren ist es mir gerade aufgefallen - natürlich sind die Knöpfe von dort. Zauberhaft!
ANI
I really need to do some projects with our sewing machine! The pincushion looks adorable, thanks for sharing.
Oh, das sieht total toll aus! Aber ich kann mir vorstellen. das es ganz schöne Fummelarbeit x)
I have so many fabric scraps hanging around, may have to give this a try, thanks! :)
So pretty! Love the fussy-cut center piece, and the pretty buttons -- and your heart-topped pins!
That is very cute! I've made similar pincushions before too. They are very easy to make a perfect to use with scrap fabric.
So pretty! I really need to make a pincushion (and start using my sewing machine again!).
It's so adorable! A perfect use for scraps and buttons that can't find a home somewhere else.
That's very cute and makes me wish I knew how to sew so I needed a pin cushion!
Hi dear,
Very cute idea, thanks for sharing!
I just found your blog and it's great!
Follow you right now, hope you can follow me back
xx
http://2minutosblog.blogspot.com
Ich hätte nciht gedacht das ich mich in ein Nadelkissen "verkucken" könnte!
Es ist wirklich voll süß und die Knöpfe sind auch ein Traum!
This is super cute! Thanks for sharing:)
I love projects that use up scraps. This turned out so cute :)
das ist ja zuckersüß geworden und die Knöpfe passen perfekt zu dem Stoff...tolle Idee meine Liebe.
Wünsche dir noch einen schönen Tag
Bella
Liebe Duni,
da sind wir ja momentan beide fleißig am Stoffresteverwerten. Was ist Dein Nadelkissen süß geworden und die Knöpfe sind einfach zum Fressen! Ich liebe so einfache Projekte und könnte mir glatt 20 Stück davon nähen und sie einfach nur anschauen....
Ganz liebe Grüße,
Karin
Sweet fabrics, the cushion looks lovely!
I love the colors and a floral pattern everyday! Those buttons are adorable!
so pretty! a wonderful design!
Cute and pretty! This deserves a space in a magazine for arts and crafts Duni.
Great little idea!! Cute! It would make a wonderful gift too!
Post a Comment